Whether you are spending your day on a Windows PC, Mac, or Chromebook, you should enable their blue light filter to help ease the strain on your eyes. Desktop screens and laptops typically have a built-in filter you can access, and there are downloadable options in case your computer doesn’t have this feature available.
We'll go into each of these steps below, but here's a simplified explanation of how to configure blue light settings on a Mac:
- Apple menu> System Preferences> Displays> Night Shift.
And here's how to configure blue light settings on a PC (WIndows 10 and 11):
- Go to Settings> System> Display (Windows 10) or Brightness & Color (Windows 11)> Night Light.

What’s the problem with blue light?
The reason blue light hurts is purely biological. Sleep is a part of the circadian rhythm, which is the cycle of biological processes that are determined in part by the levels of light and dark exposed to our bodies.
In the most natural setting, which is one where we’re only exposed to sunlight, our retinas sense when the sun descends and the environment grows darker. That induces our hypothalamus to start the process of producing melatonin and other sleep hormones and reducing our body temperature.
When we use artificial lighting to extend our day, however, our bodies get confused, and the various sleep signals are disrupted. Even worse is the blue light emitted by fluorescent and LED lights — like those on our various device displays — which cause us to be more alert and produce even less melatonin.
That’s why using a blue light filter is so important.
Windows 10
Microsoft added a blue light-limiting feature to Windows 10 in the Creators Update released in April 2017. Called Night Light, this feature shifts the Windows 10 and 11 display to show warmer colors that reduce the amount of emitted blue light. Turning the feature on is a simple process.
Step 1: Right-click on the Start button and select Settings on the Power User menu. Alternatively, you can press the Windows + X keys and then click Settings.
Step 2: Choose System in the pop-up window.
Step 3: On Windows 10, the Display category opens by default. In Windows 11, you'll need to select it from the list of categories on the right. Scroll down on the right and toggle on the Night Light setting. In Windows 11, you'll find the setting in the Brightness & color section.
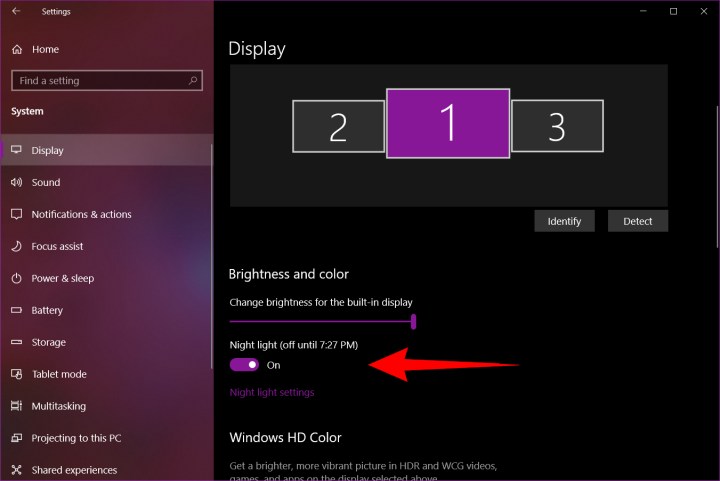
Step 4: To configure the Night Light feature, click the Night Light Settings link located under the toggle. Here, you’ll find options for turning Night Light on immediately, adjusting the strength, and scheduling when it turns on and off. In Windows 11, hit the arrow key to the right to access these settings.

Step 5: To set the schedule, toggle the Schedule Night Light option to on. Then, you can either choose to let Night Light turn itself on at sunset and off at sunrise — automatically determined by your location — or you can set the time manually by clicking Set Hours and choosing when the feature should turn on and off.
When you first turn the feature on, you’ll notice the color shift immediately. After a while, your eyes will adjust to the change, and it should be less obvious. By reducing the amount of blue light, however, the Night Light feature will then limit the impact of using your Windows PC late at night — you could find it easier to get to sleep, and your sleep might be deeper and more restful.

MacOS
First introduced in iOS, Apple brought Night Shift to Macs in macOS Sierra in March 2017. As with Windows, the feature is easy to turn on and configure to your tastes.
Step 1: Click the Apple logo in the top-left corner and select System Preferences on the drop-down menu. Alternatively, click the System Preferences icon on the Dock. In macOS Ventura and later, the utility is called System Settings.
Step 2: Select Displays in the pop-up window. On macOS Ventura and later, select Displays from the list of categories on the left.
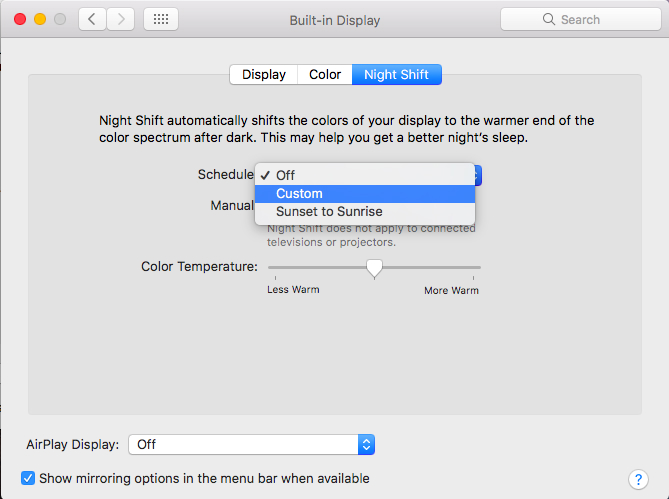
Step 3: Click the Night Shift tab in the following pop-up window.
Here, you can configure when Night Shift automatically runs, turn it on until the next sunrise, and set your preferred color temperature. For scheduling, you can let macOS turn it on and off at sunset and sunrise based on your location, or you can set a custom schedule.
As with Windows 10’s Night Light feature, Apple’s Night Shift makes your display’s colors warmer and reduces the amount of emitted blue light. Give it a try to see if it improves your sleep habits and helpss you be healthier, more productive, and generally a happier Mac user.
Chromebooks
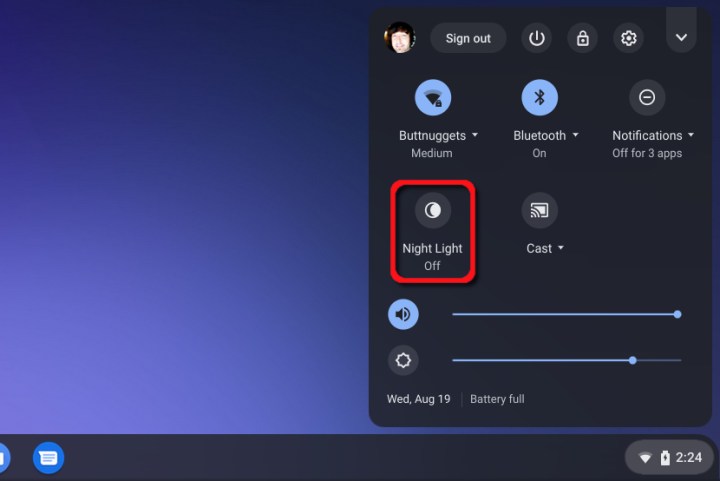
Devices based on Google’s Chrome OS have a built-in blue light filter called Night Light. The simplest way to enable this feature is to click on the System Clock followed by the Night Light button on the pop-up menu. The screen is automatically washed with a dark amber hue.
For more control over Night Light, do the following:
Step 1: Click on the System Clock and select the Gear icon on the pop-up menu. This opens the Settings window.
Step 2: Select Device listed on the left.
Step 3: Select Displays listed on the right.
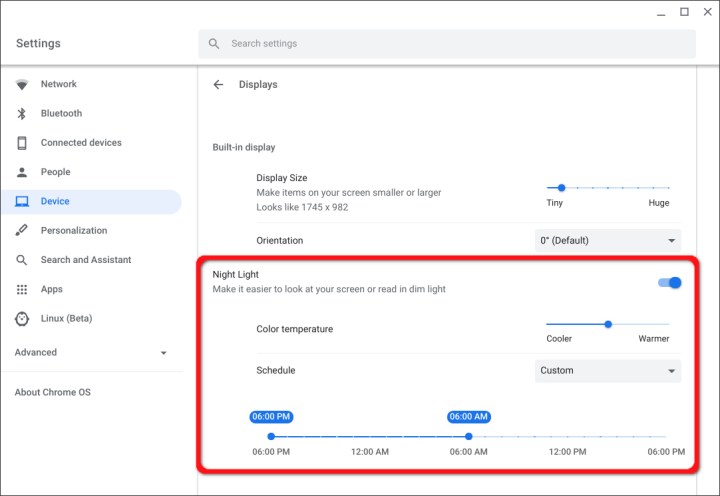
Step 4: Click on the toggle located to the right of Night Light to enable this feature. On macOS Ventura and later, click on Night Shift... at the bottom of the window to open the settings.
Step 5: Move the slider between Cooler and Warmer to adjust the blue light level.
Step 6: Next to Schedule, click the Down Arrow to select Never, Sunrise to Sunset, or Custom.
Step 7: If you select Custom, a timeline appears from 6 p.m. to 6 p.m. Select the duration by moving the start and stop times accordingly.
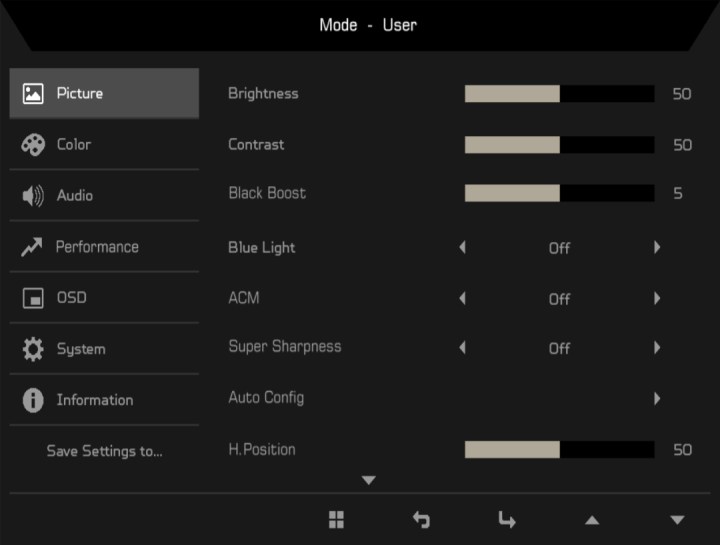
External displays
While you can change the level of blue light on the software side, external monitors may include a blue light filter you can manage with integrated On Screen Display (OCD) controls.
For instance, press the OCD button on Acer’s SB220Q 21.5-inch display, and a control panel appears on the screen separate from the PC’s desktop. As shown above, it includes options for adjusting the brightness, sharpness, and blue light. You can manually switch between 50% to 80%. You will get more blue light as you increase this value.
Overall, it’s more convenient to adjust the blue light level directly through your computer’s operating system than by doing so on the monitor. On the other hand, if you use the same monitor for several devices, altering the settings on the side of your monitor may be a far more straightforward approach.
Third-party alternatives
F.lux: is an innovative third-party alternative to adjusting your monitor’s color levels. This tech carefully monitors the sunlight level in your area and adjusts your screen’s color temperature accordingly. It’s available for free for Windows, macOS, and Linux. You can also use it to adjust the lights in your home by pairing it with a smart lighting system. You can turn the feature off whenever you want by toggling a switch.
Iris Mini: The Iris Mini is an impressive, ultra-lightweight blue light filter application. It’s a streamlined option; there are no UI, buttons, or extra steps. The feature can automatically adjust the color on your monitor to minimize effects of glare or blue light. You can change settings manually or rely on Iris Mini’s automatic feature. The automatic mode evaluates the time of day and adjusts colors accordingly. There are versions available for Windows, Mac, and Linux.
Frequently Asked Questions
Is there a way to block blue light on computer?
Both Macs and PCs have built-in blue locking blocking modes. On a Mac, you can enable blue light blocking by turning on Night Shift, located in the Displays section of System Preferences. On a PC, blue light blocking is called Night Light, and it's located in Display (Windows 10) or Brightness & Color (Windows 11).
Do blue light filters work on computers?
Yes, most Windows and Mac computers have blue light filter settings that work brilliantly to block unwanted, circadian rhythm-disrupting lights. On a Mac, it's called Night Shift, and on a Windows computer, it's called Night Light. In addition, there a handful of third-party apps you can download to block blue light on your computer, like F.lux.
Is there a computer app that removes blue light?
Both Windows and Macs have blue light blocking apps built in. There are also apps you can download to remove blue light on your computer. Our favorites are F.lux and Iris Mini.
Editors' Recommendations
- How to convert FLAC to MP3 on Mac, Windows, and web
- NordVPN free trial: Try the service for free for a month
- How to take a screenshot on a Mac
- How to schedule an email in Outlook for Mac, Windows, and web
- How to open RAR files on Windows and Mac