Apple’s macOS Sonoma came loaded with a bunch of great new features, including desktop widgets, video screen savers, and more. With plenty of them, you just need to sit back and enjoy them, without much action required on your part. But that’s not always the case.
Sometimes, you’ll have to change a few settings to enable a new feature. Other times, you might want to disable something that is switched on by default. Either way, it’s often worth diving into macOS Sonoma’s settings to get things how you want them.
Here, we’ll show you all the settings you should change in macOS Sonoma to get even more out of the operating system. It’s easy to get started — just follow this guide to customize macOS to your tastes.
Quickly show desktop items

In older versions of macOS, hiding your open windows and showing the files on your desktop either required a trackpad gesture or pressing the Cmd+F3 keyboard shortcut. If you didn’t have a trackpad or couldn’t remember the shortcut, it could be fiddly.
Now, you can do it by simply clicking an empty space on your desktop. This is enabled by default, but you might not want that — one slip on your mouse buttons could unexpectedly send all your windows flying out of the way.
To disable this feature, just open the Settings app and select Desktop & Dock in the left-hand sidebar. Under the Desktop & Stage Manager header, select Only in Stage Manager from the dropdown menu next to Click wallpaper to reveal desktop. That’s all there is to it.
Stop the trackers
Apple has always been good at protecting user privacy, and macOS Sonoma is no different. It comes with a feature called “advanced tracking and fingerprint protection,” which is built into the Safari web browser and stops advertisers from following you across websites.
By default, this is only enabled for private browsing windows in Safari, but you can turn it on for regular browsing too. To do so, open Safari and select Safari > Settings in the menu bar. From here, pick Advanced and select In all browsing in the dropdown menu next to Use advanced tracking and fingerprint protection.
Delete old verification codes

These days, many websites use two-factor authentication when you log in. This sends a verification code to one of your devices, but those codes can cause clutter (and potential security risk) in your inbox long after you’re done with them. Luckily, Apple has thought of this and has added a new feature that automatically deletes these codes in the Messages and Mail apps once they’ve been used.
To enable this, open the Settings app and choose Passwords in the sidebar. Enter your Mac’s password, then pick Password Options. Under Verification Codes, turn on the toggle next to Clean Up Automatically.
Change video call effects

Apple introduced FaceTime video effects in macOS Monterey in 2021, but it wasn’t until 2023 and macOS Sonoma that we were able to adjust these effects in detail. Now, though, it’s easy to do and thoroughly worth it.
During a video call, you’ll notice a camera icon in your menu bar. Choose this and you’ll see a pop-out window showing your video feed and a range of effects. Select the arrow next to Portrait and a slider will appear that changes the strength of the blur effect. You can also change the strength of the Studio Light feature in a similar way.
If you have disabled Center Stage and are using your iPhone as a webcam via Continuity Camera, you can hover your mouse pointer over your video feed and you’ll see a scale appear — drag it to zoom in or out. You can also move the frame, or choose Re-center to put yourself back in the middle. Note that these last effects only work with Continuity Camera, not if you’re using a regular webcam.
Use iPhone widgets on your Mac
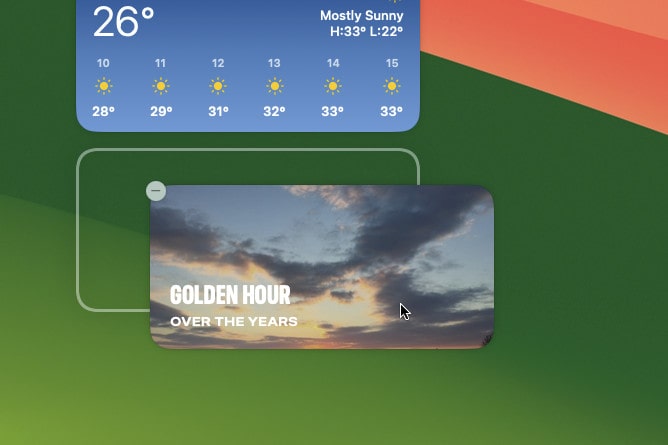
In macOS Sonoma, Apple has added desktop widgets for the first time. This means you can now move helpful little panels of app information onto your desktop instead of having to hide them in the Notification Center. One of the best parts of this is that you can use widgets for apps that are installed on your iPhone, even if they’re not installed on your Mac.
To do so, open the Settings app and choose Desktop & Dock in the sidebar. Scroll down to the Widgets header and enable the toggle next to Use iPhone widgets. Now, the next time you open macOS Sonoma’s widget gallery, you’ll have the option of adding some iOS widgets to your desktop.
Column view in Reminders
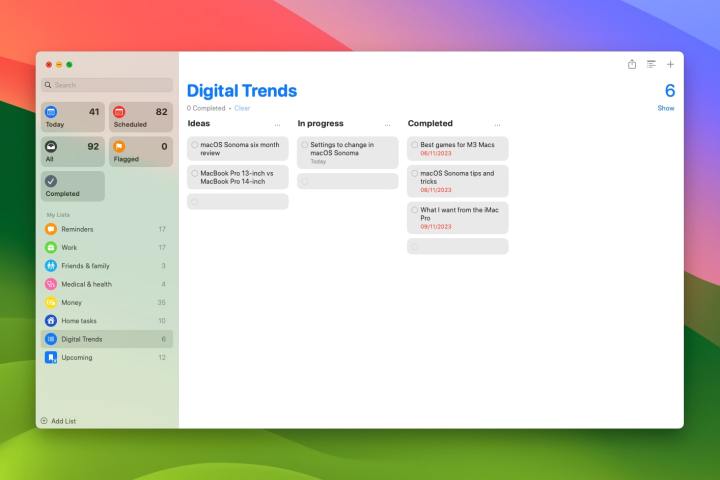
The Reminders app does a decent job of keeping you on top of all your tasks, but one thing it’s been missing for years is a column view (also known as a kanban view). This is ideally suited to the landscape orientation of most Mac screens, as opposed to portrait iPhone displays. Now, it’s here in macOS Sonoma.
If you want to use it, you’ll need to open the Reminders app and pick the list you want to view in columns from the left-hand sidebar (note that this won’t work for Smart Lists). Now, pick View > as Columns from the Reminders menu bar. To switch things back, just choose View > as List.
In the Kanban view, you can add a new column by right-clicking and choosing New Column. Give it a name, then drag some items from one column into another. Or right-click a reminder and select Move to Column and pick a column from the list.
Securely share passwords
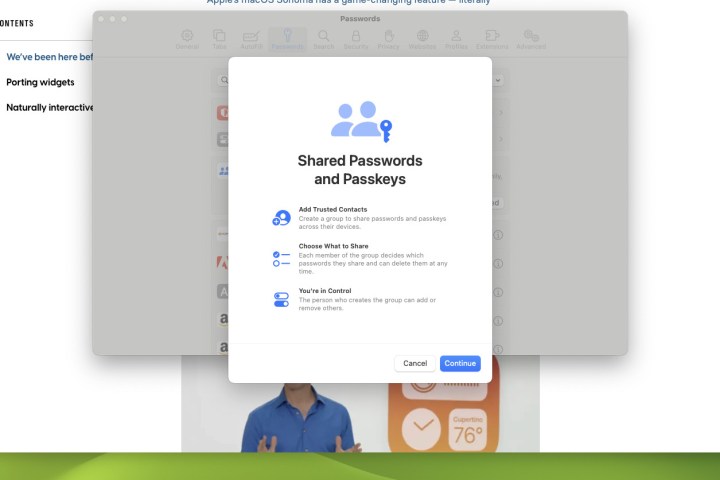
Sometimes, you and a group of people will share an account or a login. Instead of sending the password insecurely to each other (such as using emails or texts that other people can see over your shoulder), macOS Sonoma lets you share passwords with select people without compromising your account security.
First things first, you’ll need to create a group containing the people who will have access to the shared logins. Open the Settings app and pick Passwords in the sidebar, then enter your Mac password. Choose the + button, then New Shared Group. Give the group a name and select Add People, then enter the name, email address, or phone number of anyone you want to be in the group. Now select Add. Once you’re done adding people, pick Create.
You should now see a list of your passwords. Tick the checkbox next to any passwords you want to share, then choose Move. This will move the login info into the shared group. Finally, select Notify via Messages to send every member a quick note inviting them to the group.
To remove a password from a shared group, you’ll need to pick the i button next to a password, then choose My Passwords from the dropdown menu next to Group. Now select Move to My Passwords > Done. You can now delete the group by selecting Manage > Delete Group > Delete Group.
Editors' Recommendations
- Does your Mac need antivirus software in 2024? We asked the experts
- Don’t download the latest macOS Ventura update just yet
- Why you should buy a MacBook Pro instead of a MacBook Air
- Why you should buy a MacBook Air instead of a MacBook Pro
- Apple quietly backtracks on the MacBook Air’s biggest issue