All Word of Power locations in Alan Wake 2

Alan Wake 2 splits its campaign up between the titular writer from the original game and a new character, FBI agent Saga. While the two play mostly the same, each one does have some bespoke elements. Aside from smaller touches like each having their own weapons and inventory, they also have different sets of collectibles to search out. While Saga needs to track down and solve things like Nursery Rhymes and open Cult Stashes, Alan’s hidden items, called Words of Power, are more in line with his profession. These are more concepts than actual, physical items to grab, and must be picked up in a unique way. Not only are they worth finding because they unlock a Trophy, but they also will help smooth out the difficulty curve since they serve as upgrades for Alan. Our words may not be as powerful as Alan’s, but they can still guide you to every Word of Power location in Alan Wake 2.

How Words of Power work

Words of Power are environmental objects that only Alan can interact with. While exploring his section, you will be able to hunt down these spots on the map and find a spiral of words written somewhere. To “collect” one, you simply need to shine your light on it from the right angle — your controller will vibrate to let you know you’re getting close.

Words of Power are divided into seven types, each of which offers three different upgrade options in different areas. Here’s each type and how they can improve Alan’s skills.

  • Word of Fix: upgrades health stats
  • Word of Gun: upgrades weapon and ammo stats
  • Word of War: upgrades weapon damages
  • Word of Stuff: upgrades inventory space, shows resources on the map, or adds charges to your flashlight
  • Word of Aid: upgrades flares and healing items
  • Word of Action: upgrades damage done or lowers damage taken
  • Words of Lamp: upgrades your torch abilities

All Words of Power locations

Like all collectibles in Alan Wake 2, Words of Power are spread across each major zone you visit, with some only accessible later on, after you’ve made story progress or return before the game ends.

Dark Place Words of Power

A map of the dark place in Alan Wake 2.
Remedy Entertainment

There are seven Words of Power to find in the first major zone you reach as Alan, but the last can’t be obtained until you come back after getting the door code that allows you into the Oceanview Hotel.

  • The first word you get is unmissable since it is part of your main objective. You will get a Word of Fix from above a door after you get your revolver and flashlight.
  • Taking the light in your lamp from the first word, backtrack down the alley to Caldera St. Station and use the light to illuminate a lamp above the staircase going up. This will unblock the path so you can get up to the roof and through a door. You should spot the yellow arrows directing you the rest of the way to the Word of Lamp.
  • In the northeast section of the map, where you find the sheriff, the word will be in the same room.
  • Head south from the sheriff and up some scaffolding on the other side of the street. This will turn you around and lead you to the Word of War between some air ducts.
  • Go south again, and power up the taxi with your light to transform it into a police cruiser. Enemies will spawn when you do this, so be ready. Go through the area they ambushed you from. The word is up on the wall.
  • After going down Draft Street, spin around and shine a light on this word on the underside of the bridge.
  • Go down to Wheeler Street and snag this Word from outside the Talk Show Studio by some garbage cans.

Subway Words of Power
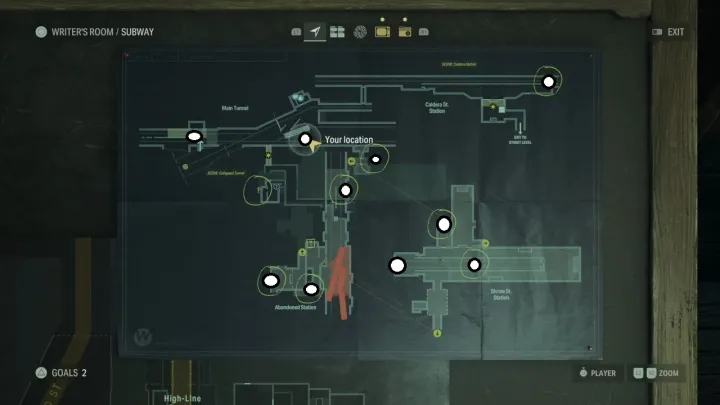
A map of alan wake 2's subway.
Remedy Entertainment

The Subway also holds a ton of Words of Power — 10 in all this time.

  • Immediately after getting into the subway, you will use an Echo to change the environment. Once you do, the word will be on the train door.
  • Look across from the breakroom on the other side of a barricade for this word.
  • Take the light and carry it down the main tunnel and look behind a metal shelving rack.
  • After climbing the ladder out, spin around and duck under some construction. Look straight up to find this word.
  • Once you get inside the fire-damaged train, climb down the ladder, but not down the stairs. Instead, turn around and go around the corner. You need to destroy a wooden pallet to reveal the word.
  • Now you can go down the stairs and find the next word on the left wall behind a gate.
  • After reaching Shrine St. Station, head through the water and search the wall on the left.
  • Climb up into the train and scan the wall to the right to collect this word.
  • On the other side of Shrine St., the next word is almost impossible to miss as it’s dead ahead.
  • On your way up the stairs and out, stop next to the break room and look through the closed fence for the word.

Oceanview Hotel Words of Power
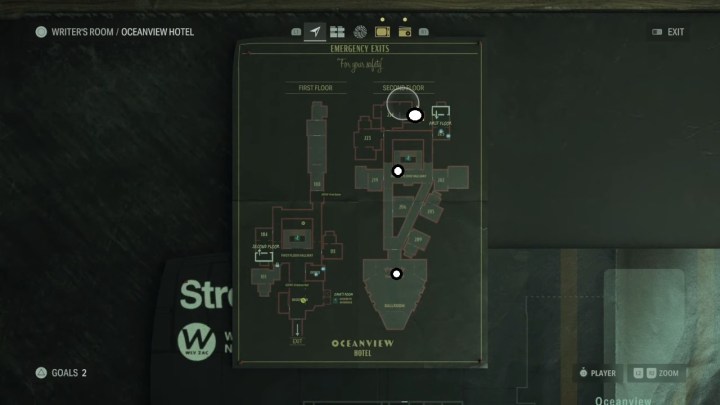
A map of the oceanview hotel.
Remedy Entertainment

There are only three Words we need to collect from the hotel.

  • On the second floor, enter room 224 and break the wooden plank to enter the bathroom and get the word.
  • While going through the hall, check for a glass panel above a door on your left. Through it, you can snag this sneaky word.
  • Take a break at the bar and look straight up to collect one more word.

Poet’s Cinema Words of Power
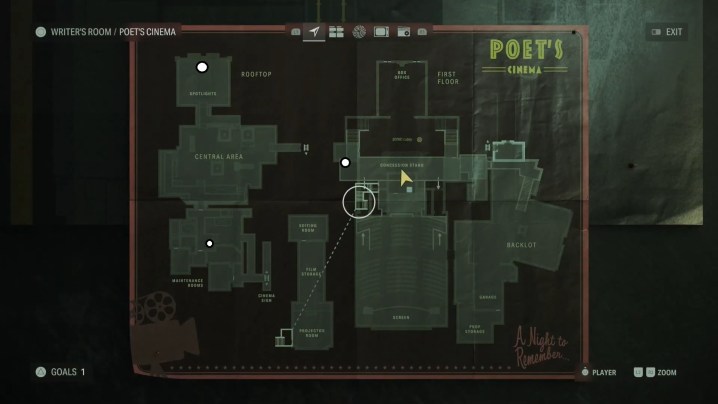
A map of the poet's cinema in alan wake 2.
Remedy Entertainment

Our final three Words are in the Poet’s Cinema.

  • Once you locate the break room, go up the stairs and look at the wall behind a standing lamp.
  • Once on the roof, go to the spotlights and look down in the corner below a window.
  • Finally, the last word is plastered on the big water tower.
Jesse Lennox
Jesse Lennox loves writing, games, and complaining about not having time to write and play games. He knows the names of more…
All Teddy Bear locations in Fallout 76
A teddy bear in a train station in Fallout 76.

There's no shame in admitting that you enjoy the company of a teddy bear in Fallout 76 over the ghouls and mutants. In fact, we would probably prefer spending time finding these cuddly bears than playing with the other players, but these stuffed animals are a rare commodity in the wasteland. Technically, these are classified as a junk item that you can break down for materials, but who would do something like that? These are great display items to make your camp feel more like home, or just another annoying daily task you need to complete. Whatever your motivations are, here is where you can find each of the different teddy bear variations in Fallout 76.
All teddy bear locations
There are 12 different variations of teddy bears that all have a distinct color pattern, name, and value, but are otherwise identical. Like most items, they can be found in a ton of places around the map, but these are the easiest spots to get the one you're looking for.
Bubblegum Bear

Our first bear is going to be inside the Foundation. Once inside, go to Ward's trailer and pick it up off the couch.
Camden Park Bears

Read more
All sphinx riddle solutions in Dragon’s Dogma 2
A sphinx in Dragon's Dogma 2.

Dragon's Dogma 2 is full of mythological monsters and beasts. During your travels, you will encounter many classics like Cyclopses, Griffins, and Dragons, but a more obscure creature is hidden away in a cave waiting to challenge you in a different way. The Sphinx is found in the Mountain Shrine at the top of the hill once you go through Wordlsend Cave. It won't attack you when you approach, but instead, it will challenge you to a test of intellect. There are a total of 10 riddles to be solved, with a reward given for each one you manage to crack. Dragon's Dogma 2 never holds your hand with anything, so we'll help you unravel these riddles.
First five riddle solutions

The first half of the riddles are given at the location mentioned above. Once you solve this first batch, the Sphinx will move, and you will need to find it again to continue. Here are the first five riddles, their solutions, and rewards.
Riddle of the Eyes
“Our eyes are our allies, yet oft do they betray, for eyes tell lies, so I advise, and thence do lead astray. Yet how will your eyes advise you? Venture through yonder door and retrieve that which is of greatest value.“

Read more
Final Fantasy 7 Rebirth: all piano sheet music locations and rewards
Cloud playing the piano in Final Fantasy 7 Rebirth.

While there's no shortage of ways to distract yourself while playing Final Fantasy 7 Rebirth, one of the most unexpected minigames is the surprisingly deep piano system. In most of the major hub towns you encounter across the expansive world, Cloud can find a piano to sit down at and tickle the keys. You're free to play any song you want in free play, but you can turn this system into a full-on rhythm game, almost like Guitar Hero, by collecting sheet music of some of the game's most iconic tracks. There's even an NPC near each piano who will reward you if you get a high enough rank on each song. Cloud may not be the most expressive in his words, but he can sure play the piano with heart. Here is where you can find all the sheet music and what rewards await if you can master them.
Where to find all sheet music

Sheet music, thankfully, isn't hidden away in chests or has to be purchased for crazy amounts of Gil, but a few do have some hidden requirements. Each new composition is found on a piano in the world and is free to snag once you sit down. Even if you don't feel like playing right then and there, make sure you always at least grab the music to add to your collection so you don't have to backtrack later and get it. There are eight in total to find, and some will only come later in the story, but none are missable once you open up fast travel back to previous areas. This is the natural order you can collect them.
On Our Way
Our first piece of music can be picked up once you hit Chapter 4. During this section, go to the Crow's Nest town in the Junon region, which you can only enter by doing the "When Words Won't Do" side quest. Once you complete this quest and can freely enter the town, hit up the bar and grab this tune.
Tifa's Theme
After a rather exciting cruise to Costa del Sol in Chapter 6, you can add this piece to your collection by making a quick stop at the fancy Royal Crown Hotel.
Barret's Theme
Not much further into the game in Chapter 7 you will visit Barret's old hometown of Corel. The Rock Bottom Bar is waiting with his song.
Cinco de Chocobo
Chapter 9 takes you through the town of Gongaga. Even a town way out in the forest has a piano, which means yet another song to snag.
Two Legs? Nothin' to it
One chapter later, in Chapter 10, you need to do a little exploring in Cosmo Canyon to find your way to the piano, but the icon on your map won't lead you astray.
Aerith's Theme
Perhaps the most iconic song in the entire game, if not the franchise, is hidden behind a completely optional side quest. Once you reach Chapter 11, return to Nibelheim and do the "White-Haired Angel" side quest. It may seem totally irrelevant, but the quest ends with you playing and collecting this song.
Let the Battles Begin!
Once you prove your skills and get an A rank or better on all prior songs, you will get this new one as a reward from the NPC Dorian next to all pianos.
One-Winged Angel
We're not sure if fighting Sephiroth or getting this song is harder. If you want to play this terrifying arrangement, you need to donate all 88 Treasure Trove items to Johnny. This more or less requires you to 100% the entire game
All song rewards
For every song you A rank, Dorian will give you a prize when you talk to him. Here's everything you can get:

Read more