Gambit tells you everything you need to know in the name. Destiny 2‘s PvEvP game mode is all about managing risk to shoot ahead of the enemy team. Unlike most multiplayer modes, you don’t fight your opponents head-on, rather racing against them to drop a boss as fast as possible. In this Destiny 2 Gambit guide, we’re going to walk you through how to die less, bank more, and kill faster.
Before diving in, keep in mind that you use your own gear in Gambit, like all of Destiny 2′s multiplayer modes. Because of that, Gambit is far from balanced for newcomers. You can still play, even if you’re brand new to Destiny 2. However, it’s a good idea to be extra careful if you’re just starting, at least until you can get some better gear.
Further reading
- The best weapons in Destiny 2, and where to find them
- Destiny 2 power leveling guide
- How to make a clan in Destiny 2, and where to go from there
Gambit 101: What is Gambit?

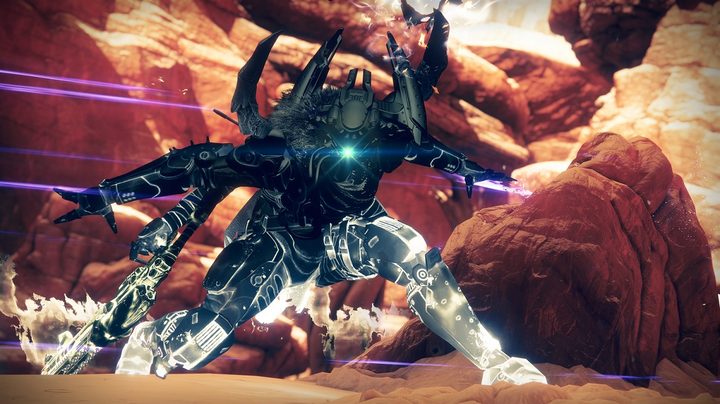
Gambit is a hybrid multiplayer mode that combines the elements of PvP and PvE (PvEvP). Two teams of four compete against each other on separate maps, defeating waves of enemies until the team can summon a Primeval. The first team to defeat their Primeval wins.
Summoning a Primeval requires depositing 100 “motes” in a central bank. Each enemy you kill will drop at least one mote, but some enemies — particularly high-value targets and elites — drop more. Motes stick around on the ground for a short amount of time, and you’ll automatically pick them up when running over them.
Depending on how many motes you bank, you’ll summon one of three blockers on the enemy side, shutting down their bank until the blocker is defeated (we’ll go over the specific blockers later). The same happens to your bank as the enemy team banks motes, so keep that in mind.
The wrench in the cogs of Gambit is invasion. After banking 25 motes, a portal will spawn that allows you or another player from your team to invade the enemy’s map for 30 seconds. There’s an announcement when you invade (and when you’re invaded), so the enemy team will know you’re around. Before the Primeval, the goal of invasion is to pick off enemies before they can bank their motes, losing them forever.
After either Primeval is summoned, the portal will open continuously after a short cooldown time. This is where invading the enemy team really shines. If you invade the enemy team while their Primeval is active, any opponents you kill will heal it, pushing the enemy team further from the finish line.
Communication is key
You can get really far in Gambit simply by communicating with your team. From coordinating banking efforts to dealing with invaders, being on the same page as your teammates is vital.
Vital for doing things together, yes, but also for doing things separately. Between invading, invaders, blockers, banking, and attack waves, there’s a lot to do, and it’s not a good idea to have everyone on your team doing the same thing at once (unless that’s killing the Primeval). If there’s an invader or any blockers on your side, it’s a good idea to dedicate at least one person to deal with that.
The basics of banking

You can only carry 15 motes at once during a game of Gambit, and you shouldn’t hit that limit often. Although it’s tempting to wait to bank your motes, you want to have a steady stream of them flowing through your bank, and you don’t want to waste any motes. There are a couple of different ways you can make sure that happens.
First, the “wasted” motes. Every five motes you bank (up to 15) will spawn a different blocker on the enemy side. Five to nine motes spawns a small blocker, 10 to 14 a medium blocker, and 15 a large blocker. Wasted motes show up when you bank under five at once, or when you bank above the minimum requirement for the blocker you want to spawn.
Ideally, you want to split motes across your team in multiples of five — say, a single player with 10 motes and three others with five. This approach allows you to get the most out of your motes.
Unfortunately, the math rarely lines up that nicely. It’s possible, but use this tip as a general guideline, not a hard rule.
That brings up the question of when you should bank, which really depends. Your default strategy should be to bank motes between attack waves, dropping by your bank while you’re on your way to the next wave.
If possible, coordinate when you bank your motes with your teammates, too. If you can get the mote train flowing early, you can effectively lock the other team out of banking motes, at least temporarily. That can mean everyone banking their motes at once, or, if you’re a little more crafty, a slow trickle of banking that will consistently keep the enemy team pre-occupied. Coordinating your banking efforts can really snowball a match in your favor.
As we’ll get to next, a lot of playing Gambit before you spawn the Primeval is trying to figure out what the enemy team is doing, which can change when you bank your motes. The point here to avoid holding onto them for the sake of it.
Pay attention to the mote counter
The mote counter at the top of each Gambit match offers a lot of information if you’re willing to look. There are three main things it tells you: How many motes the enemy team has banked, how many motes the enemy team has but hasn’t banked, and how close the enemy team is to spawning the invasion portal. Knowing all of that, you can deduce a lot about what the enemy team is doing and what you can do to counter it.
Each match of Gambit is different, but there are two common circumstances you’ll come up against. The first is a large number of unbanked motes from the enemy team. For one, that tells you it might be a good time to bank your motes, shutting the enemy team out from banking theirs. It also tells you that blockers are incoming, so it might be a good time to stay close to your bank.
The other is when the enemy team has a lot of banked motes. If there aren’t many unbanked motes floating around, there isn’t much of a reason to invade, even if the portal has spawned.
You can never know for sure what the enemy team is doing unless you invade. However, if pay attention to when the portal spawns, and the number of banked and unbanked motes the enemy team has, you can get a pretty good idea.
Play it safe

If you die in Gambit, you lose all of your motes. You don’t drop them, you don’t get them back if a teammate revives you, and they don’t show up in later attacks. If you lose them, they’re gone forever, and in a game mode as tight and competitive as Gambit, you can’t afford to lose any.
Unlike a Strike where you may play more aggressively, you’ll want to play things safe in Gambit. Motes only count when you bank them, so the number of attackers you defeat and the number of motes you pick up counts for nothing.
Playing it safe can mean a few things. If you’re in the middle of a wave with enemies around you on all sides, for example, it’s probably not a good idea to run picking up motes. Similarly, you don’t want to head into a fresh wave with 11 motes hoping you can pick up a few more. Don’t get greedy, play things safe, and above all, bank your motes.
Keep your motes in mind with invaders
In Gambit, you should follow a loop of attacking and banking unless there’s an invader or a blocker (and hopefully not both). Although invaders only stick around for 30 seconds, that can be more than enough time to pick off your entire team. At least one person from your team should deal with the invader immediately. If they can’t win the battle, at least they can keep the invader busy for awhile.
The person with the least motes on your team should go. Ideally, they won’t have any. Similarly, if you’re standing around with eight motes when the invader shows up, it’s a good time to run and hide.
An invader is just another guardian, so you shouldn’t be scared of them. That said, it’s important to remember what you have to lose. An invader can lose, at most, the rest of their invasion time. If you have a lot of motes, you can lose a lot more, so keep that in mind whenever an invader shows up.
Prioritize blockers
Just as you can snowball your advantage by summoning multiple blockers to the enemy side, your opponents can spawn multiple blockers to your side. Even if you don’t need to bank motes, it’s important to stay on top of blockers. You don’t need to dedicate your whole team to deal with them, but it’s good to send at least one person to pick them off as they spawn.
There are three different types of blockers:
- Small blocker (five to nine motes) — Taken Goblin
- Medium blocker (10 to 14 motes) — Taken Captain
- Large blocker (15 motes) — Taken Knight
For the most part, each blocker is slightly more difficult than the one that came before. A Goblin is easy enough for a single player to deal with in a few shots, while a Knight can feel like a bullet sponge. Out of the three, the Goblin is the one you want to pay attention to. Goblins can make other blockers immune to your attacks, so make sure to pick them off before dealing with larger blockers.
Heavy ammo goes to invaders
You don’t start with any Heavy ammo in Gambit. Instead, there’s a Heavy ammo drop near your bank that will respawn after a cooldown throughout the round. Make sure to save this ammo for whoever ends up invading the enemy side. Weapons that use Heavy ammo are the strongest in the game, and you want your team putting its best foot forward when invading.
That said, communication is key here. It’s just as bad to waste the Heavy ammo if an invader isn’t going to use it, so make sure to talk with your team whenever the portal spawns.
Don’t get comfortable

If you’re just learning the ropes of Gambit, this is probably the important most tip: Never get comfortable. As any seasoned Gambit player knows all too well, matches can flip in a matter of seconds, regardless of your lead. This is especially true if your team has already summoned the Primeval while the other team is still banking motes. It’s easy to assume you’re way ahead, but that’s not true.
With a coordinated team and the right combination of gear and abilities, a Primeval can fall in a matter of seconds. The combination changes between updates — in early 2021, The Lament is a popular boss weapon — but we’re confident that regardless of the version you’re playing, there will be a way to drop the Primeval almost immediately.
For this tip, it’s just important to keep that in mind. Gambit is a game mode that can snowball early, especially with coordinated banks and smart invasions. It’s also a game mode that can snowball late after you’ve summoned the Primeval. Even at the home stretch, make sure to keep your DPS up.