While Far Cry 6 has been nearly universally deemed as “just more Far Cry,” the fact is the series is still somewhat unique among other games. There are not many other titles out there that are both massive open-world games, overflowing with side missions, collectibles, activities, and treasures to hunt, and first-person shooters. For the most part, those two ingredients aren’t blended all that often. That perspective shift can make exploring the lush landscape of Yara all the more enjoyable, and even push you toward wanting to hunt down all of its secrets. One of the most cryptic of collectibles on the island is the Criptograma Chests.
Criptograma Chests are very different from typical chests littered around the map in Far Cry 6. You won’t be able to crack these crates open the moment you find them. All of the 15 Criptograma Chests require you to first find two Criptograma Charts to unlock them, meaning you will need to find a total of 30 charts to scoop up all 15 of the rewards. And you’ll want these rewards, too, as these chests hold some of the strongest gear in the game. Plus, as is common for collectibles in an open-world game, if you open them all you can also get the That’s Puzzling trophy or achievement. Finding the chests is one thing, but combined with the charts, this is a daunting treasure hunt.
Here’s how to find and open all the Criptograma Chests in Far Cry 6.
Further reading
- Far Cry 6 beginner’s guide: Tips and tricks for overthrowing the government of Yara
- Far Cry 6: Where to find all USB Song Sticks
- Far Cry 6 PC performance guide: The best settings for high frame rates
Criptograma Chest #1
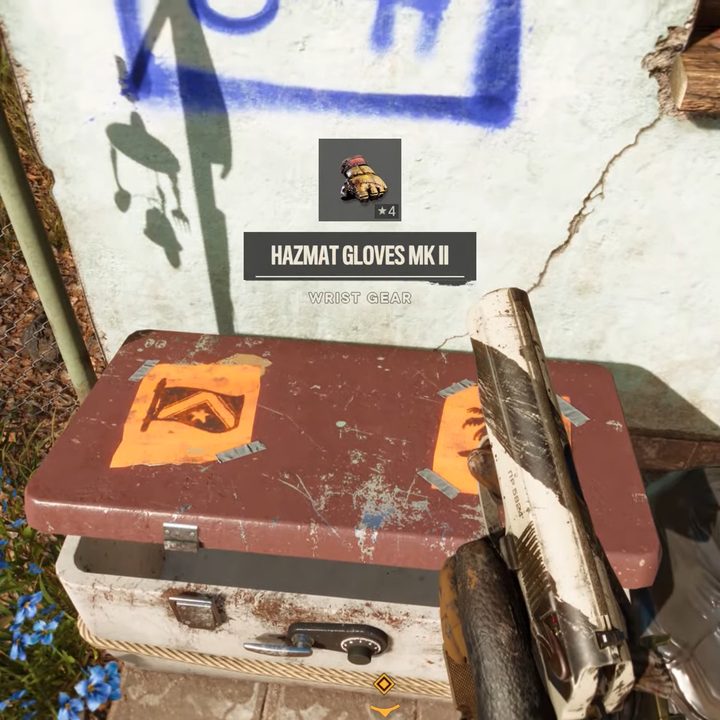
The first Criptograma Chest you can get is on Isla Santuario in the town of Armonia. The two charts are pretty close to the marker on the map for the chest, too. The first is on the roof of the house directly across from the chest, and the second is hidden inside a little tube sticking out of the right side of that same house. Bring them both to the chest to open it up and get the Hazmat Gloves MK II, which provide higher poison resistance.
Criptograma Chest #2
The next four Criptograma Chests are all on Madrugada. The first will be in the Serpentino Park at El Dorado Cabins, which you will spot along the southern end of the region. Look for a tower here for the chest icon. The first chart is to the south of the chest on the beach. Find a boulder in the sand with a large blue arrow right above it and grab the chart from the rock. The second is just a little farther south, near the tip of the area, on another big rock. Crack open the chest to get the Rioter Boots MK II, which provides a massive buff to your armor-piercing defenses.
Criptograma Chest #3
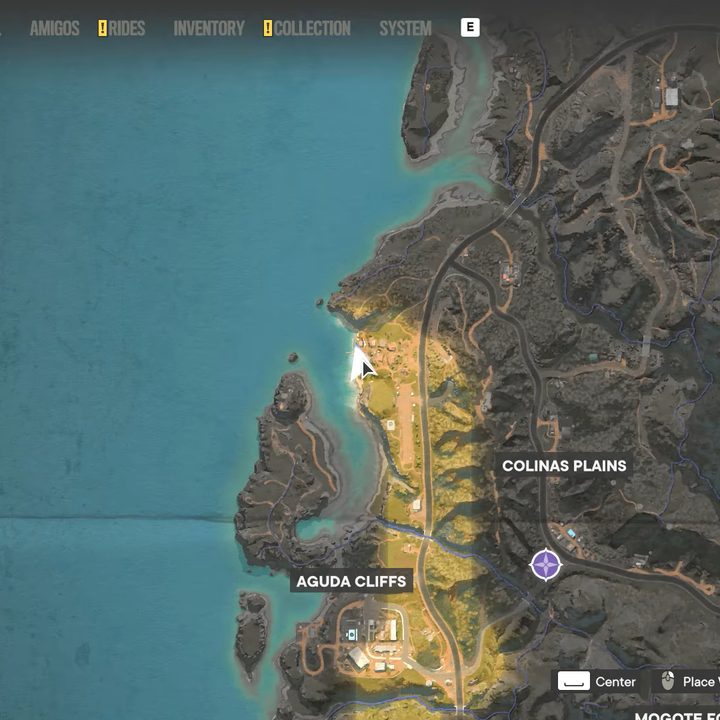
To the north end of the Aguda Cliffs near Poesia, find the docks on the west side of the town. Looking out from the pier, you can spot the first chart on the lone rock out in the water near the lighthouse. The second is right by the lighthouse itself. While making your way toward the lighthouse, find the point you can grapple to on your right into the cliffs, leading you right to the second chart. This time you’ll get the Rioter Gloves MK II. These make your melee attacks deal more damage.
Criptograma Chest #4
In the Aguas Lindas area, go north of Ida’s Refuge to the pier. On one of these buildings’ balconies will be the chest, but the first chart is on the island straight to the north. Stay on the south side of the island when you get there and look for a big blue cloth on the cliff indicating the chart’s location. The second is below the waves, but also marked by a blue cloth hanging from some wooden posts sticking out of the water. You can find it to the east of the first chart. Dive as far down as you can to the deepest piece of wood you can find to grab the chart nailed to it. This Criptograma Chest has the Rioter Vest MK II, which also buffs your armor-piercing defense, as well as resistance to explosions.
Criptograma Chest #5
Make your way to the town of Verdera right in the middle of Lozania. Here you need to keep your eyes open for a billboard for El Paraiso where the chest is nestled. The first chart is on the roofs to the south and is clearly marked by a series of blue arrows. Keep heading south from there to the last house on the block. On the water tank on the roof is the second chart. Continuing on with this set, we now get the Rioter Helm MK II. This headgear will give you some more resistance to armor-piercing damage.
Criptograma Chest #6
Moving on to a new region, Valle De Oro, we have the next set of four chests with the Fuego set to collect. First up we will visit the town of Feroza in Balaceras. Go to the construction zone with all the shipping containers to the south of the town proper to spot the Criptograma Chest itself near the greenhouse. From the greenhouse, take a right to the junkyard, breaking some wooden barriers to enter a yellow container with the chart. The second is in a broken-down car not far from there, and identifiable by the breakable planks of wood on it. Smash them up and snag the second chart. This chest will reward you with the Fuego Mitts MK II, giving you some nice fire defense.
Criptograma Chest #7
The seventh Criptograma Chest is in Cruz Del Salvador. There’s a large open field to the northwest of Segunda with a watchtower in the middle. While the chest is on top, the charts are far below. There are two manholes that can be blown up on either side of the tower, one to the southeast and the other northeast, with gas tanks conveniently placed nearby. Blow them up to open the lids and grab each of the charts. The Fuego Helmet MK II inside increases the damage you deal to burning enemies.
Criptograma Chest #8
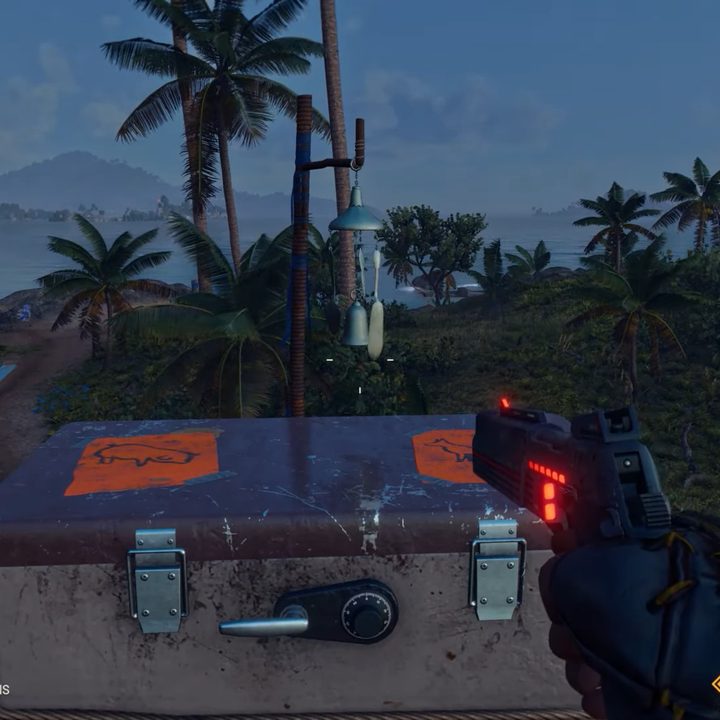
From the Guillermo Castillo Bay in Noventarmas, go south to the area that’s been partially flooded. The chest will be on the ground floor of a flooded building, but climb and grapple your way to the top to get the first chart near a wind chime. The second chest can be reached from the first by using your wingsuit to fly to a slightly shorter building behind that one. Even if you don’t make it, you can still go inside from the bottom and get to the top that way. Pull on your pair of Fuego Boots MK II if you want more fire defense at the cost of being slightly louder when you move.
Criptograma Chest #9
The last piece of the Guego set is to the southeast of the town called Ruben in Barrial, straight west of Valle de Acosta. The chest is right next to a sign saying “No Pase,” and the first chart isn’t too far from there. Go toward the docks, dive in, and find it underneath. The second is also submerged, but farther out. You can get there by land fastest by going south down the shore until you spot the orange fishing nets. Blast the net away and head into the cave to collect the second chart. Your new Fuego Pants MK II give you yet more fire defense.
Criptograma Chest #10
The El Este region will give us our next series of chests that all contain the Hazmat gear type. We’ll begin in La Joya where the chest can be found on top of the People’s Pride Clinic building. Head up there and leap to the building to the right, or west, and land on the roof. The chart is near the vent beside a chair. The second chart is down on the building closest to the beach. Get up on the roof again to snag this chart and pop open the Criptograma Chest for the Hazmat Pants MK II. These leggings will drastically improve your resistance to poison.
Criptograma Chest #11
The tiny little town of Barriga, located in the north part of Sierra Perdida and on the south end of the Causto De Paso Lagoon, is your next destination. The chest is on a dock next to a water scooter, which you’ll want to use to get to the first chart. Right across from the dock is a boathouse beside a destroyed dock. Park here and grab the chart pinned to the hut. The second chart is also nailed to a small wooden shack on the west side of the lake. There’s a fire there to help guide you. Back at the Criptograma Chest, you will get the Hazmat Suit MK II, which gives you both poison and fire resistance.
Criptograma Chest #12
Directly north of the Higado Lake in Sierra Perdida, north of the Savannah Fields, you can find a lone home with the chest on the roof next to the water tank. Go southwest from here into a shack sinking into the marsh; you’ll need to break some boards to enter and get the first chart. Next, head straight south from the chest to another building you can just walk into and collect the chart. This Hazmat Mask MK II gives you, you guessed it, more poison defense.
Criptograma Chest #13
To clean up our Hazmat set collection, go to the Conception in Conuco and find the Corazon Alley on the east side of the street. There’s a ladder you can climb up to the rooftops to reach the chest itself. The first chart is pointed out to you with a handy arrow pointing to a cabin at the end of a row of vendors. Go inside and find the chart near the staircase. The other chart is on the roof of the nearby garage. The Hazmat Shoes MK II are just like the Fuego boots, giving you more poison resistance at the cost of being a bit louder.
Criptograma Chest #14
The final two chests are deep in Esperanza. In the northeast section of the city, Old Pueblo, is La Divinidad Cathedral. Go north from there and look for the house covered in spray paint, climb on top, and jump to the neighboring roof to reach the Criptograma Chest. Back at the defaced house, look for the building with a balcony. Climb and jump onto this balcony to collect the chart. From here, use the door on the balcony to go back down to another door leading to a gap between rooftops you need to clear to find the second chart. This will get you the Rioter Pants MK II for some more defense against armor-piercing damage.
Criptograma Chest #15

Our 15th and final Criptograma Chest is just outside of Esperanza proper in the Siete Pajaros Apartments, which you will find just a bit northeast of El Presidente Square. There’s a house here next to a billboard where the chest is sitting. Looking at the apartment building, you can use a grapple point to reach a balcony with an arrow you can follow right to the chart. Use the handy zipline here to zip over to the adjacent building, do some more grappling and climbing onto the roof, and pick up your final chart. Your final reward for all this hard work is the Fuego Coat MK II, which offers fire and poison resistance buffs.
Plus, with all chests found and opened, you will also unlock the That’s Puzzling trophy or achievement.