
Fortnite Chapter 3 guide: Season 3, week 4 quests and how to complete them

As always, a new week means a new batch of Fortnite challenges. This time, for Season 3, week 4, you’ll have plenty of new ways to earn battle pass XP, with objectives that require you to visit specific locations around the map, while also utilizing new mechanics introduced this season. Overall, the quests this week aren’t too difficult, but you’ll have an easier time if you know where to go.

Here are all the new Week 4 challenges with walkthroughs for completing all of them in Fortnite.

See more

Season 3, week 4 quests

  • Damage Opponents While in a Vehicle (250)
  • Destroy Structures with an E-11 Blaster Rifle (15)
  • Knock Down Timber Pines with a Ripsaw Launcher (5)
  • Mantle Onto an Edge Within 3 Seconds of Sliding (3)
  • Plant a Reality Seed at Sunflower’s Saplings or at Fungi Farm (1)
  • Search Chests or Ammo Boxes at Crashed IO Airships (2)
  • Travel 500 Meters in the Slipstream Around Rave Cave (500)

Season 3, week 4 quest guide

Damage Opponents While in a Vehicle (250)

Kicking things off is an objective that requires you to be in a vehicle while dishing out damage to your opponents. For best results, land somewhere at Rocky Reels, where you’ll find plenty of vehicles and loot. Make sure you grab a mid to long-range weapon you’re comfortable with, like an assault rifle, and as you rotate away from the storm, be on the lookout for enemies. Once you spot someone, you should switch seats so you can fire from inside the vehicle. After dealing 250 damage, you’ll earn credit for completing this quest. Easy peasy.

Destroy Structures with an E-11 Blaster Rifle (15)

Map of The Joneses in Fortnite.
Fortnite.gg

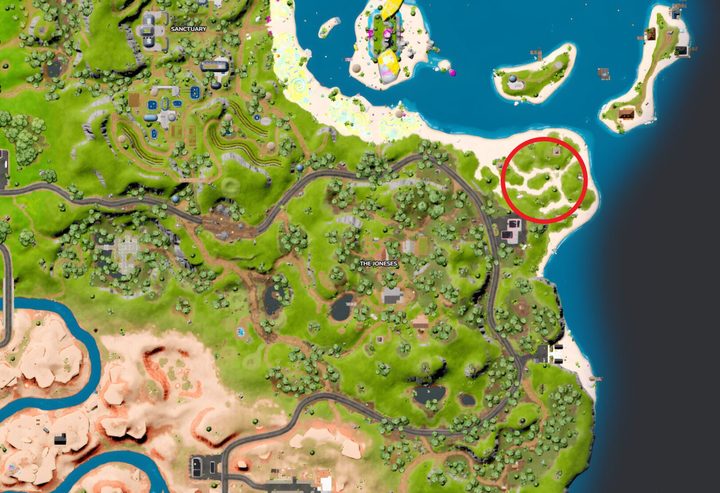
For this one, you need to get your hands on the E-11 Blaster Rifle, which can be an annoying process if you don’t have luck on your side. We actually recommend landing on the northeastern section of The Joneses (shown on the map above), where you’ll find a little hut and a chest that has a chance of dropping the E-11 Blaster. It’s got a low drop rate, but if you play often, you’re bound to come across it eventually. After you’ve acquired the weapon, simply destroy 15 structures with it and you’ll complete the challenge.

Knock Down Timber Pines with a Ripsaw Launcher (5)

Map of warehouse on the north side of Fortnite island.
Fortnite.gg

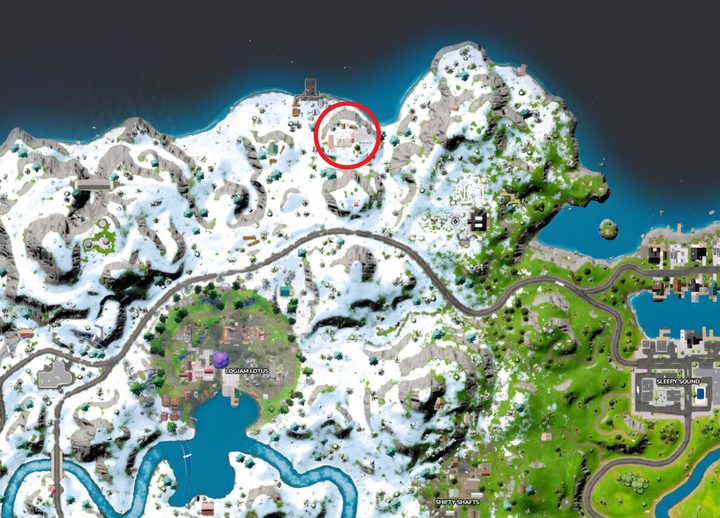
To complete this quest, you’ll need to visit the northern section of the map, where you’ll find a large warehouse that contains the Ripsaw Launcher. Head inside, and on the main floor, you’ll find Ripsaw Launchers hanging on a wall above a desk. After this, visit Logjam Lotus to chop down trees using the Ripsaw Launcher to earn credit for this quest. Remember, you need to cut down five of them for it to count. You can also find a Ripsaw Launcher from chests around the map.

Mantle Onto an Edge Within 3 Seconds of Sliding (3)

There are plenty of places to complete this challenge, but you’ll have an easier time if you go to a gas station. There are plenty of these around the map, such as the one directly northeast of Rocky Reels. Simply slide by the area with the gas pumps and then quickly jump up to the roof above within three seconds to complete this objective.

Plant a Reality Seed at Sunflower’s Saplings or at Fungi Farm (1)

Map of Fungi Farm and Sunflower Saplings in Fortnite.
Fortnite.gg

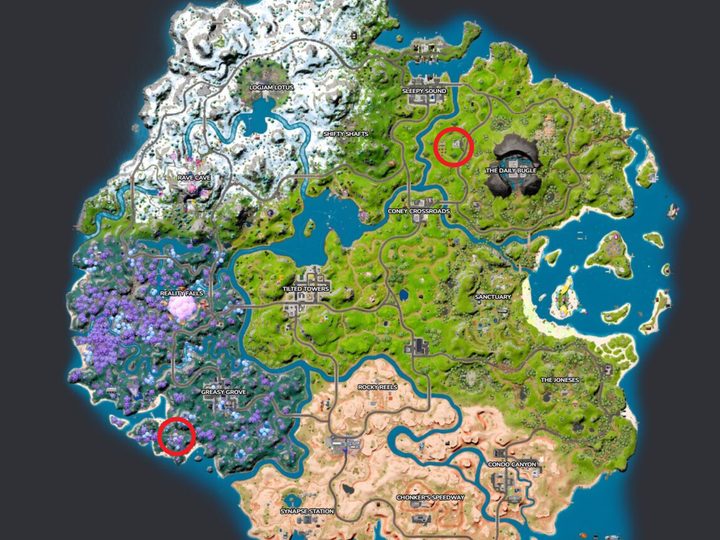
As we covered in our week 0 quest guide, you’ll need to get your hands on a Reality Seed for this challenge. These are found in the Reality Falls area in large bulbs that can be destroyed, revealing the Seeds. After you’ve found one, visit either Sunflower Saplings or Fungi Farm and plant the Seed there. It’s best to go to Fungi Farm since it’s closest to Reality Falls, but either one will work. The map above shows their locations.

Search Chests or Ammo Boxes at Crashed IO Airships (2)

Map of crashed IO airships in Fortnite.
Fortnite.gg

Above is a map of all the crashed IO airships around the island. To complete this challenge, you need to open two chests or ammo boxes at any of the locations above. Remember, this is cumulative and doesn’t need to be completed all in one match.

Travel 500 Meters in the Slipstream Around Rave Cave (500)

Character flying through Slipstream in Fortnite.

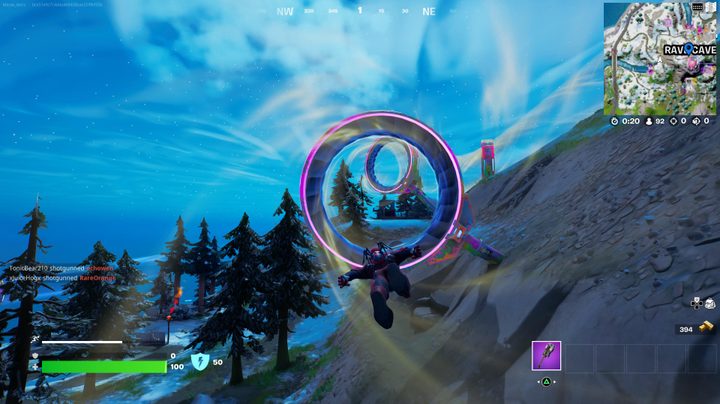
The easiest way to complete this challenge is to land inside the Slipstream as soon as a match starts. It’s best if you land within the stream on the southwestern side. The Slipstream is found all around Rave Cave, so try and position yourself at the start of it and if done correctly, you’ll float to the north side of this area. You’ll need to go back to the start on the southern side multiple times to complete this quest, so keep that in mind. This objective is cumulative, so you can earn progress across multiple matches.

Editors' Recommendations

Joseph Yaden
Joseph Yaden is a freelance journalist who covers loves Nintendo, shooters, and horror games. He mostly covers game guides…
How to give specialist a command in Fortnite
Character interacting with NPC in Fortnite.

As part of Fortnite's Spring Breakout Daily Quests, players are tasked with giving a hired specialist character a command. Of course, the game doesn't specify how to do this exactly, leading to some confusion amongst the community. Thankfully, we've got everything you need to know about completing this new quest with ease in Fortnite.
How to hire a specialist

Specialist Characters are specific NPCs all around the map. If you pull up the quest itself, you'll actually see a map of all the Specialist Characters. Keep in mind that not all NPCs fall into this category, so be sure to look at the map. We like the one to the very north of Breakwater Bay as it's usually out of the way. Once you find them, you'll need to pay 200 Gold Bars to hire them. If you don't have the funds, be sure to play more and complete bounties as needed.
How to give a character a command
After you've hired the Specialist Character, they'll be on your side for the duration of the match. If you look at the top left side of the screen, you'll see an icon that represents the Follower Communications wheel. Press and hold left on the D-pad on console or the middle mouse button on PC to get this menu to appear. Once it does, you can pick from a list of commands such as wait or follow. To complete the quest, you simply need to issue one command and after the NPC does what you ask, you'll earn credit for completing it.

Read more
A list of all the Fortnite augments, and how to use them
Fortnite

Every new chapter of Fortnite is a massive event. While seasonal changes bring plenty of minor tweaks and additions, it's almost always when a new chapter rolls around that major overhauls or new mechanics are introduced. Fortnite Chapter 4 was no exception, and aside from the extreme changes the island underwent, it brought one very important change to gameplay that wmakes a huge difference when going for that illusive victory royal (it isn't easy to win Fortnite, after all).

Augments, well, augment the game. There are a few challenges that somewhat introduce what these are, but they leave out almost all the important details for you to find out on your own. Augments need to be considered, and deeply understood, not only for when you get them yourself but to know what new tricks your opponents could have up their sleeves. Before you get taken by surprise, here's a complete breakdown of how to unlock augments and how they work in Fortnite.
What are augments in Fortnite?
Augments, or Reality Augments, are essentially a new perk system introduced into Fortnite. There are currently 22 augments in the game, but with more to come in future updates. You can get access to multiple augments during a single match, but augments do not carry over after a match is finished, whether you win or lose. These perks can range from modifying certain weapon types to granting buffs for performing actions, and much more. There are no bad augments, so you will want to get as many as possible. Augments also have their own tab in your menu where you can see which ones you've had so far to track your progress using them all.
How use Fortnite augments

Read more
All Resident Evil 4 remake Wayshrines and how to open them
An open wayshrine with a bracelet inside.

In the opening chapters of the Resident Evil 4 remake, you will come across strange shrines erected by a cult. These can be interacted with, but prompt you to use an item. Unfortunately, you won't even have the chance to open the first couple you find since the item required to open them can't be picked up until a bit later -- and only if you know where to search for it. But it's ro say that the treasures you get from them make it worth your time to backtrack and grab all the goodies inside. Here's how you can open all the Wayshrines in the Resident Evil 4 remake, and what each one holds inside.
How to get the Wayshrine Key

Surprise surprise, but Wayshrines can only be opened once you grab the Wayshrine Key. It will feel like a long time, but you can't even access the key until you reach Chapter 4 and beat Del Lago. Once you can explore the lake, head south to the Mural Cave. Deep in the caves, you will find an ornate cabinet after solving the puzzle in the cave. You can get there by going down the path from the southern dock and through the section with the two large stone hands. Thankfully, unlike Small Keys, the Wayshrine Key is reusable and can open every Wayshrine in the game.
How to 0pen Wayshrines

Read more