How to make a beacon in Minecraft

Minecraft beacons are a high-end crafting goal that helps you show off, find your way, and get some valuable bonuses. When constructed, the beacon shoots, well, a beacon into the sky — a tower of light players can see from a fair distance away.

Difficulty

Hard

Duration

1 hour

What You Need

  • Minecraft

  • Plenty of time

You can use this beacon to mark your favorite village, the castle you’ve created for yourself, or a wide variety of creative options. When completed, you can level up your beacon to provide a variety of boosts just from activating it. Here’s everything you need to know!

Gather beacon materials

Minecraft beacons are one of the more challenging items to create, suitable for ambitious players (who want to show off a little). Here’s what you need and where you can find it.

Step 1: Five glass blocks. You can get glass by mining blocks of sand and combining five or more in a furnace, making this a particularly easy step.

Step 2: Three obsidian blocks. Obsidian is a rare ore, and isn’t traded, so you can’t really count on old-fashioned RNG to find it. Instead, you can either search underground until you happen to stumble across a site, or find a handy pool of lava and pour buckets of water on it to create layers of obsidian.

However, normal pickaxes won’t work when mining obsidian. You’ll need a diamond or Netherite pickaxe to make a dent, so make sure you’ve crafted one of these before you begin.

A Nether Star in Minecraft.
Image used with permission by copyright holder

Step 3: One Nether Star. This is where things get really challenging. You only get Nether Stars from The Wither, a boss you must construct in the Nether itself. The Wither requires materials like soul sand and wither skeleton skulls, so it will take some time to build itself. When animated, The Wither is considered one of the most dangerous bosses in Minecraft, so be prepared for a tough fight against the undead monstrosity. The good news is that The Wither is guaranteed to drop a Nether Star when it is defeated.

Create your pyramid and construct your beacon

Now you’re ready to build your beacon. But there’s a catch — beacons only work when placed on top of a pyramid. You can build a pyramid up to four levels — here’s how.

Step 1: Your pyramid must be made of iron, gold, emerald, diamond, or Netherite blocks. Luckily, it doesn’t matter which — the materials you choose are entirely for showing off. The easiest method will be using iron. However, you will need a lot of blocks to build up your pyramid.
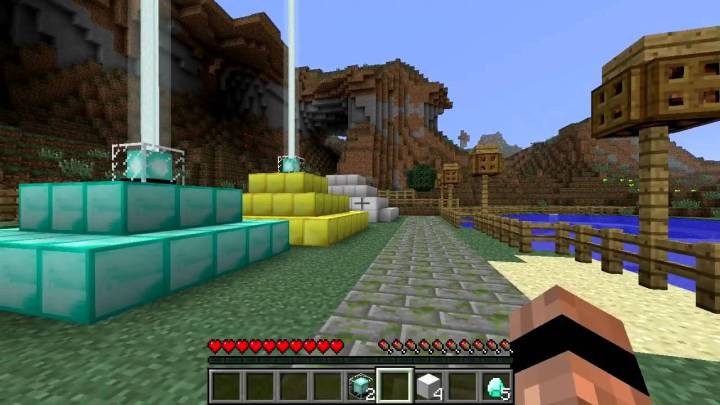
Beacon Pyramids in Minecraft.
Image used with permission by copyright holder

Step 2: The simplest pyramid is one 3-by-3 base, which takes nine blocks. A two-level pyramid has a 5-by-5 base and 3-by-3 second level, for a total of 34 blocks. By the time you get to level four, the base of the pyramid is 9-by-9, then 7-by-7, 5-by-5, and 3-by-3, for 164 blocks total. Time to get started crafting!

Step 3: Note you cannot use your beacon underground or under a covering, so make sure your pyramid has access to the sky when you build it.
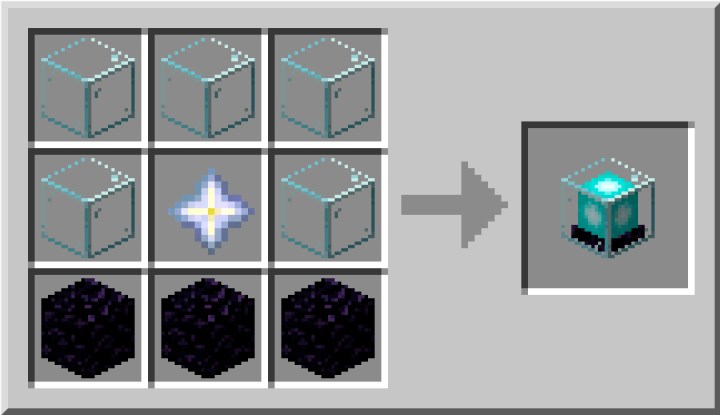
The Minecraft Beacon Recipe.
Image used with permission by copyright holder

Step 4: Construct your beacon by placing the five blocks of glass in an arch at the top of the crafting window, the obsidian in a layer at the bottom, and the Nether Star in the center. In the center of the highest pyramid level, place your beacon, and it should light up if everything is right.

Minecraft Beacon Colors.
Image used with permission by copyright holder

Step 5: You can cover your beacon with a glass pane without blocking it. If you add a dye into your glass pane recipe, it will change the glass color, and will also change the light of the beacon shooting through it. Use this method to change the color of your beacon.

Minecraft Beacon Level Up options.
Image used with permission by copyright holder

Using beacon power-ups

Now you are ready to use beacon power-ups! Approach and open its menu. You can sacrifice iron and gold ingots, diamonds, or emeralds to customize it with the power-ups that you want. The more levels to the pyramid, the more you can level up the power-up tree and enhance the benefits. Boosts include speed, jump boost, health regeneration, strength, and more.

Editors' Recommendations

Tyler Lacoma
If it can be streamed, voice-activated, made better with an app, or beaten by mashing buttons, Tyler's into it. When he's not…
How to change your appearance in Baldur’s Gate 3
A party of four adventures walking through a mushroom forest in the Underdark

Making your character can take a long time if you really want to get all the details right. From your race, class, hairstyle, and more, you have a lot of options to tweak before ever starting your adventure. If you're a little too excited, you might end up slacking off on making your character and assuming you can update it later just so you can get right into the action. If so, or you simply want to change up your look after a couple of hours into this massive game, you'll be at a loss as to how, if you even can, change your appearance in Baldur's Gate 3. You may not fully like the answer, but here's the best you can do in terms of altering your appearance after you've exited the character creator.
Can you change your appearance in Baldur's Gate 3?

The answer to this is technically yes, but not in the way you would hope. To get it out of the way, no, there's no way to return to the character creation screen after you've finalized your character. Unlike respeccing your character, there's no NPC, item, or magic mirror anywhere in The Forgotten Realms that will let you change your appearance.

Read more
Mortal Kombat 1 Fatalities: how to do every character’s Fatality
Shang Tsung stealing someone's soul in Mortal Kombat 1.

What set the Mortal Kombat franchise apart when it first hit arcades was just how brutally violent the games were. It looks tame now, but the Fatalities of the original game were some of the most shocking things anyone had seen in a game up to that point, pixelated graphics and all. With Mortal Kombat 1, NetherRealm continues to churn our stomachs with some of the most disgustingly detailed ways to dismantle your opponent. Everyone loves seeing these creative ways your favorite fighter can definitively end a fight, but if you want to show off to your friends and humiliate your enemy, you have to know the specific button input to pull it off for each character. There are more that you can unlock, but here is how to perform every character's basic Fatality in Mortal Kombat 1.
How to perform all basic Fatalities
Here are all the default inputs for every character's Fatality on PlayStation and Xbox controls in alphabetical order, as well as what range you need to be at to trigger the Fatality. Once you have reduced your opponent's health to 0 and they are susceptible to a Fatality, which you will know from the announcer calling out "Finish him" or "Finish her," you will have five seconds to input the correct sequence.
Ashrah - Mid range
Down, Forward, Down, Triangle/Y
Baraka - Close range
Back, Forward, Down, Square/X
General Shao - Mid range
Back, Forward, Down, Square/X
Geras - Mid range
Forward, Down, Down, Circle/B
Havik - Close range
Down, Forward, Down, Circle/B
Johnny Cage - Close range
Forward, Back, Down, Triangle/Y
Kenshi - Close range
Forward, Down, Down, Triangle/Y
Kitana - Mid range
Down, Forward, Down, Circle/B
Kung Lao - Mid range
Down, Down, Back, Circle/B
Li Mei - Close range
Forward, Back, Forward, Cross/A
Lui Kang - Close range
Back, Forward, Down, Circle/B
Mileena - Close range
Back, Forward, Back, Square/X
Nitara - Mid range
Down, Down, Back, Square/X
Raiden - Close range
Back, Forward, Back, Triangle/Y
Rain - Close range
Down, Down, Back, Circe/B
Reiko - Mid range
Down, Down, Back, Triangle/Y
Reptile - Mid range
Forward, Back, Down, Circle/B
Scorpion - Mid range
Down, Forward, Back, RT
Shang Tsung - Close range
Back, Down, Down, Circle/B
Sindel - Mid range
Down, Back, Down, Square/X
Smoke - Any range
Back, Forward, Down, Square/X
Sub Zero - Any range
Forward, Down, Down, Triangle/Y
Tanya - Close range
Down, Back, Down, Cross/A
All Kameo Fighter Fatalities
Cyrax - Mid range
Forward, Back, Forward, RB
Darrius - Mid range
Down, Back, Forward, RB
Frost - Mid range
Back, Down, Back, RB
Goro - Close range
Back, Forward, Down, RB
Jax - Far range
Down, Forward, Down, RB
Kano Mid range
Back, Down, Forward, RB
Kung Lao - Mid range
Forward, Back, Forward, RB
Sareena - Mid range
Back, Down, Down, RB
Scorpion - Mid range
Down, Forward, Down, RB
Sektor - Mid range
Back, Forward, Back, RB
Shunjiko - Mid range
Down, Back, Down, RB
Sonya - Mid range
Back, Forward, Down, RB
Stryker - Mid range
Forward, Down, Forward, RB
Sub-Zero - Mid range
Forward, Down, Forward, RB

Read more
How to start The Teal Mask DLC in Pokémon Scarlet and Violet
Key art featuring new characters and Pokémon that are in The Hidden Treasure of Area Zero: The Teal Mask.

The first of two announced DLC expansions for Pokémon Scarlet and Violet has hit, called The Teal Mask. Both DLCs will introduce new places, items, moves, and, most importantly, Pokémon to catch, train, and befriend. This initial adventure will take your trainer to the Land of Kitakami, but excited trainers might be at a loss for how to actually access the new area and content. Because it's integrated directly into the main game, and not an option you can select from the menu, you will need to know how to reach the DLC. This won't take long, so here's how to access The Teal Mask in Pokémon Scarlet and Violet so you can continue your Pokémon journey.
How to access The Teal Mask DLC

After purchasing and installing the DLC for your specific version of Pokémon Scarlet or Violet, either load up your save or start a new game. You will need to either play up through, or have a save already past, The First Day of School chapter. Once you are past that point, you will automatically get a call from Jacq telling you about an annual trip to Kitakami that you, as it just so happens, will be chosen to attend.

Read more