How to make a torch in Minecraft

Humans require fire, and the virtual world is no different. Without flames, we can’t boil water, cook food, or receive warmth. When investigating caves, we need flames to light our way. This guide shows you how to make a torch in Minecraft so you can light up any dwelling, dungeon, temple, or whatever else that requires illumination.

Here we show you how to make two different torch types: Normal and redstone. There’s no real visible difference between the two save for the light they shed. However, there’s a big mechanical difference: One can power redstone and all related items while the other cannot.

You’ll need to gather a few items first and place your Crafting Table and Furnace (optional) in the Overworld to make these items.

What you need

Minecraft Trees
Image used with permission by copyright holder

Wood — Go find yourself a batch of trees and chop them down. Your lumberjack skills will result in little blocks of wood logs (Survival Mode) scattered across the terrain that you need to gather. You can use any tool to chop down trees — even your fist — except for a sword. You can also use any type of wood to craft a torch.

Minecraft Coal Ore
Image used with permission by copyright holder

Coal — Coal ore blocks are typically found within four to fifteen blocks under the surface. You’ll need a pickaxe to mine one piece of coal from a coal ore block.

Minecraft Redstone Ore
Image used with permission by copyright holder

Redstone — Redstone ore blocks are typically found within 10 to 25 blocks under the surface. To gather redstone dust (also known as redstone) from this ore, you’ll need a diamond or iron pickaxe.

Make wood plank blocks
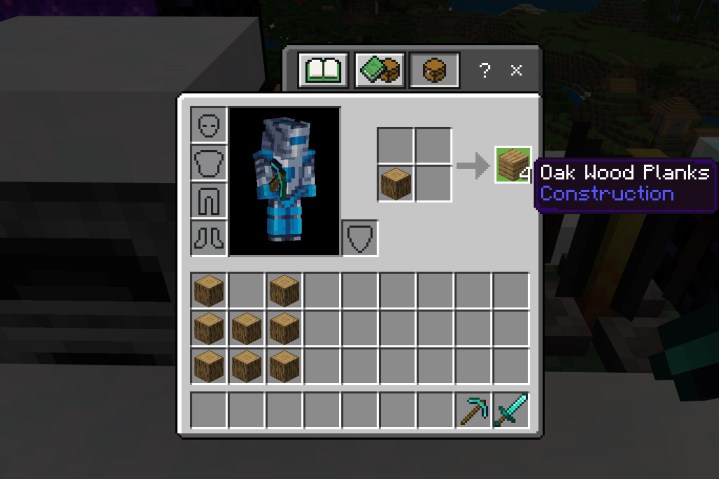
Minecraft Create Oak Wood Planks
Image used with permission by copyright holder

First, we need to convert logs into planks so we can make sticks.

Step 1: Open your inventory (shown above) or Crafting Table.

Step 2: Place one wood log block into any crafting grid square. You can use stripped wood as well.

Step 3: Drag the resulting four wood plank blocks down into your inventory.

Step 4: Repeat these steps to get all the wood plank blocks you need.

Make sticks

Minecraft Create Sticks for Torches
Image used with permission by copyright holder

Here we create the torch body using sticks generated from the planks.

Step 1: Open your inventory (shown above) or Crafting Table.

Step 2: Place one wood plank block into any square in the top row.

Step 3: Place one wood plank block directly below in the second row.

Step 4: Drag the resulting four sticks down into your inventory.

Step 5: Repeat these steps as necessary to create additional sticks.

Optional: Make charcoal

Minecraft Make Charcoal
Image used with permission by copyright holder

You really don’t need charcoal to make a torch — this is just an alternative method and good practice if you ever need charcoal later.

Step 1: Open your Furnace.

Step 2: Place coal into the bottom square.

Step 3: Place one wood log block into the top square.

Step 4: Drag the resulting charcoal down into your inventory.

Note: You can place multiple wood log blocks and coal chunks into the furnace to make more than one charcoal in a single sitting.  The Furnace will continue to make charcoal until resources are depleted.

Make standard torches

Minecraft Create Torch
Image used with permission by copyright holder

With sticks and coal (or charcoal) in hand, we can now make our torch! This version illuminates a soft white against the surrounding blocks.

Step 1: Open your Crafting Table.

Step 2: Place one coal or charcoal into the middle square in the top row.

Step 3: Place one stick directly below into the middle square in the second row.

Step 4: Drag the resulting four torches down into your inventory.

Step 5: Repeat these steps until you get all the torches you need.

Make a redstone torch

Minecraft Create Redstone Torch
Image used with permission by copyright holder

If you want red lighting, the redstone torch delivers. It spills a slightly darker and narrower red hue against the surrounding blocks. For a comparison between the two torch types, check the image below.

However, as you may have guessed, the redstone torch is more than just a pretty light: It’s what powers redstone and all related items, like redstone lamps, pistons, doors, and more.

Unlike crafting a normal Torch, you’ll only produce one redstone torch at a time.

Step 1: Open your Crafting Table.

Step 2: Place one redstone (dust) into the middle square in the top row.

Step 3: Place one stick directly below into the middle square in the second row.

Step 4: Drag the resulting one redstone torch down into your inventory.

Step 5: Repeat these steps until you get all the redstone torches you need.

How to make a torch in Minecraft
Torch (left) vs. redstone torch (right) Image used with permission by copyright holder

Editors' Recommendations

Kevin Parrish
Former Digital Trends Contributor
Kevin started taking PCs apart in the 90s when Quake was on the way and his PC lacked the required components. Since then…
How to get tech parts in Spider-Man 2
Spider-Man attacks enemies in Marvel's Spider-Man 2.

Amid all the different tokens, memories, and photo-ops you need to collect in Marvel's Spider-Man 2, the one material that is both the most common and most necessary is Tech Parts. With the exception of your abilities, which only require skill points you earn by leveling up, essentially everything you can unlock or upgrade in the game will cost Tech Parts alongside one other material. You might think you will never run low early on when you start getting them in batches of over 100 at a time, but once you start unlocking all the slick new suits and styles and gadgets you want to upgrade, you'll realize just how desperate you are to get more. Your spider-sense can't help you with this one, so here are the best ways you can get Tech Parts in Spider-Man 2.
Best ways to get Tech Parts

Tech Parts are the most basic upgrade component in Spider-Man 2, and the city is full of them. But you're better off using these methods to get them rather than others.

Read more
How to get Rare Tech Parts in Spider-Man 2
Peter and Miles perched next to each other in Marvel's Spider-Man 2.

The amount of upgrade materials in Marvel's Spider-Man 2 can make your head spin at times. From all the different tokens, parts, and plain skill points, it can be hard to keep them all straight, let alone where you find each one. The game does a decent job of letting you know what rewards any activity on the map will give you by highlighting it, but when you're hunting for Rare Tech Parts it can be a pain to slowly scroll around looking for a way to snag some. Plus, if you want to be efficient in getting them, it will take even longer. Here is how you can get Rare Tech Parts in Spider-Man 2 so you can get your upgrades done and save the day.
Best ways to get Rare Tech Parts
Technically Rare Tech Parts aren't any harder to get than other collectables like City Tokens, but are "rare" because you get them in much smaller quantities than normal Tech Parts. If you're hunting for them, your first stop should be any of the Prowler Stashes. These unlock very early in the story after Miles talks to his uncle and is sent to one to demonstrate how they work. Once you know how to solve the little environmental puzzles, they won't take you too long to get through, and they continue to appear as you move through the story. You get three for each you open.

Hunter Blinds are your next best source for Rare Tech Parts, giving five for any you complete, and are basically the opposite of Prowler Stashes. Instead of a little environmental puzzle to solve, these are combat (or stealth) focused encounters, so you can swap between them to add some variety to your Rare Tech Parts grind!

Read more
How to get City Tokens in Spider-Man 2
A fleet of drones flying towards new york.

New York is packed with different tasks, quests, and activities to complete as either one of your friendly neighborhood Spider-Men in Marvel's Spider-Man 2. In-universe, Peter and Miles will go out of their way to help anyone in need with no expectations of a reward, but as a player, we want a little prize for every task we do. Aside from just racking up XP, there are tons of materials you will need to upgrade different aspects of your heroes, such as Gadgets, Abilities, and even getting new suits. City Tokens are used for many of these upgrades so having a reliable source will make sure you are able to keep up with the deadly villains facing our heroes. Here is how to get City Tokens in Spider-Man 2.
How to get City Tokens in Spider-Man 2

City Tokens are mostly used for unlocking new suits and suit styles but are occasionally required for other upgrades as well. If you're running low, the easiest method to get some is to complete Photo-ops. There are 23 of these scattered across the map for you to track down, and each one rewards you with two City Tokens just for snapping a quick picture. If you're a particularly skilled photographer then you can even get a lot of the shots without even stopping while swinging by.

Read more