
While Middle-earth: Shadow of Mordor ends with a bit of a whimper, Shadow of War draws out its endgame with a long epilogue designed to test every skill Talion has learned up to that point. The 10-stage chapter, called Shadow Wars, becomes available after completing the game’s final story mission, The Bright Lord, and focuses entirely on the game’s siege missions. Tasked with defending fortresses in four different regions, Talion must maintain his orc army, and outfit each building with a number of hazards to keep the orc hoards at bay. Should he be struck down, or find the fortress overrun, he will need to launch a counter-attack and retake it.
Shadow Wars is, without question, the hardest part of Buy Now . It’s lengthy and features the strongest enemies you face in the entire game, and just a few mistakes can lead to hours of work as you build the force you need to retake your fortress back and defeat the new overlord. The task is daunting, so we have some tips and tricks to help you excel in the never-ending wars of Mordor.
Defending

If you’re an elite Shadow of War player, you never have to worry about attacking a fortress during Shadow Wars at all. Instead, you will be putting all your energy and time into defending four regions — Cirith Ungol, Gorgoroth, Nurnen, and Seregost — from invading armies. At this stage in the game, defending a fortress is much more challenging than taking one, as you’ll be facing many high-level war chiefs and captains looking to lop off your head. With a little preparation, though, you can endure and emerge victoriously.
Invest in your army
Your own skill in combat isn’t completely irrelevant in Shadow Wars, but it plays second fiddle to that of your orc followers. When Shadow Wars begins, most of your forts will, at best, have a group of war chiefs somewhere around level 40. This isn’t terrible for the first few stages, as enemies will be around the same level, but the hordes will level up much faster than your own army. If any of your orcs happen to die, you will be even worse off.
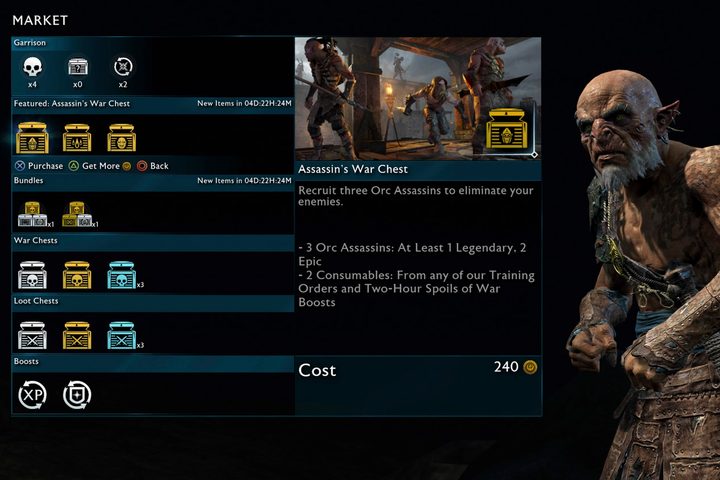
To compensate for this, don’t be afraid to spend some Mirian in the market to purchase silver war chests. At 1,500 apiece, a few chests won’t hurt too much if you’ve been saving over the course of the campaign. Purchase as many chests as you need to bulk up your defenses to include six high-level war chiefs, and you shouldn’t have a problem dealing with enemies.
Counter your enemies’ offense
Before you begin a fortress-defense mission, you have a chance to see the list of war chiefs you have to face. Along with their level, strengths, and weaknesses, each war chief also has a special siege ability indicating what kind of forces they bring to the fight. Some war chiefs will bring special troops, like Caragor riders or defenders. Others will command a drake, or fire-launching siege beasts. You can purchase and equip defenses to counter these attacks, but your fortress will still go down in a hurry if you don’t fine-tune those defenses to react to the army you’re fighting.
For each siege ability you see listed for the enemy, choose one of your own that can nullify it. Caragors, for instance, are capable of climbing up your fortress’ walls, entering without having to break down the gate, but you can purchase spikes to keep them out. Many different beasts can also make fights more complicated, but a group of hunters can thin the herd before they reach the fortress.
In addition to directly nullifying certain abilities, make sure your anti-siege weapons correspond to the weaknesses of the enemy war chiefs. If multiple war chiefs are immune to poison, for instance, a poison-spewing Siege Beast isn’t going to help much, but a fire-breathing drake will keep them at bay.
Don’t put yourself in danger
Most failed fortress defense missions don’t end in the enemy capturing all objectives, but rather Talion’s death. When several war chiefs are storming through the gate, it may be tempting to leap down immediately and fight them all at once. Don’t do that. You will probably die. Trust in your orcs’ ability to handle most of these situations on their own. In the meantime, you can still influence the fight by firing your bow at grog barrels, landing the occasional stealth attack, and, most importantly, dominating “broken” war chiefs on the battlefield. You can immediately turn enemy generals into new members of your defense force, which can make a big difference later on in the battle.
It can also be tempting head out to the area in front of your fortress and attack a war chief before he even approaches the walls. If he is susceptible to arrows and you’ve already whittled down his health bar, this can be a viable strategy. More often than not, though, it’s just an opportunity for the enemy to gang up on Talion and knock him down a few times. You need those “last stand” chances near the end of the fight — don’t waste them.
Assaulting

Should you be struck down during a fortress defense, you are forced to reclaim the tower with your own assaulting army. Fortunately, it’s a relatively simple operation, provided that you are willing to take the time to do it correctly.
Take out (and enslave) the enemy war chiefs
If you’re in a rush, you can immediately turn around and start the mission to assault your fallen fort and reclaim your overlord’s place in the throne room. We do not recommend this. It will be incredibly difficult, as the enemy will have access to all the defensive siege abilities you have, including spiked walls, reinforced gates, and hellfire cauldrons. Like in story mode, it makes much more sense for you to eliminate those hazards before the mission begins by assassinating the fort’s war chiefs, each of whom corresponds to one of its defenses.
These sub-missions play out much like they do in the earlier sections of the game. You want to first eliminate any captains with ties to a particular war chief, though there will likely only be one or two who aren’t already alone. Next, you have to complete an easy task, such as killing 20 orcs or poisoning three barrels of grog to draw out the war chief.
After all the trouble you’ve gone through to get him out into the open, it can be tempting to murder a war chief in cold blood. If you can, though, it’s much more useful to dominate and draft them into your orc army, instead. If you dominate all the war chiefs you come across before attempting the fortress assault, you will not only breeze to the throne room, but you will have a fully stocked army ready to defend the fortress in the next stage.
Don’t go on a spending spree
Unlike the fortress defenses, which require a fully upgraded fortress, you don’t necessarily need all of the upgrades during an assault. If you eliminated all of the war chiefs already, you will be able to easily move from objective to objective, killing the grunts you run into before moving onto the next one. The whole process should only take a couple of minutes, and you will be able to save the Mirian for defending another fortress in the future. However, if you do spend some money on a particular upgrade, it will still be available for you in that region during later Shadow Wars stages.
The one exception to this spending rule is for gear. If your equipment is making fights too difficult and you chose to enslave the war chiefs instead of killing them, your best option for new gear is in the marketplace. Silver loot chests you can purchase with in-game currency will only give you “rare” equipment, but you can purchase a silver war chest and then trade in its orcs for higher-level weapons and armor. It will cost a little more than you should usually be spending, but it’s helpful in a pinch.
Bring a buddy into the throne room
Once you have made your way into the throne room to confront the overlord, you are in for a very difficult fight. While Talion maxes out at level 60, overlords can reach level 65, often have multiple immunities, and will be guarded by a posse of powerful orcs who can cause a lot of headaches. You can, however, make the fight more manageable by bringing along a friend or two.
Before beginning a fortress assault, make sure you’ve assigned an orc to be your “bodyguard.” At any point, you can press right on the directional pad to summon your bodyguard, and they will be able to distract the overlord and his minions, allowing you to get some extra hits without worrying about getting overrun with enemies. Just make sure they are a high level, as weaker characters can easily get cut down early in a fight.
In addition to your bodyguard, make sure you have a mount that is compatible for the fight. In the “mounted” skill tree, make sure you invest in the “call mount” skill, as well as the sub-skill “Graug call.” This will allow you to summon the enormous beast in the middle of a fight, and while some overlords are immune to beasts, you can still use the Graug to take out their minions and make the fight a little easier. A few are even “beast fodder,” so you can have your giant friend do all the work while you sit back and fire arrows from one of the two high walls on either side of the room.
For more on Middle-earth: Shadow of War, check out our review. The game is available for PlayStation 4, Xbox One, and PC.


