
How to open Prowler Stashes in Spider-Man 2

The Prowler, aka Miles Morales’ uncle, has hung up his hood and retired from his life of crime by the time Marvel’s Spider-Man 2. Even so, after a talk with Miles, it is revealed that he left quite a few stashes of materials around the city that, since he is under house arrest, he can’t access anymore. Rather than let them go to waste, you’re sent out to collect these little resource caches to use for yourself. These are an easy way to earn yourself some Rare Tech Parts, but the Prowler didn’t just leave them out in the open. Here is a breakdown of how you can access Prowler Stashes in Spider-Man 2.

How to open Prowler Stashes

A mini-game to open a prowler stash.
Sony Interactive Entertainment

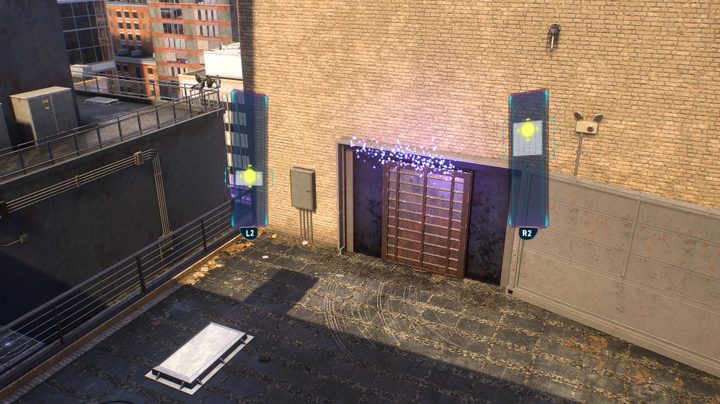
Once you get into the area where a Prowler Stash is, the hunt begins. The first step is locating the stash, which is camouflaged, so you need to use your mask to track it down. By holding down L2, you can scan the area and follow the sounds until you narrow down the correct spot. You have to aim at the right spot and be close enough to reveal it.

From there, you need to reveal the hidden area by opening up a secret area with your webs. Depending on how the door opens, you need to position yourself either to the side or above it to attach your webs to pull it open. Unlike normal yanking doors, these require you to hold both L2 and R2 at different pressures against the resisting triggers to keep them within the yellow zones of the bars on the screen. Once both are in position, you have to hold them there for a couple of seconds before you finally swing it open. This usually has to be done one more time to open a second door, but the method is exactly the same.

Once all the doors are open, you can stroll in and collect your loot to unlock some sweet upgrades.

Editors' Recommendations

Jesse Lennox
Jesse Lennox loves writing, games, and complaining about not having time to write and play games. He knows the names of more…
The best vocations in Dragon’s Dogma 2
Dragon's Dogma 2 key art featuring a knight with a fiery hole in their chest.

Your Vocation defines your role in combat in Dragon's Dogma 2. Everything from your skills to what weapons and armor you can use is tied to this class. You will pick from just a handful at the beginning of the game, but can easily change Vocations later on, as well as unlock more than twice as many new options than what you start with. It can take a while to really get a feel for a Vocation and how it performs in combat, as well as to look through all of its skills and augments, before knowing if it's worth sticking with to level up. Personal preference will play a part to some degree, but these Vocations have the most potential to make you the strongest Arisen in history.
The best vocations in Dragon's Dogma 2

You can pick from 4 Vocations at the start of Dragon's Dogma 2, but will end up with a total of 10 by the end of the game if you unlock them all. New Vocations are unlocked by completing quests, but they are almost unmissable. Four Vocations -- the Magick Archer, Mystic Spearhand, Trickster, and Warfarer -- can only be used by your character and not any Pawns.
Warfarer
There's very little downside to being a jack-of-all-trades in Dragon's Dogma 2, which is exactly what the Warfarer is. This is the only Vocation that can use any weapon in the game AND learn any skill from other Vocations. This is the only Vocation that really lets you build whatever class you want and gives you the ability to adapt to any situation you find yourself in. The main downside to this class is it has the lowest base stats, but that is a small price to pay for how versatile you can be.
Mystic Spearhand
Hybrid Vocations are all quite powerful, but we put the Mystic Spearhand at the top of the heap. This class turns you into a fighter that can take advantage of magic to output crazy damage. The two almost overpowered abilities you get here are the ability to slow enemies for a short time and to create a magical mimic that doubles all your actions. It is great for both crowd control and large single targets, but takes a while to unlock and lacks some range.
Warrior
If you're going to be a straight-up melee fighter, you might as well hit with the biggest weapon you can, right? The Warrior swings swords large enough to make Guts blush and is a full-on tank. You won't be doing anything fancy with this vocation beyond charging up and swinging as hard as possible. The obvious drawback is any flying or ranged enemy will counter you, so bring some Pawns in those classes to cover your bases.
Sorcerer
For those who fancy themselves a pure mage, stick to the Sorcerer over the actual Mage vocation. While the Mage is more focused on healing, it is the Sorcerer who gets the best offensive spells you will want to be casting. If you have a second Sorcerer with you, you can even sync up and decrease your casting time. If not, you will need some tanks to take aggro while you deal with some slightly long casting times and low total health.
Thief
As far as the starting Vocations go, the Thief is the one we find the most fun and viable for the entire game. This is a light and speedy build focused on critical hits and being able to climb and hang on to large beasts. Once on, you have a number of great skills to stagger and knock down an enemy so the rest of your squad to gang up on it. Just don't get hit because you're one of the squishier Vocations.

Read more
How to get the Finishing Touches achievement in Hogwarts Legacy
A wizard zaps someone off camera with red magic in Hogwarts Legacy,

There are tons of challenges to tackle in Hogwarts Legacy, but few are as time-consuming as unlocking the Finishing Touches achievement. This wild achievement forces you to use very specific attacks on very specific enemies, meaning you'll need to travel all around Hogwarts to find these beasts and go up against them in battle.

While you'll spend a lot of time chasing after all these enemies, there are a few things you need to know before venturing out in search of this achievement. Here's how to get the Finishing Touches achievement in Hogwarts Legacy, including which enemies you need to find and which spell must be cast on them.

Read more
The best places to land in Fortnite (Chapter 5, Season 2)

Survival is key in Fortnite, and it all starts by picking the best starting location. Even if you're an expert player, your likelihood of coming out on top is greatly diminished if you start off on the wrong foot -- whether it be at a barren location with no loot or a hot drop that could lead to a swift death.

As part of Fortnite Chapter 5 Season 2, there's no shortage of fantastic landing spots, but which one is best comes down to your skill and preference. With that in mind, here are the best places to land in Fortnite for veterans, beginners, and everyone in between.
The best places to land in Fortnite
Before jumping into the list of the best places to land in Fortnite, it's important to be aware of what makes a good landing spot. Sure, any place with decent loot might serve you well, but there's more to consider than that. Does a spot have a consistent chest/loot spawn? Are there guaranteed materials? Is it close to other places of interest (POI)s? Is it out of the way? Of course, loot is the most important aspect, but it does you no good to have a stacked loadout if you're stuck in the storm. These recommended landing spots all have some degree of consistency and fantastic loot. they also typically have some quirk that makes them effective depending on your playstyle.
1. Mount Olympus

Read more