
All Resident Evil 4 remake Wayshrines and how to open them

In the opening chapters of the Resident Evil 4 remake, you will come across strange shrines erected by a cult. These can be interacted with, but prompt you to use an item. Unfortunately, you won’t even have the chance to open the first couple you find since the item required to open them can’t be picked up until a bit later — and only if you know where to search for it. But it’s ro say that the treasures you get from them make it worth your time to backtrack and grab all the goodies inside. Here’s how you can open all the Wayshrines in the Resident Evil 4 remake, and what each one holds inside.

How to get the Wayshrine Key

A map of the mural shrine.
Image used with permission by copyright holder

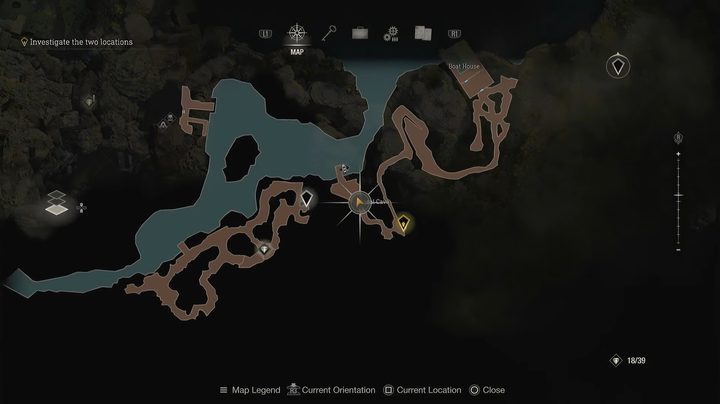
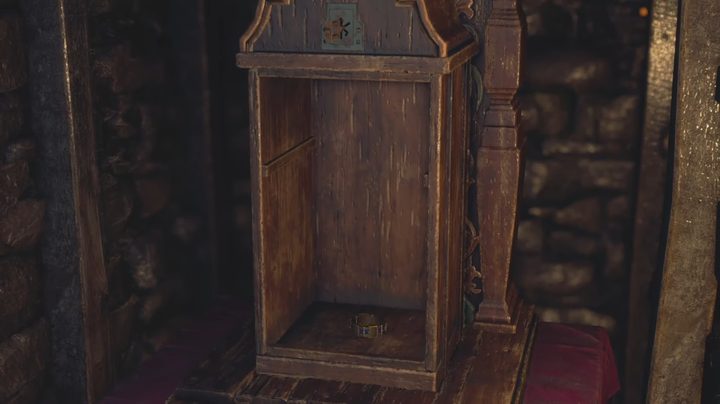
Surprise surprise, but Wayshrines can only be opened once you grab the Wayshrine Key. It will feel like a long time, but you can’t even access the key until you reach Chapter 4 and beat Del Lago. Once you can explore the lake, head south to the Mural Cave. Deep in the caves, you will find an ornate cabinet after solving the puzzle in the cave. You can get there by going down the path from the southern dock and through the section with the two large stone hands. Thankfully, unlike Small Keys, the Wayshrine Key is reusable and can open every Wayshrine in the game.

How to 0pen Wayshrines

An open wayshrine with a bracelet inside.
Image used with permission by copyright holder

Now that you’ve got the Wayshrine Key, it’s time to do some backtracking to all those Wayshrines you were forced to pass by. In total, you will need to go back and open five to reap all the rewards. Here’s the location of each, as well as what treasures they hold for you:

  1. In the farm area you come to following the critical path of the story immediately after the opening village section, go to the northeast side and behind the barn. Crack the Wayshrine open and claim your Antique Pipe.
  2. Continue forward into the Lakeside Settlement, which you probably recall as the area where villagers first started spamming dynamite at you. To the left of the main house is a small path that leads to a dead end with the shrine. Use your key and pick up the Pearl Bangle.
  3. On the path from the Merchant shop to the Church, which takes you through the Quarry, stop between the Quarry and the area with the Merchant to snag this Wayshrine’s pize. This time, it’s a Butterfly Lamp.
  4. This area isn’t named on your map, but if you ride your boat farther down the river past the Large Cave Shrine, you will find an area to dock on the left side. There’s not much besides the shrine here, which is protecting the Splendid Bangle.
  5. The final Wayshrine is right as you’re about to leave the village and enter the castle in the Checkpoint area. Right outside the house where you are first attacked by two chainsaw-wielding female villagers, the shrine is on the far southwest side of the area, and you can reach it by going to the second floor of the house and taking the platform outside. This one will contain the Elegant Headdress.

Editors' Recommendations

Jesse Lennox
Jesse Lennox loves writing, games, and complaining about not having time to write and play games. He knows the names of more…
All gestures in Lies of P and how to get them
Pinocchio with a blue electric arm.

Even though there's no multiplayer component in Lies of P, there are still plenty of ways you can express your version of Pinocchio. Most people will be interested in getting all the outfits, but there are also plenty of different gestures to unlock that let you perform different little actions around the world for some fun. Being a puppet, it kind of makes sense that you need to learn how to do these poses, but even so, you can't learn them all in a single playthrough. Many are tied to just going through the main story, but most are locked behind sidequests, letters, and how you answer certain questions. Here's the truth behind getting every gesture in Lies of P.
How to get all gestures

There are 17 gestures in total to learn, with one of them specifically locked to one NPC. We will note any requirements or ways to miss a gesture in their description.
Sit
Available by default.
Show off clothes
Speak to Antonia at Hotel Krat.
Remembrance
Read the Frozen Man's Letter found in Elysion Boulevard Entrance.
Stalker's Promise
Defeat the Survivor you can find in Workshop Union Culvert after meeting Red Fox and Black Cat.
Fear
Unlocked when you first speak to Venigni in his control room.
Swagger
After you beat King's Flame, Fuoco, keep talking to Venigni until he runs out of dialogue.
Pray
First, speak to Sister Cecile in St. Frengelico Cathedral Library with the Holy Mark. After this, defeat Fallen Archbishop Andreus and return to where she was to collect Cecile's Written Confession letter. Read it to learn the gesture. If you do not, also bring the Holy Mark to Cecile before beating this boss.
Taunt
Learned after beating The Eldest of the Black Rabbit Brotherhood boss.
Clap
After defeating the prior boss, bring the Portrait of a Boy into the Black Rabbit Brotherhood's hideout.
Sad
This is the reward for finishing Julian the Gentleman's sidequest. This can only be obtained if you lied to Julian.
Respect
Collect the Saintess of Mercy Hall Key from Simon Manus and use it to open the gate at the greenhouse and interact with the statue.
Beg
Give Red Fox and Black Cat some Gold Coin Fruit when they ask at the Grand Exhibition Conference Room stargazer.
Greet
Go back to Hotel Krat after beating the Puppet-Devouring Green Monster of the Swamp and talk to Antonia.
Anger
Talk to Antonia after beating the Corrupted Parade Master.
Happy
Talk to Subject 826 at the Arch Abbey Outer Wall.
Entreat
Go to Sophia's bedroom after beating Laxasia The Complete and speak to her to learn the final gesture.

Read more
All costumes in Lies of P and how to get them
Pinocchio in Lies of P.

Not every Soulslike game has a character creator, but even when they do, it tends not to matter much when you will be covered up for the entirety of the game. Lies of P has you play as a set character, but you are free to dress up your puppet boy however you wish. The only hurdle is that you need to find and collect new costumes in order to wear them. Instead of having tons of individual components like pants, shirts, gloves, boots, and more, Lies of P sticks to simple outfits for your body and accessories that are all headwear such as masks, hats, and the like. These costumes are completely cosmetic, meaning they have no impact on your stats whatsoever, so you can feel free to wear your most outlandish outfits with no drawbacks. There are nearly 30 in all to fill your wardrobe with, so let's go on a shopping spree and go over all the costumes in Lies of P and how to get them.
Every costume in Lies of P

We will start with the outfits, of which there are 18 to find, in alphabetical order. Note that there will be two outfits and three accessories that are preorder exclusive. As of the time of this writing, there is no other option to obtain these outfits but we will update this post should that change in the future.

Read more
All weapons in Payday 3 and how to unlock them
Robbers shoot guns in Payday 3.

No one should walk into a robbery in Payday 3 without a reliable gun in their back pocket. Sure, there are plenty of skills and tools to help you and your gang pull off many jobs with no one being the wiser, but mistakes happen. And when they do, you'll be glad to have some firepower on your side. You won't be picking up or finding weapons on the map in Payday 3, and instead must rely completely on which weapons you have equipped in your loadout before starting a heist. You will only start off with a single assault rifle and pistol to your name, but there is a nice selection of shotguns, revolvers, and marksman rifles to add to your kit. Here are all the guns you can unlock in Payday 3 and how.
All weapons in Payday 3

Guns in Payday 3 are all first unlocked by reaching a certain level. Levels are simply gained by completing heists and objectives in the game, so every match you play will contribute toward your overall level. Once you reach a threshold where a new weapon becomes available, you can head into the Vendors menu and purchase t with your cash so they become available when building your loadout. Here's every weapon you get in the order you naturally unlock them:

Read more