There are a lot of staples that fans have come to expect from the Tales series. From bigger mechanics like Artes and the action-focused combat to skits and, of course, even iconic items like apple gel all make a return in Tales of Arise. However, this new entry also puts a new spin on a lot of things, plus adds in a few fresh ideas that will keep even fans who have played the series from the beginning engaged and guessing. Out of everything new this latest entry adds, arguable the most major in terms of how they can impact your gameplay are the Artifacts.
Artifacts are a new type of collectible in Tales of Arise but aren’t just items you pick up to check off your list. Each one has a different, and sometimes drastic, effect that can change how you play or how easy or difficult the experience is. You will be introduced to them as part of the main game, but the rest are up to you to search out in the world. There are a total of 23 to be found, as well as eight more that are only offered as DLC you need to purchase or are included in bonus editions of the game, which we will separate into their own list if you’re curious about them. For all the others, here’s every Artifact location and its effects in Tales of Arise.
Note: There will be light spoilers ahead, but nothing story or plot-related.
Further reading
- Tales of Arise beginner’s guide
- Tales of Arise: Best early abilities to unlock
- The best Tales games, ranked from best to worst
What are Artifacts?
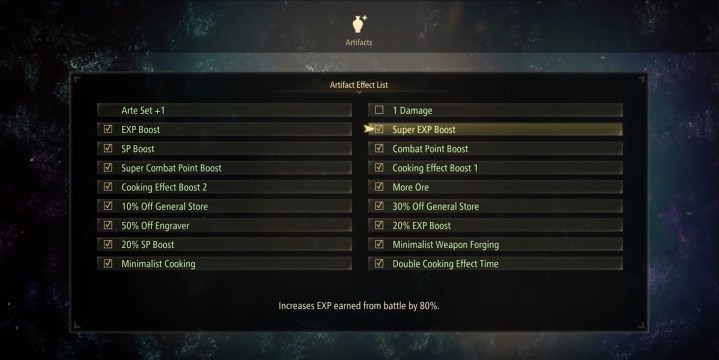
Once again, Artifacts are a brand new addition to the Tales series in Tales of Arise. They’re not overly complex and are actually a pretty easy concept to grasp. They are simply unique items. Again, there are 23 of them that, once found, give you some kind of buff or modifier to your game. These can range from impacting the combat system to raw EXP bonuses or improving the effects of cooking.
Once you’ve found an Artifact, it will be added to your Artifacts menu in your Field Guide. From here, you can see all the ones you’ve found, and choose which ones you want to turn on. Be warned, though — you can’t turn off most of them once you’ve activated them. So, either make a save before turning on any Artifact you feel may unbalance the game or be absolutely sure you’re ready to leave it on for an entire playthrough. Speaking of which, Artifacts also stay with you when you start a New Game+, so you can collect them all in your initial playthrough and then turn them on for your second go to make it a breeze.
You will also get a trophy/achievement for finding 20 Artifacts, so you don’t even need to get them all if that’s what you’re after.
All artifact locations and effects
Crocodile Crusher: The first artifact is automatically given to you during the main quest when you reach Menancia: Mount Dhara — Mountain Trail. This Artifact will give you Arte Set +1, which lets you equip two sets of Artes to swap between in battle. Normally you’re limited to three Artes while grounded, plus three more while airborne, but activating this Artifact will allow you to have six on the ground and six in the air, giving you way more variety and options.
Quivering Candles: This artifact is a quest reward for completing the side quest called The Mysterious Pair, which you can start in Niez. The mission here is to find a specific item, which would be extremely easy, but rather than tell you what you need to find, you have to figure out what item is required based on riddles. The riddles will lead you to go all the way back to Calaglia in the Iglia Wastes. Go as far north in this area as you can and you’ll find a sparkling point of interest on the map you can interact with to get the item.
What the Artifact you get actually does is called More Ore, and that essentially sums up the effect. While exploring, mining spots will produce a lot more ore when you mine them.
Glutton’s Maze: This is another Artifact that you get for completing a side quest. The quest in question is called Gourmet Saga: Prairie Scent and is started in Aqfotle Hills. Finish it up, and this Artifact will give you Cooking Effect Boost 1, which equates to cooking buffs lasting 10% longer than their default time.
Blade of Sealing: You can find the Blade of Sealing inside of a hidden chest in the old tower in Adan Lake, though there are some high-level enemies surrounding it, so you may have to come back for this one after you’ve leveled up quite a bit. Once you’re able to crack the chest open, this Artifact’s effect simply states one damage, and you should take that literally. With this effect active, you, your party, and any enemy you fight can only deal one damage per hit. Why would you want this on? The only reason we could think of is if you just wanted to practice your combos without killing your enemy, like with a training dummy, for instance.
We mentioned making a backup save earlier before turning on any Artifact effects, but want to stress it here because this one can straight ruin your game. This is a JRPG where you’re regularly dealing damage in the 100’s very early on to take out basic mobs, so unless you’re ready to spend potentially hours in a fight, make sure you’re prepared before flipping this on.
Drums of the Master: Here’s another Artifact waiting to be looted in a treasure chest, only this time, there’s a boss guarding it rather than just some tougher enemies. Head to the Top Level of the Thereum Falls, where you will need to beat the boss in order to actually reach the top. But before going farther, detour off the side path that looks like it leads to a cliff. Drop down this edge, and follow the path you land on to reach the treasure.
The drums come with the effect called Combat Point Boost. With this turned on, you will automatically earn 20% more Combat Points per battle.

Lucky Cat Statue: This cute little statue is a reward for doing the side quest titled Echoes, and you can get it in Niez after a certain part of the main story. It’s a simple enough quest, but the Artifact will give you SP Boost, which will increase your SP gained after a fight by 20%.
Glutton’s Code: While in Mosgul, the side quest Global Connection will appear toward the end of the game. Once it does and you wrap it up, you get the Glutton’s Code. Activating its effect will make any buffs you get from cooking last 20% longer, plus it can stack with Glutton’s Maze as well.
Silver Suit of Armor: Another side quest-related one that won’t be available until you’re close to the end of the game, this time you’re looking for the quest called Their Future in Pelegion Level 3. This quest also has the prerequisite of doing another side quest called Missing Lover first, which you can find in Thistlym.
That’s all well worth it for this Artifact, which will make your party earn 20% more EXP from battle.
Hellmask Fiend Skull: This is a tough one to do until you level up a good deal. This Artifact is the final reward for beating Dohalim’s Advanced solo battles in the Viscint Training Ground. The effect, called Reckless Abandon, is almost the exact opposite of Blade of Sealing. Turning this one on makes everyone, again including all enemies as well as your party, deal 100% more damage. That will make fights go by lighting fast, win or lose. Be very careful with this one, since just a few hits, or even one from a strong enemy or boss, can wipe your entire team.
Golden Lucky Cat Statue: If the normal Lucky Cat Statue wasn’t strong enough, do the Untamable Rage quest in Thistlym to unlock the Golden Lucky Cat Statue. It has the same effect, only this time gives you a massive 80% more SP from fights and can be stacked with the regular cat statue, too.
Vivid Sphere: Owls are another type of collectible in Tales of Arise, and each one you find also comes with a reward. The owl in Iglia Wastes, which you can only reach by using Dohalim’s vines to climb up to the highest point on the map, will give you the Vivid Sphere. This Artifact comes with Carry Over Records, which simply gives you the option to bring all your records into a New Game+ run.
Golden Suit of Armor: If you guessed this Artifact was just a better version of the Silver Suit of Armor, you’d be right. By completing the side quest titled Spirit Temple on Traslida Highway, you can get yourself this shining suit of armor that boosts your EXP gain by 80%. Again, you can stack both sets of armor for even more EXP.
Glutton’s Guidebook: Another one you can probably guess the effect of by now, this Artifact is your prize for doing The Phantom Flower of Nivira quest. It starts in Viscint Autelina Palace Library in the latter half of the game and is rather tough. Manage to make it through and you can add another 80% to the timer of your meals. As always, stack them together if you really want to enjoy those buffs.
Drum of Legend: Back to the drums, this is a very late-game quest called Farewell, Mage from Niez. Seriously, you will want to be very high level before trying this one. If you can surmount this challenge, the effect of Super Combat Point Boost will give you 80% more Combat Points from fights.
Devil Sculpture: The next unique Artifact is the Devil Sculpture. If you can power through Dohalim’s Ultimate solo battles in the Viscint Training Grounds, you can now activate the Chaos difficulty setting, which is the hardest option in the game.

Golden Fairy Statue: Once you do the side quest Brave New World, which itself is opened up by beating the Four Lights that come from the Wedge, a new quest in the Fountain Plaza Avenue of Cyslodia will appear called A Humbling Lesson. Finish it up, and you will get this statue that is another buff to the amount of ore you get when mining.
Battle Maiden’s Shield: This Artifact is another tied to finding a specific owl. The bird in question is in Glanymede Castle, specifically the Lord’s Chamber. Find it and you will get the shield that has the effect called Carry Over Equipment. The name really says it all. If you want to bring your equipment into New Game+, turn this baby on.
Broken Machine Gun: While we’re carrying things over into New Game+, grab the Broken Machine Gun from this next owl in the Hidden Chamber within the Riville Prison Tower. While it would be cool to use this gun as a weapon, we’ll settle for it letting you bring both your money and items into your next run of the game.
Trident: The owl in the Lord’s Chamber of Del Fharis Castle comes with an effect called Carry Over Skills. This will, you guessed it, let you bring all the skills you’ve unlocked into New Game+.
Ancient Excavator: If you want to carry over all the levels you’ve earned in your first playthrough, hit up the owl in the Guard Room of the Autelina Palace for this Artifact.
Metal Miner’s Cap: The last tricky Artifact to find is again tied to an owl, but not one you’ll stumble across naturally. You need to go to Uninhabited Island, but you can only go there as part of a side quest called Beyond the Grave, which isn’t even shown to you on your map. You need to know, or randomly happen upon, the Tuah Seashore and discover a letter in a bottle along the coast. From there, you can follow the steps of the quest all the way to the island, where it concludes in a boss fight. The owl will be in the same area as your encounter with th4 boss.
All that trouble will be worth it for Carry Over Arte Proficiencies, allowing you to bring all your Artes and their stats into New Game+.
Machine Beast Statue: The final Artifact is a bit of a chore. It isn’t the reward for finding any specific owl but for finding all of them. If you hunt them all down, though, you can bring all the outfits you’ve unlocked into New Game+.
DLC Artifacts
If you’re curious about the DLC Artifacts, they are available for a bit of extra cash, but completely unnecessary for beating the game. Think of them more like Assassin’s Creed Odyssey’s paid XP boost, only permanent instead of timed. If you’d rather pay to speed things up a bit, go for it, but you’re not missing out by passing on them. Most do exactly what they’re called, but we’ll explain the ones that need it.
- 10% off General Store
- 30% off General Store
- 50% off Engineer
- 20% EXP Boost
- 20% SP Boost
- Minimalist Weapon Forging: This one makes it so the material cost for forging any weapon is reduced by one.
- Minimalist Cooking: Again, just makes all the required ingredients one lower.
- Double Cooking Effect Time
Editors' Recommendations
- All Teddy Bear locations in Fallout 76
- All Trinkets in Tales of Kenzera: Zau, explained
- What is dragonsplague in Dragon’s Dogma 2 and how is it cured?
- The best item recipes in Dragon’s Dogma 2
- All sphinx riddle solutions in Dragon’s Dogma 2