
The best Warzone Marco 5 loadout

With the launch of the Call of Duty: Warzone Season 4 Mercenaries of Fortune update, players have gained access to the new Marco 5 SMG, which has made its way to the top of the weapon meta. It’s common for new seasonal weapons to be excellent and the Marco 5 is no exception, offering competitive damage, fire rate, mobility, and accuracy.

This weapon will likely be nerfed in the coming weeks, so we recommend using it while it’s still effective. But how should you build it and which Perks should you utilize alongside the new SMG?

Recommended Videos

Here, we’ll go through the best Marco 5 loadout in Warzone.

Recommended reading:

Marco 5 overview

The Marco 5 in Call of Duty: Warzone.
Image used with permission by copyright holder

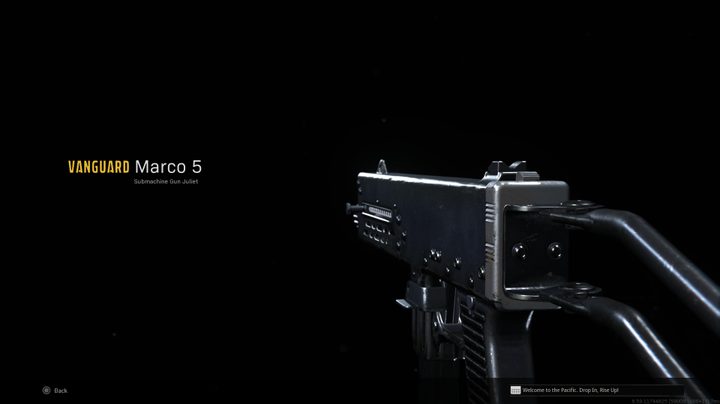
As always, let’s dive into an overview of the new Marco 5 SMG, which is available for free as part of the new Season 4 battle pass. In terms of time to kill (TTK), the Marco 5 is an absolute beast, coming out ahead of many top SMGs in the game. Now, its potential TTK won’t be something you achieve all the time, but if you land headshots, you’ll win most of your gunfights within 12 meters or so.

There are a couple of quirks you should be aware of with this particular weapon. For one thing, it has a burst fire option that doesn’t require you to continuously pull the trigger. This makes it easy to use at mid to even long-range since it’s easier to control. In addition, this weapon can be dual-wielded, which is a devastating combo up close. But don’t expect to hit anything past 7 meters or so since you’ll have to rely on hip-firing.

The best Marco 5 loadout

The Marco 5 in Call of Duty: Warzone.
Image used with permission by copyright holder

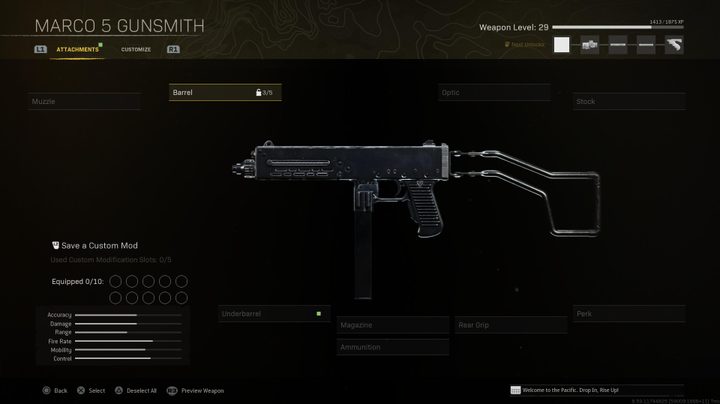
Recommended loadout:

Muzzle: Recoil Booster
Barrel: Imerito 342mm 04P
Optic: Slate Reflector
Stock: Perfetto Esatta
Underbarrel: Mark VI Skeletal
Magazine: 9mm 48 Round Drum
Ammunition: Subsonic
Rear Grip: Fabric
Perk: Momentum
Perk 2: Quick

To ensure you get a fast TTK, we recommend starting off with the Recoil Booster Muzzle, which increases the weapon’s fire rate. This will impact your recoil, as its name suggests, but when using this weapon up-close, you shouldn’t worry too much about that. Next up, we advise going with the Imerito 342mm 04P Barrel for improved bullet velocity, flinch resistance, accuracy, and control. This attachment is best suited for mid-ranged battles but will also counter the downsides of the Recoil Booster.

After that, it’s recommended to use the Slate Reflector Optic so you’ve got a clear picture of your opponents when aiming down sights. Try not to pick an Optic with too much magnification since those attachments will hurt your aim down sights (ADS) speeds. Then, we advise using the Perfetto Esatta Stock for improved recoil control, aiming stability, and ADS speeds.

When it comes to the Underbarrel, there are a couple of viable options that will depend on your playstyle. If you’re struggling to control the recoil, the M1941 Hand Stop will be your best bet, but otherwise, we recommend the Mark VI Skeletal, which boosts your movement speed and ADS times. As for Magazine type, we highly recommend the 9mm 48 Round Drum since it doesn’t have as many downsides as the other choices. If you’re playing Solos, you might be able to get away with the smaller Mag types.

Since this build doesn’t feature a suppressor, we advise using the Subsonic Ammunition type, allowing you to remain hidden on the minimap when firing. After that, utilize the Fabric Grip to boost your ADS speed, sprint to fire speed, and hip-fire accuracy — all of which are useful up close. For Perk 1, we recommend using Momentum for increased movement speed after securing an elimination, along with Quick Perk 2 for faster overall sprinting speed.

Perk 1: Quick Fix
Perk 2: Tempered
Perk 3: Battle Hardened

As of late, there are lots of different viable Perk options, so we recommend picking what works best with your particular play style. With this being a close-range build, we advise using Quick Fix for Perk 1, which immediately starts health regeneration when you apply an armor plate or gain an elimination. This will likely save your life when dealing with multiple foes at once.

Then, it’s a good idea to pick Tempered, a Perk that allows you to max out your armor with two plates rather than three. Finally, go with Battle Hardened to counter players using Snapshot Grenades.

Lethal Equipment: Semtex
Tactical Equipment: Stim

Depending on which map you’re on, you should consider a variety of Equipment. For instance, those on Rebirth Island and even Fortune’s Keep can focus on using Throwing Knives to quickly eliminate a downed player without using ammo. But if you’re on Caldera, Semtex Grenades might work better since your opponents won’t be continuously respawning. As for Tacticals, we advise using Stims with this particular build.

Joseph Yaden
Former Digital Trends Contributor
Joseph Yaden is a freelance journalist who covers Nintendo, shooters, and horror games. He mostly covers game guides for…
Black Ops 6 might be the biggest Call of Duty release ever
Soldiers near a train in Black Ops 6.

Call of Duty: Black Ops 6 is on track to be the most successful Call of Duty release in the franchise's history thanks to a record-breaking launch, according to Activision and Microsoft.

The companies revealed that Black Ops 6 had the biggest three-day opening for the series by many metrics. It had the most players, most hours played, and the most total matches, according to a post on X (formerly Twitter). The game also got a shout-out during Microsoft's quarterly earnings call on Wednesday.

Read more
The best Wildcards in Call of Duty: Black Ops 6
Kill Order gameplay in Call of Duty: Black Ops 6.

The concept of a Wildcard might sound like a risky endeavor in Call of Duty: Black Ops 6, but this part of your loadout isn't random at all. We haven't seen this system since Cold War, and even those who remember it from that game will need to learn all the new cards there are in Black Ops 6. You can only equip a single Wildcard on your loadout, but they are powerful enough to completely redefine your playstyle. So far, there are only six to unlock while grinding through the levels with your friends, but picking just one is still a tough choice, especially if you want to use a permanent unlock on one after hitting Prestige. We've ranked all the Wildcards in Black Ops 6 so you can always have the winning hand.
All Black Ops 6 Wildcards, ranked

There is a level of personal preference in which Wildcard you will find better than others, but in most cases, the ones we've ranked as the best will help every player gain an edge in online matches. Here's our ranking of each Wildcard from best to worst, along with what level you unlock them at.
Perk Greed - Level 54
The last Wildcard you unlock is easily the most powerful. Perk Greed lets you unlock a fourth Perk to your loadout instead of being limited to three, which can borderline break the game if you choose the right set of Perks. It is also the most versatile of the Wildcards since it gives you the most options to play with instead of a specific bonus you may not find useful. It can also more easily unlock the special bonus buff you get for equipping three Perks from the same category.
Gunfighter - Level 33
Right in the middle of the unlock list, Gunfighter is one Wildcard you could easily make a case for over Perk Greed in some situations. This one increases your attachment points for your primary weapon by three. If you're rocking a top-tier weapon already, this Wildcard can let you tweak its stats even higher. We rank it second because it only applies to one weapon and thus is a bit more limiting.
Overkill - Level 24
For such an early Wildcard, Overkill is quite a powerful choice. This card lets you equip any weapon (except melee weapons) in your Primary and Secondary slots instead of the ones typically reserved for each. That means you can build a loadout with two Primary weapons and be far more versatile on the battlefield. Instead of having to trade off range, damage, rate of fire, mobility, or any other aspect of your game, you can cover almost all your bases by picking two Primary weapons that cover each other's weaknesses.
Prepper - Level 45
Field upgrades are powerful, don't get us wrong, but having two instead of one isn't always that much of a game-changer. It's a bit less useful than Gunfighter only because field upgrades are more situational and require more attention to use to their full potential. If that's you, then this is a great choice.
Danger Close - Level 38
Who doesn't want another grenade, Molotov, or combat axe? Is getting a second Lethal worth the Wildcard slot, though? Not in our opinion. Most of the time, Lethals are used in desperation or as a way to deny enemy movement for a time, and even then, they are risky because of how vulnerable you are while using them.
Tactical Expert - Level 15
The first Wildcard you get is better than nothing, but only just. It's exactly like Danger Close, only you can hold two Tacticals instead of Lethals. This is, by nature, a little worse since Tacticals don't have the ability to kill an enemy (unless you get super lucky and you directly hit an enemy with one who is on low HP). You can get some use out of them, but you're better off upgrading as soon as you have another option.

Read more
The best Perk-A-Colas in Call of Duty: Black Ops 6
A screenshot from Call of Duty: Black Ops 6's zombies mode.

There's nothing more refreshing than taking a nice big swig of a Perk-A-Cola during an intense Zombies match with your pals in Call of Duty: Black Ops 6. Besides tasting great (we assume), these colas empower you with buffs that will keep you alive until the later rounds. These bonuses are just as important as the Pack-A-Punch, but come in a wider range of flavors. It is possible to stack them all, but that gets expensive very fast so you need to be thrifty about choosing which ones are most valuable early on. These colas come in eight different types that may or may not be worth your Essence to chug. If you want to know which ones are the best in Black Ops 6, check out our ranking.
Best Perk-A-Colas in Black Ops 6

We're ranking these Perk-A-Colas based on their base bonuses, not any additional effects you can get if you Augment them, from best to worst.
Jugger-Nog
You can never go wrong with the classic Jugger-Nog. Increasing your health by 100 is useful for the entire duration of a Zombies mode, but especially in the early rounds. Going down is at best a major setback and at worst a cascade into defeat. This extra health allows you to get out of a bad situation that would otherwise end your run.
Quick Revive
This Perk has two components, with the less useful one being the ability to revive teammates 50% faster. Ideally, that shouldn't be needed but is nice. However, what makes it rank so high is the 50% shorter delay on health regen. Your health will come back over time in Zombies but at a dreadful pace. Starting to heal faster means less time running and kiting zombies around and more time in the action helping the team.
Speed Cola
The best early guns for Zombies mode have a large magazine, fast reload, or both. Running out of ammo at the wrong time and not being able to get more rounds in the chamber fast enough has ended many a run, but Speed Cola is the solution. It will speed up your reloads and armor plating by 30%. That's not a massive number, but fast enough to make the difference.
Stamin-Up
These zombies aren't the shambling types. They will chase you down like sprinters, and some of the monstrous ones can outpace you even at full tilt. Stamin-Up sounds like it would let you run for longer, but actually just lets you run faster since you have no limit on sprint in Black Ops 6. Positioning is everything in Zombies so being able to get where you need to be faster is never a bad thing, especially if it's a downed teammate bleeding out.
Deadshot Daiquiri
Every zombie has a weak spot, which is most often the head. Deadshot Daiquiri makes a critical hit hurt even more than normal, plus increases your auto-aim on those weak points when you aim down sights (ADS). That second part shouldn't factor much if you've got good aim, which is why this is only a decent Perk-A-Cola.
PhD Flopper
Not being able to hurt yourself is situationally useful, and the ability to cause an explosion by diving is a risky move. Yes, it's cool, but you don't want to be lying prone surrounded by zombies. This is a cool gimmick, but save yourself the Essence and skip it.
Elemental Pop
When Elemental Pop works, it's great. The problem with it is that you can't rely on it. It gives a small chance on every shot you take to add a random ammo mod effect, which is cool but impractical. If you have spare Essence on you, sure, it won't hurt you to have, but it isn't something that will turn the tide for you or your team.
Melee Macchiato
Finally, Melee Macchiato bottoms out the list. It is fine in the early game when the hordes are small and you're better off meleeing enemies since it will smack enemies away with each hit, but quickly drops off in usefulness. When the zombies get too strong and too numerous, you will need a lot more than a strong punch to deal with them and end up forgetting you even have it.

Read more