Tired of manually adjusting the temperature in your home? Sick of those costly energy bills in the summer and winter months? It sounds like a Nest Thermostat could be a worthwhile investment.
Manufactured by Google, Nest Thermostats are web-connected smart thermostats that allow you to remotely control the temperature in your home using your phone, tablet, and even voice commands with a compatible smart speaker or smart display.
Available in several models and generations, installing a Nest Thermostat takes a little bit of time and patience but can be a totally do-it-yourself (DIY) endeavor if you're willing to put aside an hour on your next free weekend.
Can you install a Nest Thermostat?
For some, installing one of these smart devices might seem complicated and intimidating; after all, there’s wiring to worry about, right? The truth is, manufacturers like Nest have made installing a smart thermostat so easy that anyone can do it — even if you have zero experience with any kind of wiring. Here’s everything you need to know.
Decide on your level of smarts: Choose your Nest
Before you install anything, you’ll have a choice to make, at least with a Google Nest thermostat: The specific model.
Nest has a few different models, like the original Nest Learning Thermostat and the newer 2020 Nest Thermostat. Both install in much the same way. If you want to go into detail on which one is best, check out our comparison: Google Nest Thermostat versus Google Nest Learning Thermostat.
The Nest Learning Thermostat is the flagship model. As the name suggests, it learns your home and your comings and goings, and it can automatically respond to adjust temperatures. Then, over time, it takes this pattern of recognition and adapts your energy usage. It’s super smart (with app and voice control), but it comes at a price — the Nest Learning Thermostat runs about $249.
The new Nest Thermostat was launched late in 2020. (Want to know how it works in detail? Read our Google Nest Thermostat (2020) review: A little less, yet still the best.) This is what you could call a budget model. Coming in at a wallet-friendly $129, it makes this smart technology far more accessible. But with its pared-down price tag comes fewer smarts — you’ll need to program this thermostat yourself, but beyond that, you still get an adaptable smart thermostat that knows when you’re home and when you’re not, with a companion app and voice control for a great price.
Check your furnace compatibility
Before you click the Buy button, verify that the device will be compatible with your furnace. Nest’s website lets you check before you buy. It's disappointing to think you’re about to add cool new tech to your home only to have to ship it back for a refund. Avoid frustration and check in advance by going to Nest’s website.
How can you tell? Just pop the cover off your current thermostat and see which wires you have now. Input your findings into the website checker and wait for your results.
Look for a C-wire
In some cases, you will need what’s called a C-wire to properly power your thermostat. A C-wire is just one of the wires that runs from the furnace to the thermostat. When you peek behind the cover, you’ll be able to see what you’ve got. If you have an older furnace system without a C-wire, it will likely work with a Nest Learning Thermostat, but not so much with the new 2020 Nest Thermostat.
While Nest Thermostats are easy to install yourself, you can also have an HVAC technician help you out. With compatibility assured, you’re ready to install your Nest Thermostat.
Not sure if Nest is the one for you? Dig in to our list of the best smart thermostats for 2022 to find more choices.

Step by step: How to install your Nest thermostat
There are essentially three phases to this process: Installation, setup, and programming or learning.
Step 1: The first thing you'll want to do is download the Nest app. The best part is that the Nest app will guide you through the process step by step and offer helpful videos and photos.
Step 2: Next, turn off the power for your home's HVAC. While most furnace systems are low voltage, you still need to turn off the breaker to the system for safety.
Step 3: Remove your current thermostat cover. Take a photo of the existing wiring. You’ll need this for reference later.
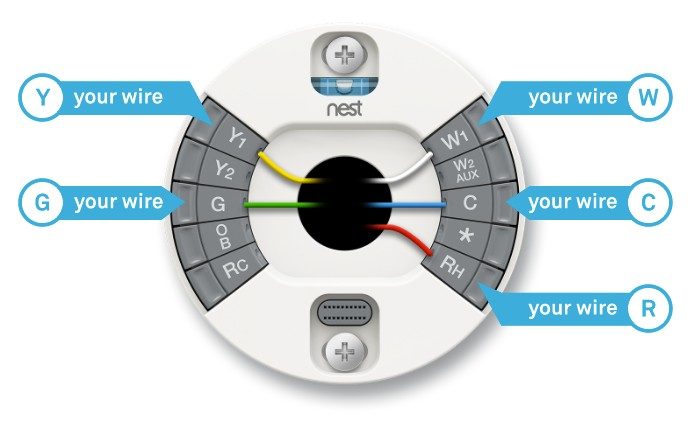
Step 4: Disconnect and label existing wires. Nest supplies you with tiny labels so you can keep track of which wires are which — use them.
Step 5: Remove the old thermostat. Then remove the old base and wall plate, and attach the new Nest wall plate and base. Make sure everything is nice and level.
Step 6: Now it's time to wire up your new Nest thermostat. Connect the wires to your Nest thermostat’s base by following the wiring diagram from the Nest app.
Step 7: Next, attach the Nest faceplate. This is the fun part — clip the new faceplate on, and wait for the magic to happen.
Step 8: Restore power. After turning the power back on, your Nest should power up on its own. In some cases, it may need to charge up a bit first.
Step 9: With the faceplate now operational, the app will help you with the rest, which will involve making some choices regarding settings and preferences.
Step 10: The final step will be to program your thermostat in the app, or, if you opted for the Nest Learning Thermostat, it will start its learning phase, which may take a couple of weeks.
Setting up a Nest thermostat is relatively easy. While it does take some time — allowing about an hour from start to finish, including programming time, is a good idea — you can easily have this done in an evening or on the weekend. It will also take some time before you start to notice those energy savings on your heating bill, but that’s OK because installing a device like a Nest thermostat is a long-term play.
Nest thermostats are also excellent for those who have cabins or cottages, second homes, or office spaces to manage. You can do a lot from your smartphone using the Nest app and not use energy unnecessarily.
How to install a Nest Thermostat without a C-wire
Depending on the wiring of your home, your HVAC system may not actually have a C-wire at all. Traditionally, the C-wire is an essential part of connecting any kind of newer thermostat, but not to worry if you don't have one. Google makes a that you can purchase to get your new Nest connected without having to figure in the expense of having a professional install a brand-new C-wire.
Once you've got your hands on a C-wire adapter, follow the next several steps to get it wired into your home's HVAC system, and finally into your Nest thermostat.
Keep in mind that the C-wire adapter only works with 24 VAC systems and is only compatible with third-generation Nest Thermostat products.
Step 1: As covered in the previous section, the first thing you'll want to do is cut power to the HVAC system. Then, go ahead and remove the faceplate of your Nest Thermostat to expose the wiring terminals underneath.
Step 2: Connect the C-wire adapter to your furnace air handler or zone controller. The adapter kit comes with easy-to-follow instructions on how to do so.
Step 3: Once the adapter is in place, connect the remaining leads to the proper terminals and put the faceplate back on your thermostat.
Step 4: Turn the power back on to your HVAC system. Now your Nest Thermostat should boot up without an issue.