
Taking photographs of pets can sometimes be as difficult as shooting a starry night. At least with stars, they tend to stay put in one place for several minutes. But with a few simple tricks and camera settings to keep in mind, it’s not impossible to capture amazing, professional-looking photos of these important family members, worthy of hanging on the wall next to pics of the grandparents.
To help you take great pet photos, we spoke with Josh Norem, a pet and landscape photographer based in the San Francisco Bay Area. Norem started photographing animals when he first volunteered at local animal rescue organizations, which have a need for high-quality photos but don’t have the time or resources. You can follow him on Facebook and 500px.
How do you get your pet to cooperate?
Josh Norem: There are many tricks of the trade, but in the end it comes down to patience and being ready for that special moment when it happens. In a perfect world you’d have a “wrangler” to direct the animal to look at you, but oftentimes the cat or dog will just look at the wrangler, so it helps if he or she can stand next to you or lead the animal’s vision to where you are located. If you don’t have an assistant, try using squeaky toy apps on your phone [to draw the animal’s attention] – I use Human-to-Cat Translator and Dog Squeaky Toy on my iPhone, which are both free. The only hard part is holding the phone and the camera at the same time. Making a strange noise will sometimes be enough to get the cat or dog to look at you for a brief second – this is where it pays to be ready. You want to have your composition set and focus locked on their eyes.
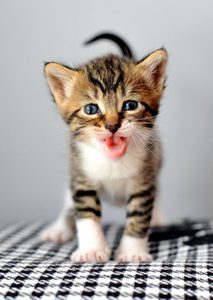
At the local rescue organization where I volunteer, we usually do a play session when shooting shelter cats like Tommy (pictured above). It’s important to make them look fun and energetic, though it’s not always possible.
What type of equipment do you use?
JN: You don’t need special gear, but a speedlight or flash is a must-have if you’re indoors. Unless you have spectacular natural light, the flash will fill in the shadows and also helps freeze the subjects, which is one of the reasons a lot of my photos look tack sharp – it’s the flash, and also a steady hand and good lenses.
If there’s one golden rule of flash photography, it’s that you never want to point your flash directly at the subject, at least not without some sort of diffuser. It will make the subject look horrible in most conditions, and can also cast shadows around them and it will look ugly. Point your speedlight up at the ceiling; the light goes up and comes down on the subject, looking very natural and even (this won’t work if you have tall ceilings). Avoid using the camera’s built-in flash, as it puts light right in the subject’s eyes and the result looks terrible.
Speaking of lenses, there is no substitute for having a good lens, period. You will see a very noticeable difference between a DSLR kit lens and a $1,000 prime lens. A 50mm prime lens is the best value.
As for specific equipment, I use a Nikon D800 with three Nikkor gold band “pro” lenses and a SB-900 flash. I shoot in aperture priority mode 99-percent of the time and use TTL metering on the flash, which is like “auto” mode in that the flash reads the scene and considers the camera’s exposure settings in order to properly set the flash power. It’s extremely accurate and very easy to use.
What are some rules to keep in mind?
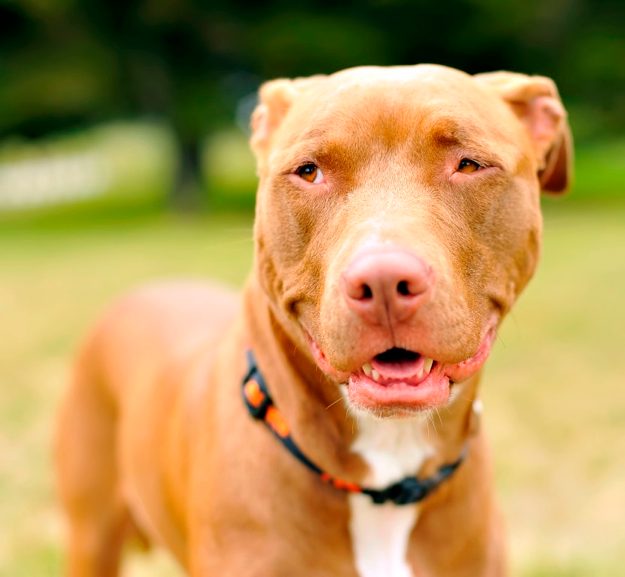
JN: There are some basic guidelines you can follow. Rule number one: Always focus on the eyes. If the eyes aren’t in focus, the shot is wasted, end of discussion. The way to do this is to make sure you know which focus point is active; don’t let your camera control it, because it will usually focus on what’s closest to the camera (the animal’s nose). You can always change focus points from “auto” to “single point.” Do this (consult your camera’s manual if you don’t know how) and have that focus point right on the animal’s eyes.
You also want to pay attention to the rule of thirds, so when cropping try to get the closest eyeball in the upper or lower quadrant of the frame to give it a pleasing composition. Besides focus and composition, you need to worry about your exposure; if the exposure is too dark or too bright, adjust it using exposure compensation. The last tip is to get at or below eye-level with your subject. This will always add intimacy and a unique perspective to a shot. If you have good focus and exposure, you’re very close to the goal of getting a great image. The rest is timing, practice, and a little bit of luck.
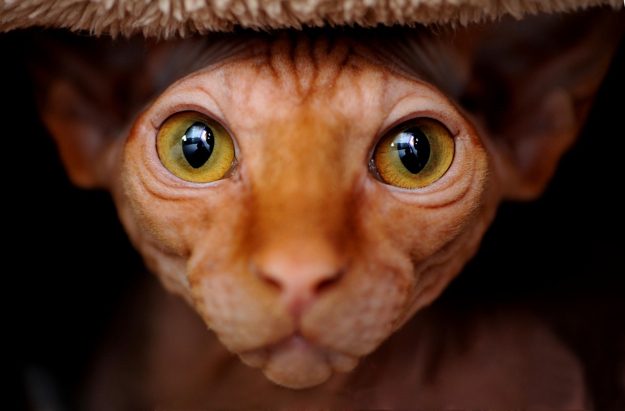
How do you take those beautiful close-up portraits?
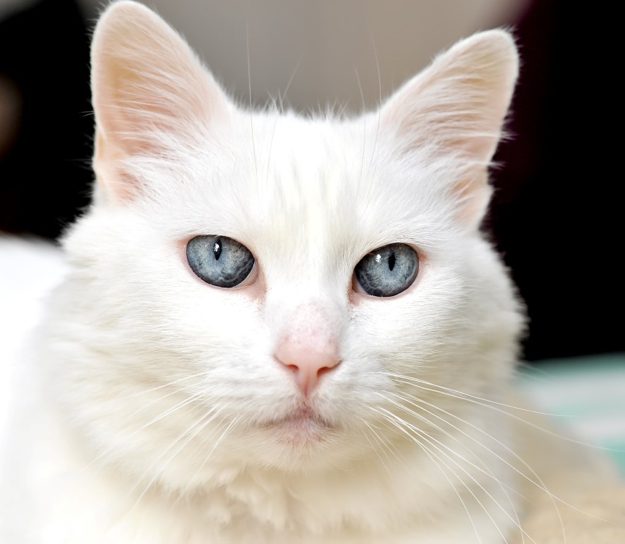
JN: To take a close-up shot of your pet with a smooth, blurred background, set your camera to aperture priority mode and your lens to the widest aperture possible (lowest f-stop number). For a good lens that will be f/2.8, or for a really fast prime it might be as low as f/1.4; on a kit lens it will be f/3.5 usually. Next, get close to your subject, and have them be a few feet away from their background. (In general the further the subject is from the background, the blurrier it will be; the closer they are to the background, the more it’ll be in focus.) The wide aperture setting will take care of the rest. Be warned though, you could end up with eyes that are in focus and a blurry nose and head. Sometimes that looks pretty cool; it’s all up to how you want the picture to look. If you want your pet’s face to be more in focus, just close down your aperture a bit (go from f/2.8 to f/4, for example) or zoom out a bit. Extra distance between you and the subject will get more in focus.
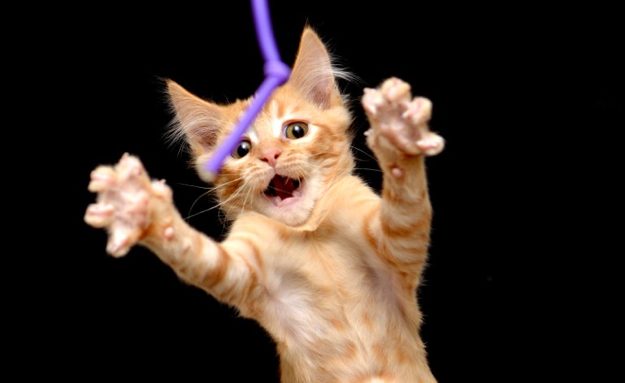
How do you take photos of your pet in motion?
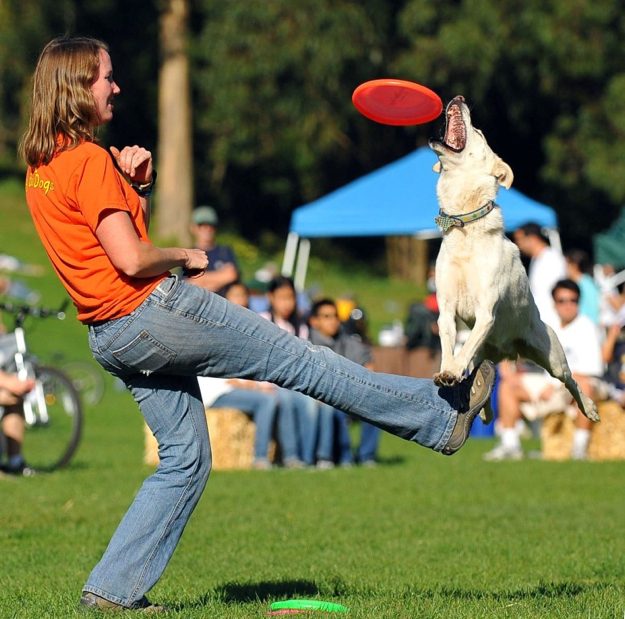
The trick to capturing pets in motion – like a dog in midair – is a fast shutter speed and a camera and lens that can hold focus on a moving subject. I put my camera into continuous focus mode instead of single-shot. This keeps the focus motor active the entire time, so I just hold down the back focus button, but you can also do it by holding down the shutter halfway. The second part of the equation is a fast shutter speed, which requires a lot of light to work properly. If you’re in midday sun you will be fine, but if it’s dark you will need to boost your ISO to compensate. As a general rule you can try switching to shutter speed priority mode and set your shutter speed to 1/500 or so as a starting point, and see how that looks. Going higher is okay as long as you have enough light. Ideally you’ll want the dog’s eyes in the shot, and it’s much easier to focus if they are going side-to-side instead of coming toward you. So get your shutter speed up, set it to continuous focus and fire away.
Is there a way to achieve similar results with a point-and-shoot camera?
So far, the tips mentioned revolve using a DSLR, but what about you point-and-shoot camera owners? The problem with automatic point-and-shoot cameras is shutter lag, which is the time between when you press the shutter button and the picture being taken. It can be a few seconds on some cameras, which is too long in most cases unless you have a very patient animal. Most point-and-shoots will also use the onboard flash in a lot of cases, which always looks terrible. My advice: Turn off the flash and set the camera to burst mode so you can take many pictures at once. Use portrait mode if your camera offers it, and if you can control the aperture put it at its smallest number.
(Images courtesy of Josh Norem)


