Related
- 7 cheap camera hacks for creative photography
- The best lenses for portrait photography
- What is depth of field?
Bokeh. To some, it’s the most sought-after aspect of a photograph; to others, it’s a buzzword that just won’t die. The term — which is an intentional misspelling of the Japanese word “boke,” meaning blur — refers to the quality of the out-of-focus areas in a photograph. While any defocused part of an image is technically bokeh, the term is often reserved for specific looks, usually highlights in the background of an image that turn into colorful, overlapping blur circles.
Bokeh can’t really be quantified, but there is subjectively “good” bokeh and “bad” bokeh. Instagram is overflowing with bokeh photos. YouTubers decorate sets specifically to get bokeh in their videos. I talk about bokeh in my lens reviews. It’s become such a recognizable quality of “real” cameras (DSLRs and mirrorless models) that photographers use it as a way to stand out from the crowd of phone photos shared online (phone manufacturers have caught on to this and developed portrait modes to bring bokeh to camera phones).
But bokeh can be about more than a pretty picture. It can influence the story in an image, and that makes it a creative choice worth having some thought put into it. It’s possible for bokeh to either contribute to or detract from the mood you want to evoke, so more than just learning how to make it, you need to know what type of bokeh works for specific shots — and when to avoid it entirely.
What causes bokeh?
Bokeh is connected to depth of field. The shallower your depth of field, the more blur you’re going to get. But there is more to it than that. Everything from the shape of a lens’s aperture blades to how the glass itself is designed contributes to the quality of bokeh, and we have different words to describe the different types. Among other styles, it can be feathered, swirly, or look like soap bubbles. There’s no right or wrong answer, but a certain look may be better or worse for certain subjects.
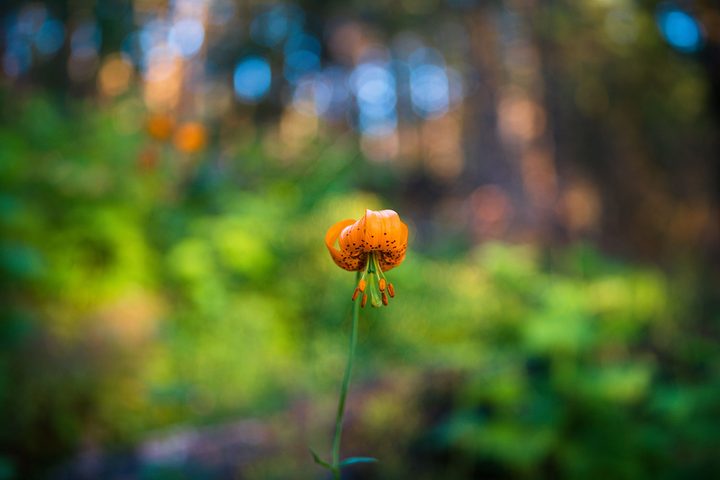
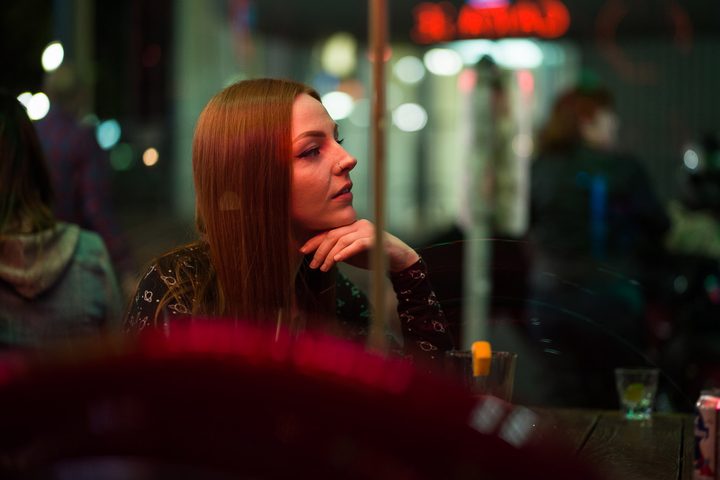
Beyond the lens and camera, the scene itself contributes to the quality of the bokeh. A plain white wall won’t produce interesting blur, even with a very shallow depth of field. During the day, a forest canopy can produce striking bokeh as sunlight filters through the leaves, creating a cascade of sparkling light sources in the background. At night, city scenes can make for fun or dramatic bokeh from street lamps, traffic lights, and neon signs.
You can also create your own bokeh by introducing elements into the scene. A popular look is to hang Edison bulbs in the background of a shot (I’m guilty of this) or hold shiny objects, like prisms or string lights, directly in front of the lens to create foreground blur.
But even “good” bokeh can go wrong. An example of this that has stuck with me is from the 2014 film Need for Speed. It’s during a downtempo emotional scene immediately following a near-fatal car crash. Shot at night and dimly lit, it’s a rare slow moment in the movie — except for the wild and colorful background bokeh that would be more at home in a party scene. The shape of the aperture blades is clearly visible in the blur circles, which causes the bokeh to upstage the actors, and it’s framed in such a way that you can’t ignore it. Plus, because the character is barely lit, the bokeh becomes even more noticeable — at a time when it really shouldn’t be. This isn’t “bad” bokeh — it looks cool out of context — but it’s certainly a mismatch for the scene.

Contrast that to this shot from the Top Gun: Maverick trailer (which is really something — go watch it if you haven’t yet). It’s similarly lit, with comparable amounts of point-light blur circles in the background, but the bokeh is all a single color and almost perfectly round, without a distracting aperture shape. The shot is also framed to use the bokeh to draw your eyes to the subject, rather than tempting them away to the wrong part of the frame, as in the Need for Speed shot.

There is a lot of subjectivity at play here and you’re free to disagree with my assessment. The point is simply that you should think about how you use bokeh, rather than just go for the “more is better” approach. When used correctly, bokeh can enhance both the aesthetic and the theme of your images, whether stills or video.
Sometimes, it really is enough to make a picture look pretty; good bokeh may turn an otherwise boring subject into Instagram gold. So if you’ve got a subject and location in mind, here are the next steps.
How to shoot bokeh photos with your DSLR or mirrorless camera

Again, great bokeh starts with a shallow depth of field, where your subject is kept sharp but everything in front and behind of it is blurred. You can read our depth of field explainer for a deeper dive into how it works, but there are basically three things you can change on your camera to control it: aperture, focal length (zoom), and distance.
1. Shoot wide open
The aperture determines how much light passes through the lens, but in addition to letting in more light, a larger aperture produces a shallower depth of field. To take a photo with the most bokeh, set the aperture to its widest setting (which is indicated by the smallest f-number, such as f/1.8). A kit lens may only open to f/5.6, but work with what you have.
If you’re still new to manual settings, start in Aperture Priority mode (also called Aperture Value on Canon cameras). This will let you adjust the aperture to control depth of field, but the camera will automatically set the shutter speed so you don’t have to worry about the proper exposure.
2. Zoom in
If you’re working with a zoom lens, start by zooming in as far as it will go. Longer focal lengths produce a shallower depth of field than shorter ones at the same aperture, so by zooming in, you increase the amount of bokeh you can get. If you have, say, an 18-55mm kit lens, you’ll get more blur at 55mm than 18mm.
For prime lenses, the same concept applies, but it’s a bit trickier because you’ll likely have different focal lengths with different aperture ratings. Is a 50mm f/1.4 or a 100mm f/2.8 better? Both can produce a very shallow depth of field, but will have different looks. If you’re experienced enough to own a collection of prime lenses, you likely already have a good idea for how they perform, but don’t be afraid to do some side by side comparisons and really examine the differences. Here’s how a 35mm f/1.4 compares to an 80mm f/2.8 on a Fujifilm X-T2:


- 1. Fujifilm 35mm at f/1.4
- 2. Fujifilm 80mm at f/2.8
3. Get closer
Perhaps the easiest but most overlooked step to producing more bokeh is this: move the camera closer to your subject. The closer the lens is focused, the more out of focus the background will be. This is a particularly useful trick if your only lens is a kit lens with a relatively small aperture.
What we’re really going for here is the ratio between subject distance and background distance, so if you can’t get closer to your subject, try moving the subject farther from the background. If you’re shooting a portrait, don’t have the person standing right in front of the background; ask them to step toward you. The more distance between them and the background, the blurrier the background will be.
How to shoot bokeh photos with your phone
Phone cameras have gotten good — really good, actually — but they still don’t offer the same control and flexibility as an interchangeable lens camera. Firstly, the sensors are teeny tiny, and that means getting a naturally shallow depth of field is all but impossible. And with one exception, the lenses in camera phones don’t have physical aperture diaphragms to open up or close down, so you can’t control the aperture. On phones with multiple cameras, however, you can control focal length, although you’ll find the difference in depth of field between a phone’s telephoto and wide lenses isn’t that noticeable.
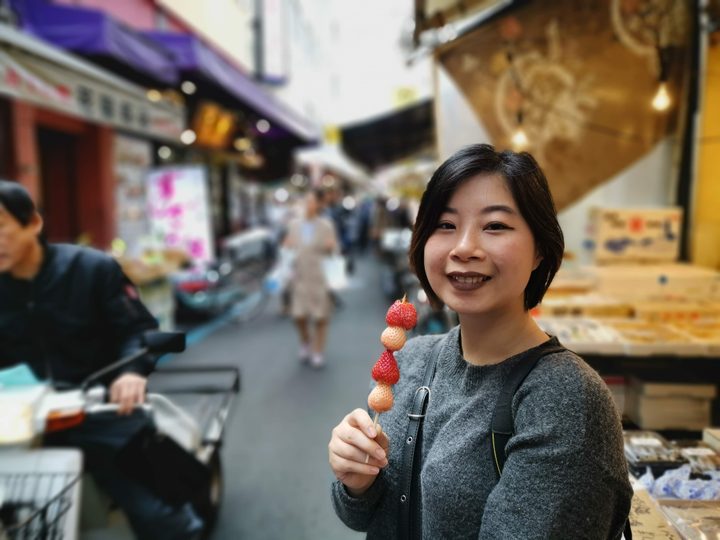
So in comes portrait mode. Not all phones have this feature, but it has become increasingly common in recent years and a lot of brands now offer it across many models. Different phones will call it by different names, but all function the same way: they fake a shallow depth of field by using computational photography.
If you want to know more about how it works, here’s our portrait mode explainer. For the purpose of this article, it’s more important to know that it works — and it can work quite well. I’m still impressed by the portrait mode on my 3-year-old iPhone 7 Plus. It wouldn’t hold up in print, but for the likes of Instagram, the results can be nearly indistinguishable from a mirrorless camera with a nice lens — at least at first glance.
Computational photography may eventually surpass traditional photography in bokeh quality. Because there are no physical constraints, a phone could one day accurately simulate different styles of optical blur without needing different lenses, even simulating “impossible” lenses with wider apertures than what are available for interchangeable lens cameras. We’re not quite there yet, but we’re getting closer with each new flagship phone that comes out. Until then, for the best bokeh, you’ll want to stick to a DSLR or mirrorless camera — and a bright lens.
Best lenses for bokeh photography
If you’ve got an interchangeable lens camera, here are some of our favorite lenses for producing that buttery-smooth bokeh your Instagram followers crave. This is not an exhaustive list and is limited to lenses we have fully reviewed, but it’s a good place to start your search. If you’re looking for a low-cost gateway into bokeh photography, start with something like a 50mm f/1.8 or one of these other prime lenses.
Sigma 105mm F1.4 Art


Sigma itself calls this lens the “bokeh master,” and we have to agree. This full-frame lens available for Canon, Nikon, Sony, and Panasonic/Leica combines a telephoto focal length with a very wide aperture. It produces a razor-thin depth of field that can make portraits and product shots pop. It is absolutely massive, weighing over 3 pounds, but you won’t find more bodacious bokeh.
Fujifilm XF 56mm F1.2R APD


The Fujifilm X series uses smaller APS-C sensors, but there’s no shortage of wide-aperture lenses for it. Of all of them, this is the most unique. APD stands for apodization filter, which has the effect of smoothing out the roughness in blur circles. The result is extra-creamy bokeh from the fast f/1.2 aperture. This lens comes at a hefty premium over the non-APD version, however, and the difference in blur is, admittedly, minimal. If money’s no object, the APD will give you something special — but otherwise, just pick up the standard XF 56mm F1.2R, which is already pretty dang bokehlicious.
Fujifilm XF 56mm F1.2R APD review
Lensbaby Burnside 35


If you’re looking for a bit less realism and a bit more pizazz, the manual-focus Burnside 35 from Lensbaby is a great choice. This affordable full-frame lens combines a Petzval-style swirly bokeh with a second aperture to dial up or down a vignette. It’s not for everyone, but it made for some of the most fun we’ve ever had with a lens, and the result can be stunning when you take the time to get it right. For a truly unique bokeh that will stand out, this is a great option.
Canon EF 85mm f/1.4L IS


The 85mm is a classic portrait lens, but it’s rare to see one with image stabilization built-in. This helps in low light to reduce blur from camera shake, and in any situation by stabilizing the view through the viewfinder, making it easier to accurately frame your shot. It also focuses incredibly quickly, making it a good choice for capturing bokeh-mazing photos of your pets or kids in action. For Canon DSLR shooters, this is a must-have lens if you can afford it.
Canon EF 85mm f/1.4L IS review
Olympus M.Zuiko 45mm f/1.2 Pro


The Micro Four Thirds format is quite a bit smaller than full-frame, but lenses like the 45mm f/1.2 Pro help it stay relevant. Not only is this lens much smaller than its full-frame counterparts, but Olympus engineers poured an insane amount of effort into crafting its bokeh, and they are very proud of the results. We quite liked it, too — this is the only lens we’ve ever reviewed that received a perfect score.
Olympus M.Zuiko 45mm f/1.2 Pro review
Nikon Nikkor Z 50mm f/1.8 S


Nikon’s full-frame mirrorless system is still just getting started, but it already has some very good lenses. The Z 50mm f/1.8 S is a premium spin on the classic “nifty fifty,” combining very sharp optics, a fast aperture, and a relatively compact size in a moderately priced lens. It produces a soft, natural-looking bokeh that’s wonderful for portraiture.
Nikon Nikkor Z 50mm f/1.8 S Review
Sigma 28mm F1.4 Art


Sometimes, you need a wide-angle perspective but still want that bokeh beauty. That’s where Sigma’s 28mm F1.4 Art comes in. Available for Canon, Nikon, Sony, and Panasonic/Leica, it’s not a cheap lens, but among wide-angles with bright apertures, it’s pretty affordable. It is technically excellent, but more importantly, it is subjectively beautiful and produces a moody vignette when shot wide open. It’s great for things like environmental portraits, where you want the focus to zero in on your subject, but you still want to reveal some of the surroundings, too.