Adobe Photoshop Lightroom is powerful photography desktop software that has become one of the most widely used programs by professional photographers. The simplicity of being able to manage, process, and post to social media from a single program is a big part of why professional photographers love it, and it’s also a big reason why you should be using it, too — even if you have no plans of making a career out of photography.
Adobe recently announced it is splitting Lightroom into two related programs. One is focused on mobility, while the other is the power editor users have known. Regardless of the change, both share common features, and an Adobe CC subscription gets you both programs. Our article was written before the change, but the tips still apply — particularly for Adobe Lightroom Classic CC. (Check our guide for the differences between Lightroom CC and Lightroom Classic.)
Don’t worry if you’re new to photo editing and don’t know how to use Lightroom yet, or if you haven’t worked out the best keyboard shortcuts; our guide will walk you through the basics, and reveal how a program like Lightroom can make your workflow easier, not more complex.
Not just for the pros
Why non-professional users would want to spend money (either by purchasing it outright or by signing up for an Adobe CC subscription) on Lightroom has to do with one big issue that people face: keeping track of all the images that we take nowadays. While our phones and computers offer built-in ways to do this, they typically lack the flexibility and power of Lightroom — not to mention the powerful editing tools.
But before we get to those, let’s take a look at perhaps the most important piece to the Lightroom puzzle: photo management capabilities.
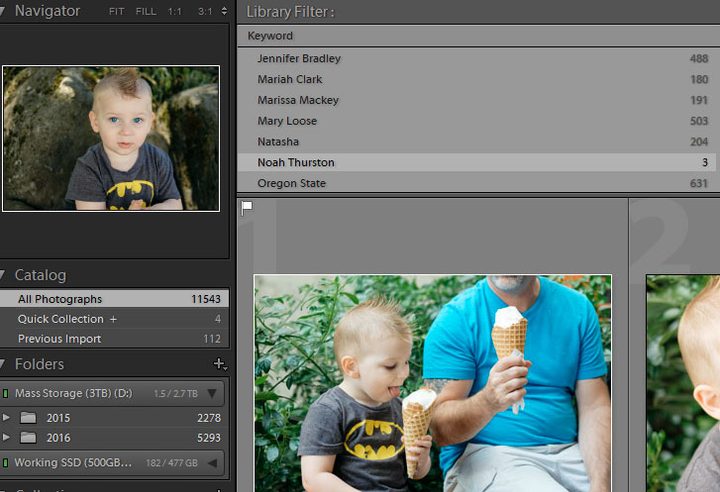
Lightroom is based on a catalog system and can automatically create and manage folders across multiple locations, even on different hard drives, without losing track of your images. Essentially, you import your photos and Lightroom makes it easy to find them again. One of the ways it does this is through a powerful search function and the use of keywords that you can add to your images when you import them into the software.
But its ability goes beyond just text-based searches. Thanks to facial recognition, Lightroom can help you find images of specific people, which allows you to tag faces and attach a name to them. After you have tagged a certain person multiple times the software will begin to suggest facial tags on faces it thinks matches a face you have already tagged on your computer.
So when you are needing to find a good picture of your son or daughter, or that pest of a nephew, you can simply open up Lightroom and search for them by name — assuming you did the initial leg work and tagged their faces. The software will then pull up all of the images on your system that have that face.
Navigating Lightroom
Lightroom is broken up into several modules which separate the steps in your workflow. The Library module is where you can import photos, add keywords, create folders, and otherwise manage your catalog. The Develop module is where you will do the bulk of your image editing (adding filters, fixing red-eye, increasing sharpness, removing blemishes, and much more). This is followed by the Map module, which you may not use much, but this is where you can search your image library based on GPS data for photos that include that information (such as those taken on your phone).
Next up is the Book module, where you can design photo albums that you can print yourself or through online vendors like Blurb. After that you have the Slideshow module, which — you guessed it — helps you set up a slideshow. Finally, you have the Print and Web modules, which are mostly for pros, but the Print module helps you print your images on your home printer and the web helps you make gallery that you can upload to a website.
To navigate between the various modules in Lightroom, simply click the different tabs located in the upper right portion of the Lightroom window.
Importing your images into Lightroom in 6 easy steps
The most important step in using Lightroom is giving it some photos to work with. You may have thousands of pictures somewhere on your computer already, and Lightroom can work with those in addition to any new ones you take. The steps below outline the process for importing new photos from a camera or memory card, but Lightroom’s Import window makes it easy to navigate to any other folder to import photos that are already on your computer, too.

- Insert your memory card into your card reader, or connect your camera via the USB cable.
- Open Lightroom.
- Click the Import button (Lightroom should detect the memory card and automatically open the import window).
- Select the images you want to import, or ‘check all’ to import them all.
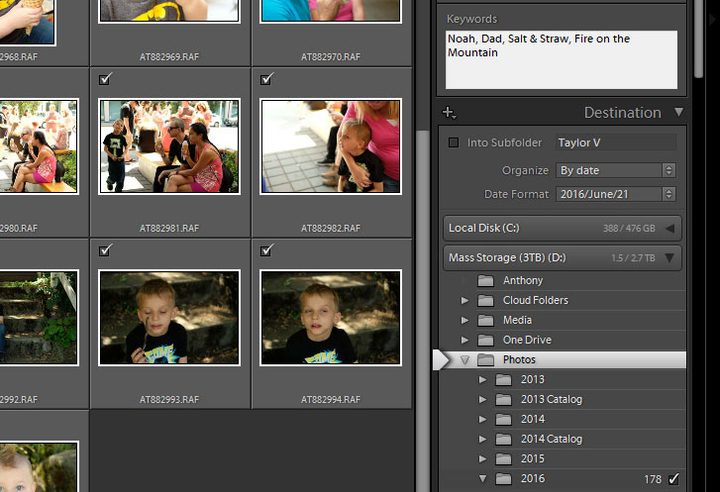
- Add keywords to help you search for these images later, for example ‘Family Reunion 2016.’
- Import the images. (You can also tell it where on your computer to import the images, but it defaults to your images folder, so most of you will want to just leave it alone.)
- That’s it!
In the case of importing photos from another location on your computer, Lightroom gives you three choices for how it manages those files. You can choose to simply “add” the photos, which leaves the physical files where they are; “copy” them, which duplicates the files and puts a copy in your designated Lightroom folder; or “move” them, which puts the files in your Lightroom folder and removes them from their original location.
Using Lightroom’s editing tools to take your images to the next level
As noted above, the ability to edit your photos within Lightroom is as convenient as it is powerful. You can do everything from applying one-click presets with VSCO or Instagram-style ease of use, to spending more time and changing individual settings one at a time for a more polished, professional look. Lightroom does it all — well, mostly. Professional photographers still rely on Photoshop for advanced features and techniques, but for most people, Lightroom is more than enough.
Editing your images
In the Develop module, you are able to process and edit your images with more control than whatever photo management program came bundled with your computer. On top of that, when combined with Lightroom Mobile , Adobe’s free Lightroom extension app, you can even process and edit your images from your phone or tablet, and all of your adjustments will be synchronized back to your computer.
Anything you do to an image (short of deleting it entirely) will be reversible.
Lightroom works best when processing RAW images, which offer the most latitude for making adjustments, but you can also process and edit JPEGs. Either way, every adjustment you make within Lightroom is non-destructive, so anything you do to an image (short of deleting it entirely) will be reversible.
The develop module is broken up into several tabs, on the left side of the window you have your presets. These are fast, one-click edits that you can do to quickly get your images to a specific look, and then fine tune with the controls on the right half of the screen. Adjust the crop, increase exposure (brightness), convert a photo to black-and-white, boost the saturation, and more.
The presets are one of Lightroom’s most powerful tools, and is one of the reasons why it is so popular among photographers. You aren’t limited to certain preinstalled options, either; you can buy additional presets created by other photographers, or you can make your own. They allow you to quickly and easily get your image to the desired look, or at least close to it, without having to spend a ton of time playing with the more advanced and detail oriented sliders.
Think of the presets sort of like Instagram filters, but with way more control and much better results. For example, VSCO’s film presets mimic the quality of various films to lend a classic look to your modern digital photographs.
Saving and sharing your images
Lightroom has built-in support for Facebook and Flickr, and you can easily get other plugins for most of the other social networks. In other words, you can easily process and share images from one program, across most of your social networks. So even as Lightroom is more advanced and complex than the photos app on your phone, it doesn’t sacrifice the easy sharing abilities that we all depend on.
Advanced users can also export images to a variety of file formats, change quality and image size, and even add a watermark to help guard against image theft.
And so much more…
Lightroom can be as basic or as involved as you’d like it to be, and the program can grow with you as your skills evolve. These are just some of the reasons that an average person may like to get their hands on Adobe Lightroom. Covering all of its capabilities and functionality in one article isn’t really possible, but hopefully this was enough to get you started.
If you are interested in learning more about Lightroom’s advanced functionality, Adobe has plenty of walkthroughs and tutorials covering every aspect of the program.