Windows 10 and MacOS both have their devoted fans. One side prefers the look and feel of Windows and the breadth of the Windows PC ecosystem. The other side appreciates the elegance of MacOS and the close integration between Apple’s software and hardware.
However, there is one thing that MacOS has always done better: Take advantage of high-resolution displays. Still, Windows 10 is catching up now that 4K has become the new high-resolution norm.
Here’s how to adjust high-DPI scaling in Windows 10 to get the best visuals you can squeeze out of your PC.
High-DPI displays and Windows
Though Full HD (1920 x 1080) and higher displays are much more common today, 4K UHD (3840 x 2160) displays are now the new high-resolution norm.
Some PCs, such as the HP Spectre x360 15, only offer 4K UHD screens. Other manufacturers use custom resolutions, as highlighted by Microsoft’s Surface line. These PCs have a very high pixels-per-inch (ppi) count packed into a screen with a 3:2 ratio versus the more common widescreen 16:9 ratio.
There’s no question that high resolutions are great. However, they require a higher physical pixel count, and when you cram all those pixels into a small display, on-screen items not properly scaled to support that high resolution can become very small. That makes them extremely hard to see and use.
The term dots per inch, or DPI, is typically associated with printers and how many dots they can print both horizontally and vertically within an inch. On displays, this translates to the measurement of an image on the screen. The more physical pixels installed in a screen, the more dots the GPU can “print” (or render) in both directions.
Microsoft originally defined “high-DPI” as a display with between 120 and 144 ppi, and it started supporting high-DPI displays in Windows 7. Since then, manufacturers have shipped displays with significantly higher ppi, causing a few problems along the way.

Pixels-per-inch problems
The first major problem with Windows 10 high-DPI displays is that the vast majority of Windows applications weren’t written for such high resolutions. Newer applications are more aware of high-resolution displays, and some developers have caught up with the times and have adjusted their older applications.
However, there are still millions of Windows applications that simply don’t display well on today’s best displays when they’re running at their native resolutions. Consider the following screenshot, which shows a 4K UHD screen set at its native resolution with the Windows 10 Settings app maximized.
The Windows 10 and application user interfaces on such a display are simply too small to use. Why? Because the screen has a high pixel count and the program’s user interface wasn’t designed to natively support the larger width and height. It’s essentially telling Windows and the GPU to “print” a smaller interface. That’s where Windows 10 scaling comes in.

Adjusting Windows 10 scaling
The most basic setting to look at is display scaling, which essentially means adjusting the DPI by some percentage multiplier. By increasing the display scaling, you can make on-screen items such as text and icons more substantial and more comfortable to read and use.
For example, here is the same 4K UHD display and settings app at 250% scaling (click on the image to see it clearly in full resolution). All the on-screen items such as text and icons are now much easier to view and manipulate.
In a nutshell, the application only knows to provide its interface up to a specific resolution and physical pixel count. Because your resolution and pixel count is higher, Windows and the GPU will use the additional pixels to render the interface at a larger scale without everything looking like a blurry mess. Text and lines are sharp, as if the app natively supported 4K.
To adjust the scaling, do the following:
Step 1: Click the Notification icon on the Taskbar and select the All Settings tile in the Action Center. Alternatively, click the Start button followed by the Gear icon on the Start Menu. Both open the Settings app.
Step 2: Click System.
Step 3: The Display section should load by default. Scroll down to Scale and Layout.
Here, you will see a drop-down menu for changing the size of text, apps, and other items. These are typically set to a unified “recommended” setting based on what Windows 10 knows about your display.
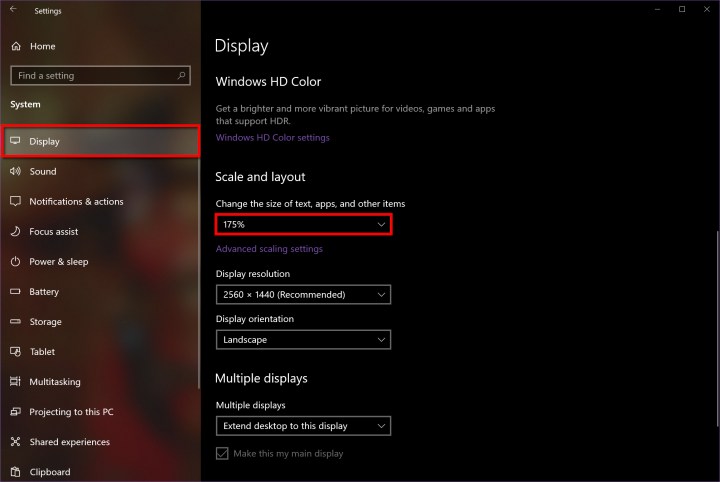
Step 4: To change the scaling, click the Down Arrow and select a new setting on the pop-up menu. The scaling percentage ranges from 100% to 300%.

Let Windows help
Some desktop apps will look blurry when you change scaling and display settings and adjust for DPI. If you’re running the Windows 10 April 2018 Update or newer, the system should automatically try to resolve these problems when it sees an issue. If not, here’s where you can find the setting:
Step 1: Click the Notification icon on the Taskbar and select the All Settings tile in the Action Center. Alternatively, click the Start button followed by the Gear icon on the Start Menu. Both open the Settings app.
Step 2: Click System.
Step 3: The Display section should load by default. Scroll down to Scale and Layout.
Step 4: Click the Advanced Scaling setting link under the scaling percentage box.
Step 5: Make sure the Toggle is set to On under Let Windows Try To Fix Apps So They’re Not Blurry.
Step 6: This step is optional. Enter a custom scaling size under Custom Scaling. This shouldn’t be necessary unless you are working with a unique display that needs personalized scaling to function.
Windows desktop applications
Problems can arise with older Windows desktop applications. When many of the 16 million or so Windows desktop applications were first written, high-DPI displays were rare. Moreover, updating applications to support all display resolutions made available today is just too costly for developers.
Problems mainly arise when you’re using Windows 10 scaling to make your high-DPI displays more manageable. Many Windows desktop applications simply don’t scale well, with symptoms like blurry text and icons. Microsoft has made some changes to Windows 10 high-DPI support, and today these older applications are handled much more effectively.
Even with all of Microsoft’s improvements, Windows desktop applications can still run into issues. Fortunately, there is a trick that you can use to make some of those applications look better on high-DPI displays.
Step 1: Click the Notification icon on the Taskbar and select the All Settings tile in the Action Center. Alternatively, click the Start button followed by the Gear icon on the Start Menu. Both open the Settings app.
Step 2: Select Ease of Access.
Step 3: The Display section should open by default. Under Make Text Bigger, move the Slider accordingly, and then click Apply.
Step 4: Under Make Everything Bigger, click the Down Arrow and select a scaling percentage.
Adjust the DPI settings manually on an app-by-app basis
You may also need to adjust the DPI settings manually on an app-by-app basis. Here’s how:
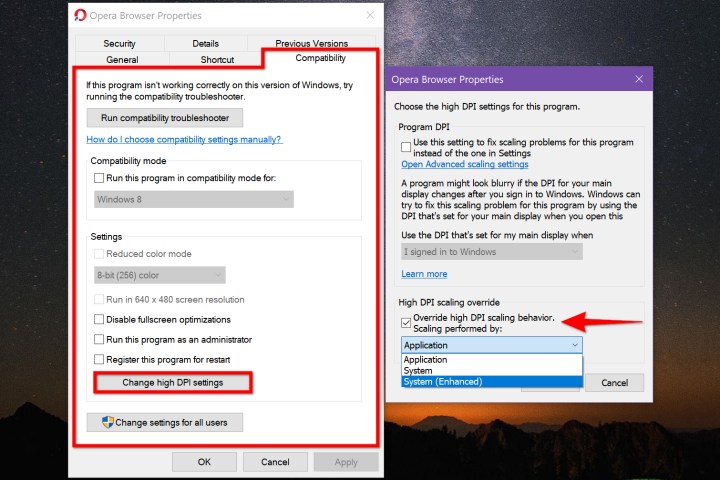
Step 1: Right-click on the program’s desktop shortcut and select Properties on the pop-up menu.
Step 2: Click the Compatibility tab.
Note: If you don’t see this tab, you may need to open File Explorer and right-click on the program’s actual EXE file buried somewhere on your drive — Program Files or Program Files (x86). Sometimes desktop shortcuts don’t allow for compatibility changes.
Step 3: Under Settings, click Change High DPI Settings.
Step 4: A second pop-up window appears on the screen. Check the box next to Override High DPI Scaling Behavior.
Step 5: Select Application, System, or System (Enhanced) on the drop-down menu and then click OK. For more information about each setting, consult the next section of this guide.
Note: You may need to experiment with these three settings until you determine which one fixes your program’s scaling issue.

High DPI scaling override settings explained
Consider the application shown below as it runs on a 4K UHD display set to 250% scaling. While usable, it’s incredibly blurry, which isn’t the ideal experience. Now, let’s see the same application using each of the three override settings.

Application
The Application option doesn’t allow for user customizations, and instead uses the default application displays. This results in the same thing as if you have your Windows 10 system configured for 100% scaling — notice how the icons under the menu are tiny.

System
The System option uses the Windows 10 system to control the settings. This is the default, so it won’t matter if you have this selection on or off.
System (Enhanced)
The System (Enhanced) setting doesn’t work with all applications. If it’s compatible with an app, it will give you better graphics and clearer text, so it’s worth trying.
Tinker with the settings to see what works best
Before the Windows 10 Creators Update, there were more detailed settings that could be configured to control the size of text, icons, and other elements. Microsoft removed those options, however, so now you’re left with these more limited options. You’ll still be able to customize your PC enough to make it both appealing to look at and efficient to use.
When looking for new apps for Windows 10, try to make sure they are Universal Windows Platform (UWP) apps. UWP has built-in scaling that takes advantage of your screen size to give you the best graphics without leaving you struggling to access certain areas of the screen.
Editors' Recommendations
- You’re going to hate the latest change to Windows 11
- How to disable VBS in Windows 11 to improve gaming
- How to change mouse DPI on Windows and Mac
- How to convert FLAC to MP3 on Mac, Windows, and web
- How to convert M4A files to MP3 on Mac, Windows, and web