How to create a system restore point in Windows 10

Microsoft’s restore point feature is a great safety net if something goes wrong with your PC. It allows you to revert your system back to a previous state, immediately providing a solution to any trouble you may be experiencing on your Windows device.

Creating system restore points in Windows 10 is a utility that should not be used sparingly. Having one to refer back to when it’s required will save you a ton of headaches in the future.

Let’s take a look at how to create a system restore point in Windows 10.

Difficulty

Easy

Duration

5 minutes

What You Need

  • Laptop or desktop with Windows 10

Using Windows 10’s System Protection

While there is a way to enable automatic system restore points, it's a good idea to create a manual one on a semi-regular basis for good measure.

Step 1: Within Settings, select System and then About. In the Related settings section, hit the System info option. Finally, select System protection.

The System protection option on Windows 10.
Image used with permission by copyright holder

Step 2: Before you can create a system restore point, you may want to configure the settings associated with it. But more on that after. Below the Configure button, select the Create button.
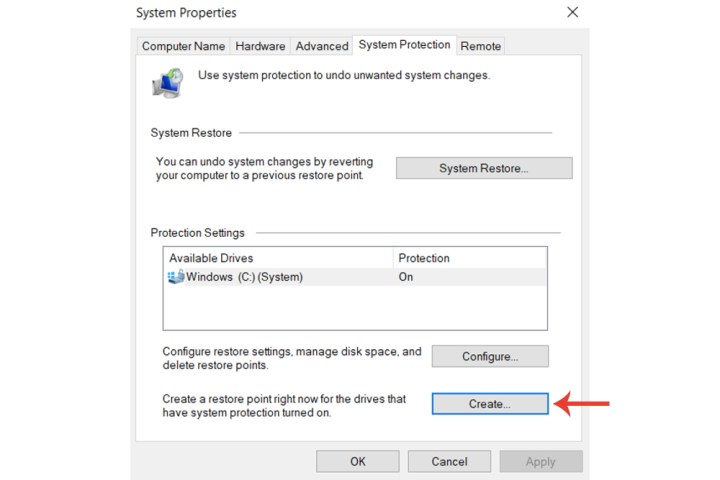
The Create button for creating a system restore point manually on Windows 10.
Image used with permission by copyright holder

Step 3: Enter a description that will describe the restore point. It won’t need a date and time, as those aspects are attached automatically.

Step 4: Select the Create button.
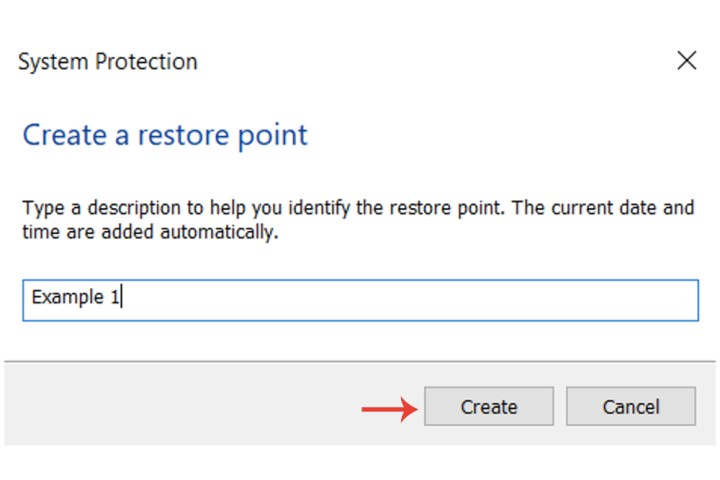
Entering a name to identify a system restore point on Windows 10.
Image used with permission by copyright holder

Configure system restore settings

Step 1: Select the Configure button. Here, if the Turn on system protection button is enabled, then you should already have several restore points saved by Windows automatically.

The Configure button for system restore points on Windows 10.
Image used with permission by copyright holder

Step 2: Within the Disk space usage section, you can set the maximum amount of disk space used by a system restore point. Current usage shows you how much space is already taken from existing restore points, while the Delete button will remove all those points for the chosen drive (usually the C drive).
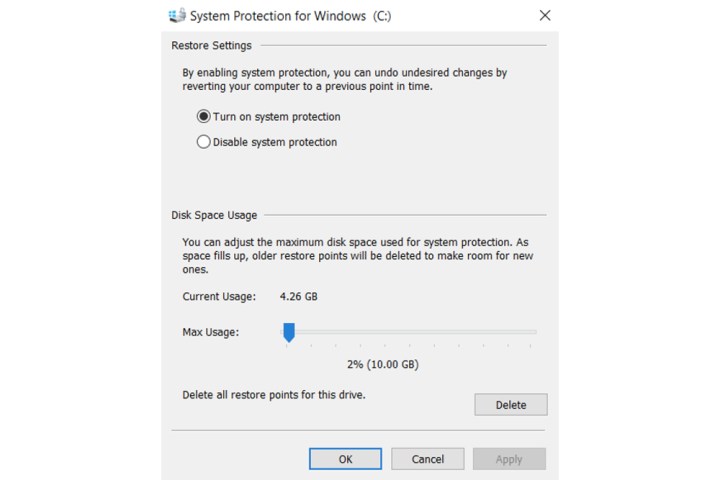
The configuration options for system restore points on Windows 10.
Image used with permission by copyright holder

Use a system restore point

Now that you’ve created a system restore point, let's take a look at using it.

Step 1: Select the System restore button from the System properties window.
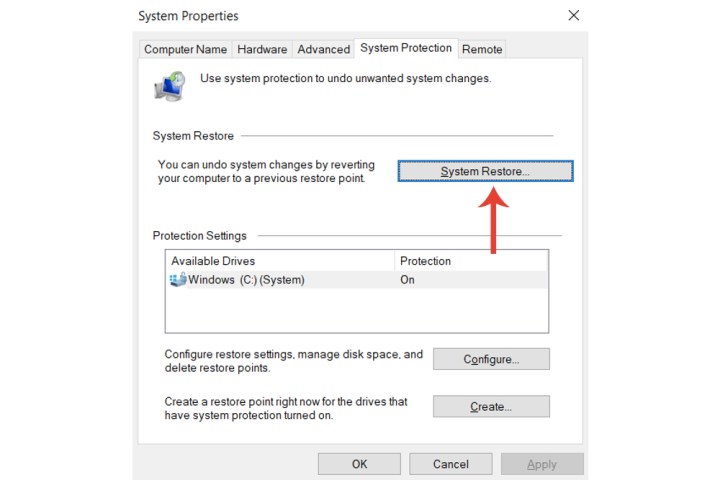
The System Restore button on Windows 10 for accessing and activating system restore points.
Image used with permission by copyright holder

Step 2: The restore point you created from the previous section should now show up alongside the description you entered, the time, and the date.

Furthermore, within the System restore menu, select the Show more restore points option to see the ones saved automatically. You can also scan them for affected programs.
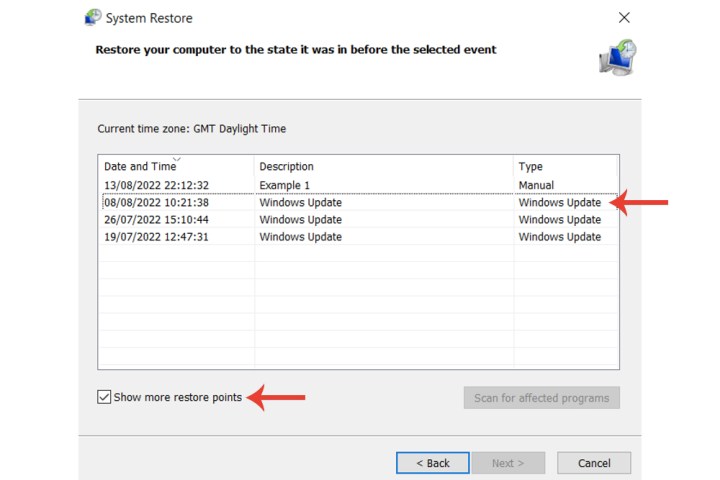
The System Restore menu with available system restore points on Windows 10.
Image used with permission by copyright holder

Step 3: After selecting that restore point and the Next button, select the Finish button to complete the process.

The Finish button for confirming a system restore point activation on Windows 10.
Image used with permission by copyright holder

If you don’t have any available system restore points to choose from, then it may be time to perform a reinstall. We have a full guide on how to reinstall Windows 10.

Editors' Recommendations

Zak Islam
Former Digital Trends Contributor
Zak Islam was a freelance writer at Digital Trends covering the latest news in the technology world, particularly the…
How to delete a Discord server on desktop and mobile
Memrise bot in the Discord app directory.

Have you had enough of Discord for a while? We get it. It can be a little exhausting to say the least, especially if you’re running a jam-packed server, filled with multimedia and messages. Fortunately, if you’re in the mood to take a break, it’s not too hard to delete your Discord server.

Read more
The next big Windows 11 update has a new hardware requirement
Windows 11 device sitting on a stool.

Microsoft’s upcoming Windows 11 24H2 update is expected to arrive with yet another hardware requirement. Centered around SSE4.2 or Streaming SIMD Extensions 4.2, a crucial component for modern processors, the new Windows 11 24H2 with build 26080 will only boot on CPUs that support the instruction set.

This information comes from Bob Pony on X (previously known as Twitter), following earlier reports in February where he claimed that CPUs lacking support for the POPCNT instruction were no longer compatible with Windows 11. The updated requirement is essentially the same, except that they now mandate the entire SSE 4.2 instruction set instead of just the POPCNT instruction within it, as was previously required.

Read more
You’re going to hate the latest change to Windows 11
A laptop running Windows 11.

Just two weeks after rolling out a preview build to Windows Insiders, Microsoft is pushing out an update to Windows 11 that adds advertisements to the Start menu. Build KB5036980, which is now slowly rolling out to the wider Windows 11 user base, includes recommendations in the Start menu, and they sneakily sit beside your real apps.

These apps comes exclusively from the Microsoft store, and they sit in the Recommended section of the Start menu. This section includes recently used, frequent, and new apps, but one (or more) slots will now be dedicated to an ad. As the update reads: "The Recommended section of the Start menu will show some Microsoft Store apps. These apps come from a small set of curated developers. This will help you to discover some of the great apps that are available."

Read more