How to alphabetize data in an Excel spreadsheet

Microsoft Excel is as good at working with text as it is with numbers, giving you the ability to manipulate both kinds of data in the ways that make the most sense for your needs. The ability to easily alphabetize data in Excel is a prime example.

Difficulty

Easy

Duration

5 minutes

What You Need

  • Microsoft Excel

Using the alphabetize buttons

The easiest way to alphabetize data in Excel is to use one of the simplified sorting buttons located under the Data tab in the menu at the top of the spreadsheet.

Step 1: These buttons default to either an A-Z or a Z-A sorting order and can either sort a single column or sort multiple columns in a table. In the latter case, the tool defaults to sorting by the left-most column.
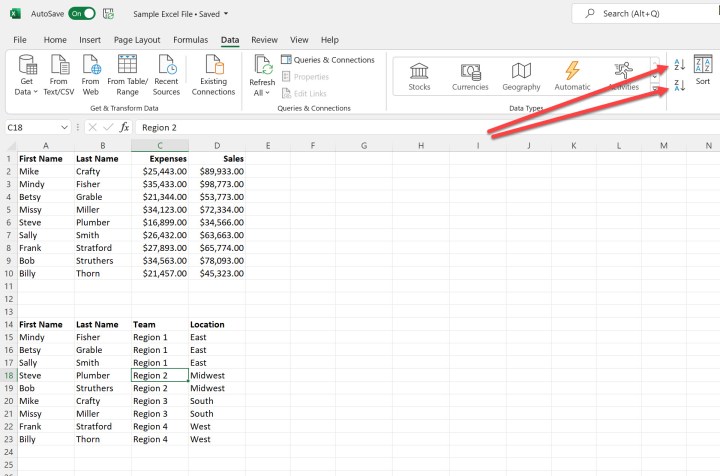
Simplified sort buttons in Microsoft Excel.
Image used with permission by copyright holder

Step 2: To sort using one of the buttons, select your column or table. In this case, we're using the second table in the sample spreadsheet.

Selecting a tablet in Microsoft Excel.
Image used with permission by copyright holder

Step 3: Click the A-Z button. This will alphabetize the table by the contents of the First Name column. You could also sort in reverse order by using the Z-A button.

Data alphabetized by first column in Microsoft Excel.
Image used with permission by copyright holder

Alphabetize using the Sort command

If you want more control over how your data is alphabetized, use the Sort command.

Step 1: Select your table and then click the Sort button. This will open the Sort dialog box. By default, the tool will sort by the left-most column in A-to-Z order, and it will assume you have data headers that should be used in the sorting process. If you don't have headers, then deselect My data has headers.
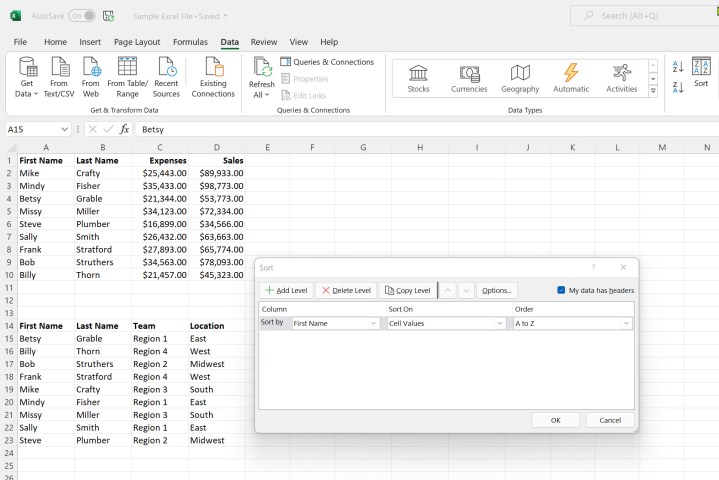
Selecting a table and using the Sort button in Microsoft Excel.
Image used with permission by copyright holder

Step 2: Click the Options button. Here, you can choose whether your data is case sensitive and whether to sort top to bottom or left to right.

Sort options in Microsoft Excel.
Image used with permission by copyright holder

Step 3: In our example, we're going to sort by Location and then by Last Name. To do so, we'll select Location in the first Sort by drop-down box. Then, we'll click Add Level to select Last Name from the drop-down box. You can also use the Delete Level and Copy Level options as necessary.
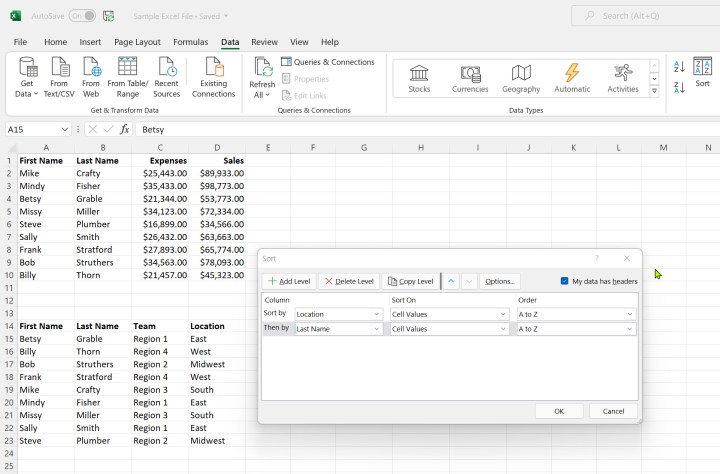
Sorting options selected in Microsoft Excel.
Image used with permission by copyright holder

Step 4: Click OK when finished making your selections. Your data will now be sorted by Location first and then by Last Name.

Table sorted by options in Microsoft Excel.
Image used with permission by copyright holder

For more on how to use Excel, check out our guide on how to password protect an Excel file.

Editors' Recommendations

Mark Coppock
Mark has been a geek since MS-DOS gave way to Windows and the PalmPilot was a thing. He’s translated his love for…
How to sort your data in Google Sheets
Google Sheets is open in the Safari browser on a MacBook Air.

Google Sheets is a remarkably powerful and convenient tool for collecting and analyzing data, but sometimes it can be hard to understand what that raw data means. One of the best ways to see the big picture is to sort it to help bring the most important information to the top, showing which is the largest or smallest value relative to the rest.

Read more
How to convert Excel files to Google Sheets
A MacBook on a table using Google Sheets.

Google Sheets is a versatile tool that can pick up and run with any existing spreadsheets from applications like Microsoft Excel. You can even convert existing Excel spreadsheets to Google Sheet documents. Whether you're looking to continue working in Sheets or want the improved ease of collaboration and sharing that Sheets offers for that particular spreadsheet, here's how to convert Excel files to Google Sheets in just a few steps.

Read more
How to see where your personal data is listed online and remove it
Two women video calling on their laptop with dog nearby protected by McAfee.

It's important to keep your data and information safe while you're browsing online. That's something that McAfee Total Protection Ultimate is particularly adept at assisting you with. However, what do you do when your personal info has already been found and posted by data brokers and people-search sites? That's where a new feature from McAfee can help you significantly. It's called Personal Data Cleanup. Here's what you need to know.

Personal Data Cleanup is able to find and help you remove all your personal info from data broker and people-search sites. The service scans the riskiest data broker sites for information such as your home address, date of birth, and even the names of your relatives. If it finds your personal information, the service gives you a heads up and allows you to choose to remove it yourself, or have McAfee initiate the removal process on your behalf.

Read more