How to delete a user on your Mac and free up disk space

Two people use iMacs on a desk in an office.
Apple

If you have an account on your Mac that’s no longer used and is taking up valuable disk space, you can remove it in just a few steps. Our guide will take you through everything you need to do to delete a user on a Mac quickly and easily. And we'll also show you how to add a new user to your Mac at the same time.

Recommended Videos

Difficulty

Easy

Duration

5 minutes

There are plenty of other changes you can make to improve your Mac — if you want to use Split View on macOS or learn some handy trackpad gestures, we’ve got you covered. But for now, let's set about deleting a user on your Mac.
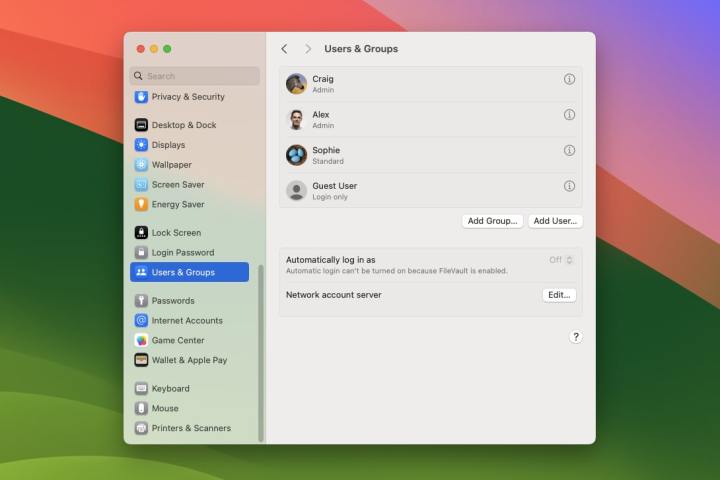
The Users & Groups screen in macOS Sequoia.
Digital Trends

Ensure you have administrator access

Deleting a Mac user account requires you to have administrator access. You’ll need to be logged in to the administrator account and know the admin username and password to continue. You’ll also have to ensure you’re not logged in to the account you wish to delete — if you want to remove an administrator account, you’ll have to create another admin account and log in with that first.

Step 1: Open the Settings app and select Users & Groups in the left-hand sidebar. You will now see a list of all the accounts on your Mac.

Step 2: Select the small i button to the right of the user account you want to delete. This will load a pop-up window where you can change the account's name, reset its password, and switch it being an administrator account (or revoke that status).

Step 3: In the bottom-left corner of this pop-up window you'll see a button reading Delete User. Select this button. You might have to enter your admin password the first time you do this.
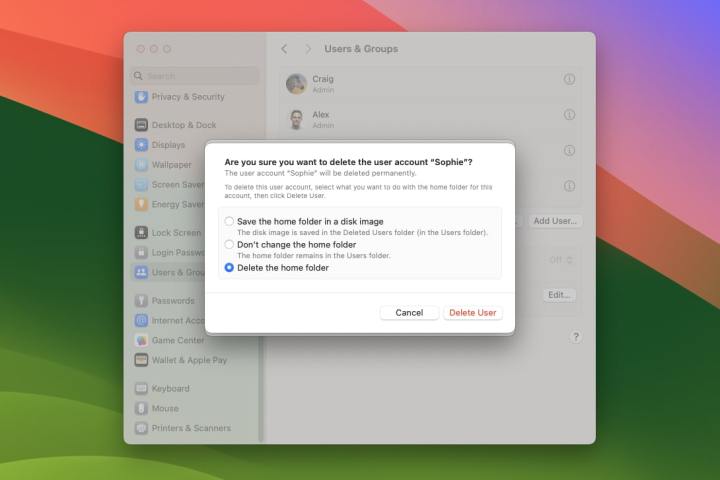
A screen for deleting a user account in macOS Sequoia.
Digital Trends

Step 4: Your Mac will give you a few options for what to do next. You can save the account's home folder to a disk image, which will preserve all their documents and information in case you want to restore the account later (the disk image of their files is saved in /Users/Deleted Users/). You can also leave the user's home folder where it is (which keeps it in /Users/), or delete it entirely.

Step 5: Once you've made your choice, pick Delete User. The account will now be removed.
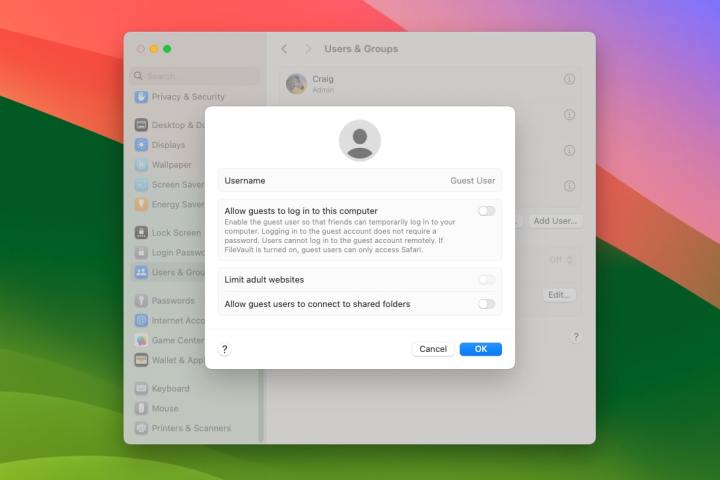
A screen for removing the guest user account in macOS Sequoia.
Digital Trends

Remove the guest user account

Creating a guest user means you can let friends, family, and coworkers use your computer without gaining access to any of the private data stored in your own account. That's helpful if you want to let them use your Mac from time to time, but don't want them messing with your personal account. And if you want to instead remove the guest account, it's easy to do.

Step 1: As before, open the Settings app and head to Users & Groups.

Step 2: At the bottom of the list of accounts, you'll see one called Guest User. Select the small i button on its right-hand side.

Step 3: To remove the guest account, simply disable the toggle next to Allow guests to log in to this computer. Select OK when you're finished.

Step 4: The pop-up window where you can disable the guest user account also lets you adjust its settings. If you'd prefer to keep the guest user account active but want to restrict it a little more, you can limit its access to adult websites and decide whether guest users can connect to shared folders using the toggles in this pop-up section.

A screen for creating a new user in macOS Sequoia.
Digital Trends

How to add a new user

Instead of deleting users on your Mac, you can also add new users. This process is very straightforward and won't take long to set up.

Step 1: Open the System Settings app and select Users & Groups in the sidebar.

Step 2: Below the list of users, pick Add User, then enter your username and password and pick Unlock.

Step 3: You can now enter the new user's details, including their full name, account name, password, and an optional password hint. You should also decide whether their user type will be Administrator, Standard, or Sharing Only. You should only select Administrator if you want the user to have full power over your Mac. When you're done, select Create User.

Step 4: Once the new user has been created, you can refine their details by clicking the i button next to their profile. Here, you can change their username and profile picture, reset their password, convert them from a regular user into an administrator (and back again), and delete their account.

Whether you're adding or deleting a user account on your Mac, the process is easy to do. Provided you have admin access when you try to do it, it shouldn't take more than a few minutes.

Check your Mac's storage space before and after deletion to see how much space the deleted account was using.

Alex Blake
Alex Blake has been working with Digital Trends since 2019, where he spends most of his time writing about Mac computers…
The new macOS update includes a battery boost for Safari
Laptop showing the macos 15.5 update.

The macOS 15.5 update is here, and it's overall pretty light on features. However, the Safari 18.5 update bundled with it does include a new developer feature that will save battery life for users. "Declarative Web Push" is a more efficient approach to web notifications that will drain less battery every time you get a notification on Safari.

The feature already came to iOS and iPadOS in the last update, allowing developers to swap their notification implementations to the simpler JSON format. Just for fun, here's what it looks like:

Read more
I tried a $5 scratchpad app for the Mac. I’ll never go back to Apple Notes
Summoning a scratchpad in the Antinote app for macOS.

I have missed more transitory ideas than I can count while absorbed in work. Or missed deadlines. Or forgot minor chores. On a few occasions, I was just too lazy to reach out for my iPhone, open a to-do app, create a new page, and type in. You feel the flow here, right?

On other occasions, I just lost my train of thought mid-way through it all. Often, an app just doesn’t have the functions I need for that fleeting, low-stakes note-taking job. Then there’s the load of “yet another app” taking up precious screen space. 

Read more
Apple could soon fix Wi-Fi access woes across all your devices
Setting up Wi-Fi on an iPhone.

One of the biggest hassles while traveling is the hunt for a decent internet connection, and then getting it to work across all your devices. The conundrum is now mainstream across hotels, lodges, and coffee shops — essentially all the establishments a person is supposed to spend a few hours of their day, but needs to fill a web form first before they can get internet access.

Apple will soon put an end to those Wi-Fi registration struggles. According to Bloomberg, the company is working on “a system that can synchronize captive Wi-Fi access details across the iPhone, iPad and Mac.”

Read more