How to record your screen on a Mac

Recording your computer screen is a handy way to capture what you’re doing on your device. On a Mac, you can use it to record MacOS gameplay or show a friend how to perform a task … because sometimes showing someone is much easier than trying to explain it.

Fortunately, MacOS includes two built-in ways to help you record your screen with ease: Using the Screenshot toolbar or using Apple’s QuickTime Player app. We’ll take you through both methods in this guide so you’ll know exactly how to capture videos when you need to.

Recommended Videos

Use the Screenshot toolbar

Step 1: Press Command + Shift + 5 on your keyboard. This opens your Mac’s Screenshot toolbar.

Step 2: In the center of the toolbar are two options for video recording: Record Entire Screen or Record Selected Portion. As the names suggest, you can click the left-most of the two buttons to record the whole screen or the one on the right to record just a portion.

The MacOS Screenshot toolbar showing two buttons used to record a Mac's screen.
Image used with permission by copyright holder

Step 3: Click Options to tweak how it records. From here, you can screen-record on your Mac with audio. Under the Microphone heading, just choose a plugged-in mic, and when you record, your voice will be included.
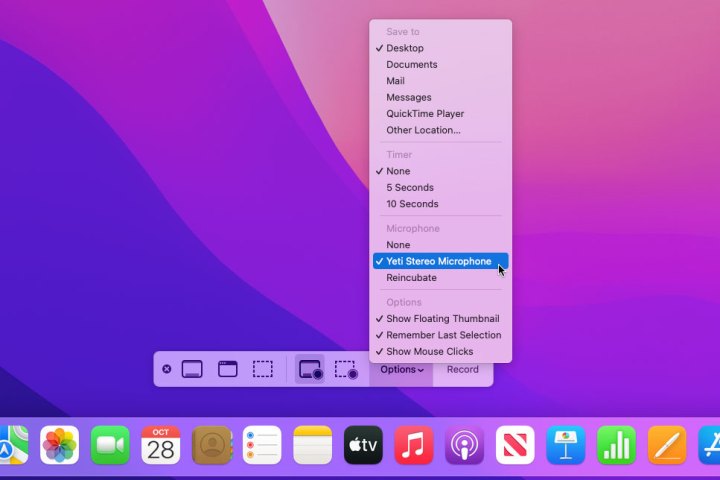
The MacOS Screenshot toolbar showing its options menu.
Image used with permission by copyright holder

Step 4: If you chose to record the whole screen, just click anywhere on your display to begin the recording. Alternatively, click the Record button.

Step 5: If you selected Record Selected Portion, you will see a box on-screen showing what will be captured. Click and drag the handles at the edges of this box to adjust what is recorded. You can move this selection to wherever you want. When you’re ready, click Record.

A portion of a MacOS screen that will be recorded.
Image used with permission by copyright holder

Step 6: When you’re finished, click the Stop button in the menu bar, or press Control + Command + Esc. A thumbnail will appear in the bottom-right corner of your desktop. Ignore it or swipe it right to save the video. Click the Thumbnail to open the recording, then click the Trim button (to the left of the Done button) to cut it if necessary. Control-Click the thumbnail to get some options, like opening it in an app or changing where recordings are saved.

A thumbnail of a saved screen recording on the MacOS desktop.
Image used with permission by copyright holder

Use QuickTime Player

Step 1: Open QuickTime Player from the Applications folder, from Launchpad, or by pressing Command + Space and typing the app’s name.

A Spotlight window in MacOS showing results for QuickTime Player.
Digital Trends

Step 2: Click File > New Screen Recording or press Control + Command + N.

QuickTime Player on a Mac showing a menu with an option to start a new screen recording.
Image used with permission by copyright holder

Step 3: This opens the same Screenshot toolbar as in the section above. Click Record Entire Screen or Record Selected Portion, then click Record.

The MacOS Screenshot toolbar showing two buttons used to record a Mac's screen.
Image used with permission by copyright holder

Step 4: When you’re finished, click the Stop button in the menu bar or press Control + Command + Esc.

Step 5: Unlike recording using the Command + Shift + 5 shortcut, QuickTime will automatically open the recording and save it to your chosen location (by default, this is the desktop). Here, you can view, edit, or share it.

A screen recording in QuickTime Player, with a menu open showing an option to trim the video.
Image used with permission by copyright holder
Alex Blake
Alex Blake has been working with Digital Trends since 2019, where he spends most of his time writing about Mac computers…
Mail app for macOS will soon get an overdue AI upgrade
Mail app with categories in macOS.

Apple delivered a notable upgrade to the Mail app a few weeks ago, introducing intelligent categories to keep the inbox uncluttered and make discovery of relevant content easier. The trick, however, was limited to the mobile platform, and never appeared on Macs.

That is about to change soon. In the latest edition of his PowerOn newsletter, Bloomberg’s Mark Gurman claims that Mail categories will finally make an appearance in the desktop client this April.

Read more
This app turns your Apple Watch into a Mac and smart home gesture hub
Wow Mouse app for Mac click and gesture control.

Just about a year ago, a startup named DoublePoint launched a gesture control app that lets smartwatch users control phones, tablets, and headsets, among other devices. The Apple Watch has finally received its own version.

In the lead-up to CES 2025, Doublepoint introduced the WowMouse app for Apple Watch, which boasts a few algorithmic refinements and a partnership with Bosch. The app’s Android version has already raked in over 100,000 downloads, says the company.

Read more
What is AppleCare+ and is it worth adding to your MacBook?
A person using a MacBook with an Apple Studio Display.

If you’ve just kitted yourself out with one of the best Macs, you might be looking to protect your purchase with some kind of insurance. If that’s the case, you’ve probably heard of AppleCare+. But what exactly is AppleCare+, and should you buy it for your MacBook?

Here, you’ll find everything you need to know about AppleCare+, including what it is, how much it costs, and whether it’s worth it. Read on and you’ll be able to make an informed decision for your Mac in just a few minutes.
What is AppleCare+?

Read more