Whether you've got one of the best graphics cards currently available or an older model in need of a refresh, you may want to learn how to undervolt a GPU. It can lower power demands, reduce temperature and noise levels, and in some cases, even improve performance.
Undervolting requires some basic knowledge, but once you know what to do, it can be done in a few easy steps. Keep reading to learn all about undervolting your graphics card.
Before you begin
Before you jump right in, be mindful that not all GPU models can (or should) be undervolted. Dated models below Nvidia's 10 series may not allow this. The reason is that voltages are locked on all Nvidia cards previous to the Pascal series (GTX 10xx). This means that most popular undervolting tools don't support these cards. There are workarounds, but they are often much more complex than what you get on newer cards.
AMD cards can generally be undervolted, even on older models. Indeed, some models, like AMD's Vega series, could actually see their clock speeds improve when undervolted due to having additional power and temperature headroom when running at lower voltages.
How to undervolt an Nvidia graphics card
Undervolting Nvidia GPUs requires a few extra steps compared to AMD. We will go through all of them below.
Step 1: MSI Afterburner is the most popular undervolting tool for Nvidia graphics cards. To begin the process, download the free program here.
Install it on your computer and then launch it.

Step 2: On the lower left part of the MSI Afterburner interface, you will find information about the voltage of your GPU. Below that, you can find the Curve Editor. You can access it by simply double-clicking or pressing CTRL + F.
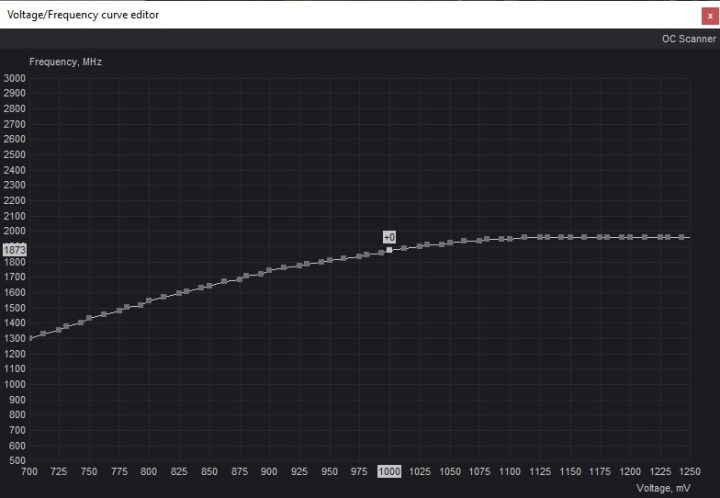
Once the Curve Editor is open, you will see a (somewhat intimidating) graph. This graph holds two important pieces of information. The X-axis is the voltage of your graphics card, and the Y-axis is the frequency (clock speed).

Step 3: Before you take any further steps, you will need to figure out what frequency your GPU runs at under stress. There are two ways to do this: Launching a GPU-intensive program or running a stress test, such as FurMark.
The easiest way is to launch your most resource-heavy game and let it run for at least 15 minutes. Some games are more based on the processor than the graphics card, but most newer titles put enough pressure on the GPU to show you the correct frequency -- especially at higher resolutions.

Step 4: Go back to the Curve Editor tool in Afterburner and find the right frequency on the Y-axis. Simply click along the dotted curve line until you are able to see the correct frequency on the left-hand side, aligned with the curve. Look down and check the corresponding voltage. In our example, 1873MHz requires a core voltage of 1000.

Step 5: Undervolting, like overclocking, is not an exact science. Instead, it's all about trial and error. If you are starting with 1000mV and a frequency of 1873MHz, you might want to take it step by step and lower the voltage to 950mV. Your numbers will vary depending on your graphics card. As a rule of thumb, it's better to undervolt little by little instead of doing too much at once.
Click on the voltage that you would like to achieve. As you can see, that number will be tied to a lower frequency than what you want to maintain. There are ways to fix that.
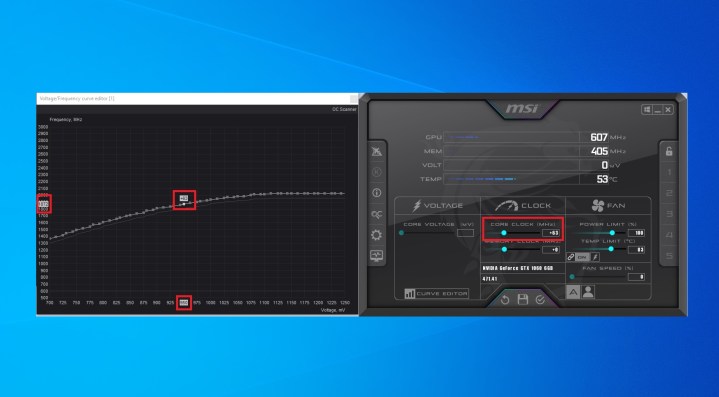
Step 6: Go back into the main window of MSI Afterburner and look at the Core Clock (MHz) section. You want to adjust the core clock so that your card's frequency matches the voltage you want to maintain.
To do this, increase the core clock until the curve in the Curve Editor changes. Track your chosen voltage at the bottom (in this example, 950mV) and the frequency on the left. Keep increasing the clock until your frequency is the same as it was during your stress test while running on the new, lowered voltage.
The end result should be that your card will run at the same frequency as before while maintaining the maximum voltage of your choice. Remember that these numbers will vary based on the values you started with.

Step 7: In order to preserve these changes, go back to the MSI Afterburner window and press the floppy disk Save icon in the middle at the very bottom of the screen.
Put your new frequency/voltage combo to the test by booting the same game (or another resource-heavy program) you ran before. Track the values in MSI Afterburner to make sure that you're hitting the same frequency as you did prior to undervolting your card. If you're not, increase the core clock a little more and try again.
Let the game run for at least 30 to 60 minutes. If everything works well, you're not experiencing any issues with your graphics card, and nothing crashes, you're in the clear. If you're feeling adventurous, you can try to go back and re-do the steps in order to lower the voltage a little further.
However, if you're experiencing any sort of graphical issues or crashes, it means you've undervolted the card too much. In this scenario, re-do the steps with a higher voltage while maintaining the same clock speed. Eventually, you will find the spot that works best for your graphics card.
Step 8: This can be treated as an extra step, but it's definitely recommended. To make sure your new settings work well and that the card will perform as it should under any circumstances, it's a good idea to put it through a proper stress test. Playing a game is one thing, but there are programs that can help you stress the card in other ways.
Download FurMark or 3DMark Time Spy and run the stress test/benchmark up to three times. If everything is stable, congratulations -- you have successfully learned how to undervolt your Nvidia GPU.

How to undervolt an AMD graphics card
Undervolting an AMD graphics card is much more simple, since you can do it right within the AMD Radeon driver suite.
Step 1: Open the Radeon driver software by right-clicking on your desktop, and selecting AMD Software: Adrenaline Edition.
Step 2: Use the menu tabs at the top of the screen to navigate to Performance > Tuning.
Step 3: You can use automated undervolting, for a quick and easy undervolt. To do so, just select Undervolt GPU on the left-hand side. This will automatically undervolt your GPU, lowering its power draw and temperatures in turn.
For more manual control, toggle on the option for GPU Tuning, and Advanced Control.
Step 4: In the section marked Voltage (mV) lower the voltage by 10 mV, then select Apply Changes in the top right.
Step 5: Run a stress or benchmarking tool, like Furmark, or 3DMark to make sure your GPU is still stable. If it passes, then try lowering the voltage again.
Step 6: Repeat the above steps until the system crashes, then return to the laste stable voltage and try running it as your daily GPU voltage. If it's stable, congratulations! You just undervolted your AMD GPU.


