
Apps are a way of life these days: We download them at a moment’s notice to solve the latest problem or explore the newest trend. That’s what they’re made for! But over time, this can cause the dreaded buildup of apps on our computers and devices, slowing them down and filling our operating systems with clutter. Even worse, some old apps may start causing problems with OS updates or functions.
The solution is deleting apps, but it’s not always obvious how you should get rid of them. To help out, we have the guides you need for Windows 10, MacOS, iOS, and Android to uninstall apps speedily and get some cleaning done!
Uninstall on Windows
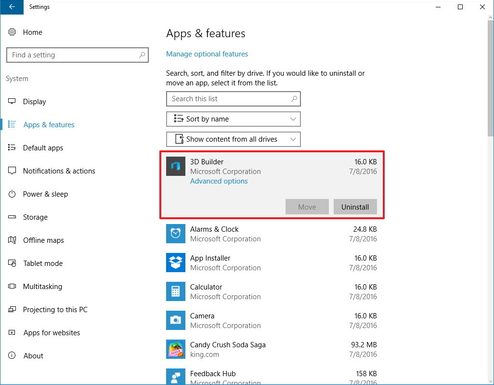
Step 1: Windows gives you handy information that can help you choose which apps to uninstall. To learn more, head to the search box on your Windows 10 screen (next to the Windows icon that pops open the Start menu). Here, search for “apps & features.”
Step 2: The search box should bring up an option to visit the “Apps & features” section of the Settings menu. Select it, and the window should open. Here you will find a list of the downloaded apps you have on your computer. You can choose to search the list for a specific app, or sort by name, how much space the app is taking up, and more.
Step 3: Once you have filtered the apps as you like, you can select any of them you want. This will pop open a couple options to either more or uninstall the app. Choose “Uninstall,” and the app will be removed from your user account (the permissions will remain if you want to download the app again).

Alternative method: Note that you can go to any individual app in the Start menu and right click on it—or press and hold down if you are using a touchscreen—to open up a mini menu that includes an uninstall option. However, the above method is better if you want to clear space or find a particular app.
Uninstall on MacOS
 Step 1: For deleting a single app quickly, head over to the Finder. You can launch the Finder at any time by choosing the square face icon in your MacOS dock if you don’t already have this file management window open.
Step 2: In the left sidebar of the Finder window, look for the Applications section. Head over here to see all the apps that have been downloaded on your Mac. They come arranged in alphabetical order, although you can arrange the list in many different ways.
Step 3: Right-click (or equivalent) on the app you want to get rid of. This brings up a dropdown menu: Here, choose “Move to Trash.” All items in your Trash will be deleted after a certain amount of time, or you can go in and self-delete Trash items any time you want. Unlike in Windows, this will actually uninstall the app completely.
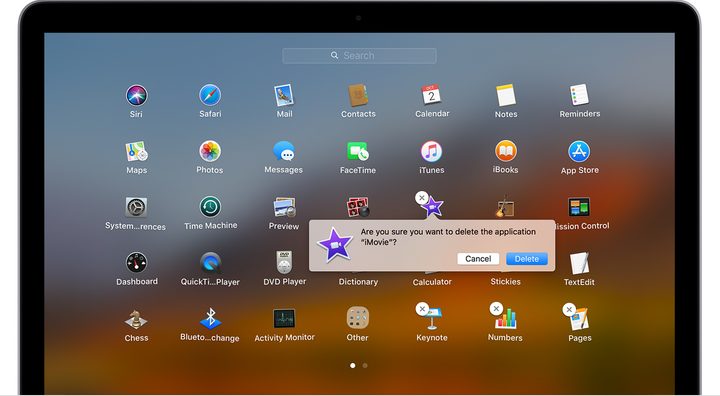
Alternate method with Launchpad: First you need to open the Launchpad, a separate app management tool that you may prefer to use. The easiest way to do this is to press the shortcut key F4, or the Launchpad icon on a Touch Bar. If you don’t have those options, then search for Launchpad in your Applications (it looks like a rocket ship). Launchpad will open an overview screen of all the apps you currently have on your MacOS platform. The apps will appear in alphabetical order, so you can cycle through them as you need to find a particular app.
Once you have found an app that you want to get rid of, select and hold it with mouse/finger until it starts to jostle around. At this time, a white “X” icon will appear by the app. Select this, and MacOS will ask you if you want to delete the app. Confirm by tapping “Delete,” and the app will vanish. Note that there are some system apps on Launchpad that you won’t be able to delete, so don’t worry about accidentally getting rid of something important.
Uninstall on iOS
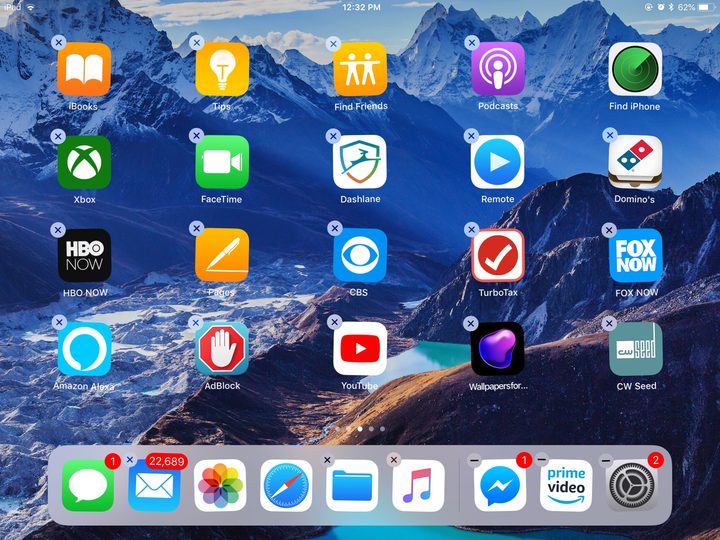
Step 1: The easiest way to delete an iOS app on sight (applies to all iPhones and iPads) is to simply press and hold down on the app until it starts to jiggle. This will create an “X” in the upper left corner of the app. Press this X, and you will be able to confirm that you want to uninstall. The app will then vanish!
Step 2: Sometimes the above method can get tedious if you want to delete a large number of apps at the same time. For a more efficient method, select the Settings icon. From here choose the General section, and go to “iPhone storage.” We suggest you pause here to enable the “Offload Unused Apps“ ability, which will save app information and then get rid of the apps you don’t use when you start running low on storage. You can also scan through your downloaded apps and select each app individually to quickly delete it.
Uninstall on Android
Step 1: First, you will want to find the “Application manager.” This may prove a little challenging, since different generations and brands of Android devices may have different setups. We suggest first visiting “Settings,” and from here look for a section that says “Apps” or “Apps & notifications.” Open this section, and look for an option to visit the “Application manager” (or double check to see if you are already there).
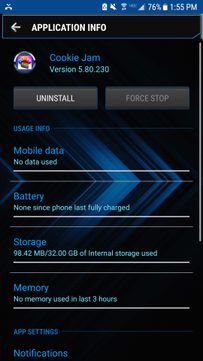
Step 2: Once in the Application manager, your job gets a lot easier. You will see a list of downloaded apps in alphabetical order. Select any one of them, and your device will pop open a screen that gives you all the data about that app, including how much storage it is taking up, and an option to “Uninstall” or “Disable” the app. Select the “Uninstall” option where available to get rid of spare apps.


