Like our other devices, routers have software that occasionally needs updates as well to offer improved security and compatibility, and even provide new features for users. To do this, the router needs a firmware update, and that requires a little work. If it’s been several years since you’ve checked for router updates or you heard about a recent update/fix for your router line, it’s time to take action. Here’s what you need to do.
- Tip: Check for app updates and automated downloads
- Step 1: Visit your router provider’s website and find your model
- Step 2: Download the latest firmware update file
- Step 3: Connect your router to your computer via Ethernet
- Step 4: Launch your router settings page if necessary
- Step 5: Start the firmware update
Tip: Check for app updates and automated downloads
Newer routers often make things easier by connecting to the cloud for important updates and automatically downloading upgrades for firmware. If you have an app to manage your router, open it and look for an update option.
Netgear’s Nighthawk app is a good example of this: You can log in, click on your router icon, and choose Check for Updates. This will allow you to quickly check and update your firmware without needing to follow the steps below. If your router app allows you to enable automatic updates, this is also a good idea.
Step 1: Visit your router provider’s website and find your model

To manually update firmware, you will need to start by downloading the latest firmware file. To help with that, major router brands have support webpages. We’re going to start by showing Netgear routers and the Netgear support page because it’s laid out very clearly, but other router brands follow very similar processes. Here’s the Linksys support page and the TP-Link download page if you need them.
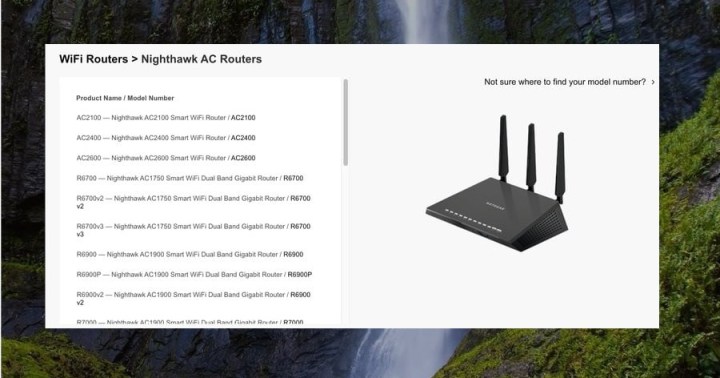
On the support page, select Wi-fi Routers, then select from the router line you have. For example, let’s choose the Nighthawk AC Routers category.

Next, select your specific router model. It’s a good idea to have your router on hand to look for the model number if necessary. Note that some models may also have different versions, so you will need to choose the correct version too (TP-Link routers can be more guilty of this than others). Using the wrong firmware for your model or version could cause serious issues.
Step 2: Download the latest firmware update file

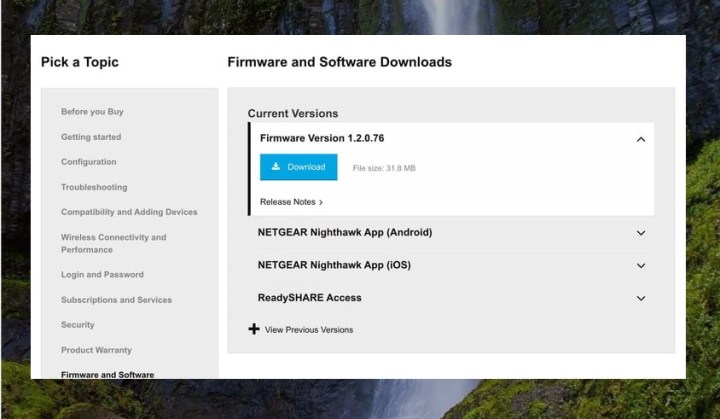
With the correct model chosen, look for the download option or window to see where your firmware files are. Here, we navigate to the Firmware and Software Downloads section, and we can quickly find the Firmware Version 1.2.0.76. Select this, and select Download to install it on your local hard drive.
Again, the process will look different for every router provider, but most do have some type of dropdown list to look for the firmware file. Unless you’re rolling back to previous settings (not common for router software), you’ll want to choose the newest firmware file for your model.
Step 3: Connect your router to your computer via Ethernet
You can’t update your router firmware via the Wi-Fi that your router is producing. You’ll need a wired connection to the computer you are using, which means connecting an Ethernet cable from the router to your computer. This also means that the best device for updating your firmware is usually a laptop.
Step 4: Launch your router settings page if necessary
Here your experience may diverge a little. If you are using one of the newer Netgear firmware files, all you have to do is unzip and open it. When the file opens and begins running, it will take the lead and navigate you through the necessary steps for updating the firmware.
However, other router brands may prefer you log into your administrator settings for the router and initiate the update yourself. To start this process, open your web browser and navigate to your router settings. If you need help accessing them, you can find out how to access your router admin page in this guide.

Now you will have to log in with your router settings username and password. This is not the same thing as your Wi-Fi network login information. It’s typically set to admin and password for each field or a similar option that you can find on the back of your router, although it’s always a good idea to change it for security reasons, something you may have done the first time setting up.
Step 5: Start the firmware update

Now use your settings page to start the firmware update. Look for an option that says Firmware or Firmware Upgrade. Sometimes this is found in a System Tools section, sometimes in an Administrator section, and sometimes in an Update or Maintenance section. Look around, and you will be able to find it before long.
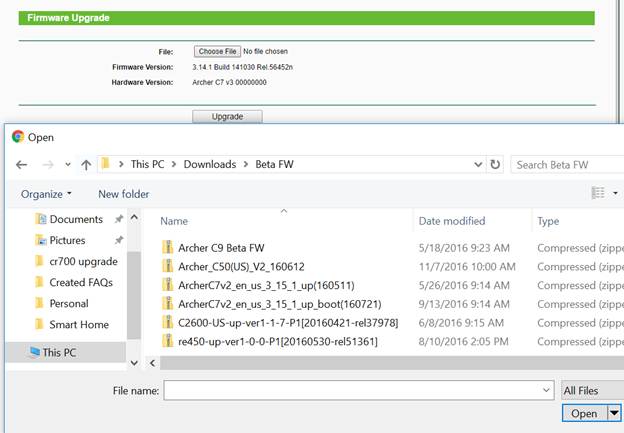
Once you find the Firmware option, select it. This should bring you to a menu where you will see an option to Choose File or Browse your local files. Select this, then navigate to your recent downloads or search for your firmware file by name.

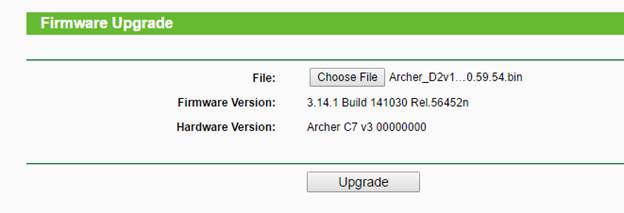
Select your firmware file, and then choose the Upgrade option. Let the upgrade progress until it’s completed; this will take at least a few minutes.
After the firmware is fully updated, there’s a chance that your router will revert to factory settings. If this happens, you will want to spend some more time in your router settings webpage to tweak settings back to where you had them, or run through the setup process again to get everything in working order.


