For many Windows 8.1 users the option of creating a private local account wasn’t an obvious choice during the operating system’s installation. Rather, choosing to set up a connected Microsoft account seemed the only avenue during the update, and it left many users with an account they might never intend to use.
Related: How to reset your Windows 8 password
The only reasons to have a Microsoft account is to gain access to the Windows Store, cross-platform functionality, and Microsoft’s integrated cloud storage. If you don’t care about those features you may find it extremely beneficial to have the added security of a private local account that doesn’t provide Microsoft with any of your data.
To help, we’ve put together this comprehensive walkthrough. Just follow these simple steps and you’ll have the ability to deactivate or disable your Microsoft account in minutes.
Note: Save any work you have open before you begin switching to a Windows local account. During the process of switching the system forces you to sign out of your account which closes any open applications.
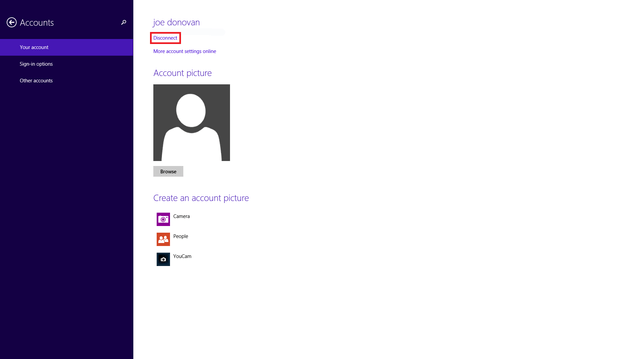
Step 1. Disconnect your Windows account
To disconnect your Microsoft account you first need to access your Microsoft account settings. To do this simply go to your Settings menu, click on Change PC Settings, then select Accounts. Now, choose your Microsoft account from the list and click the Disconnect link under your name and email address. Then verify your account by inputting your password once Windows prompts you.
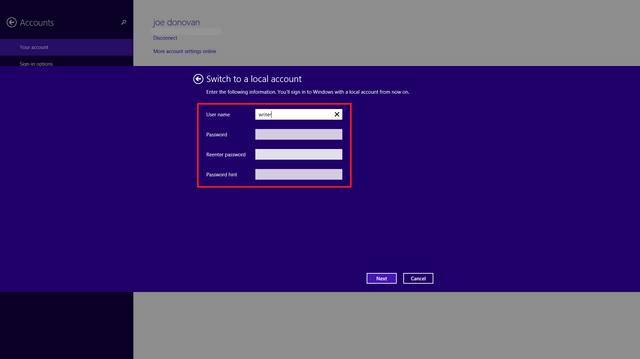
Step 2. Create your new local account
After inputting your Microsoft account password, input your desired username and password for your new local account. The prompt also asks you to re-enter your desired password and create a helpful password hint. Do keep in mind leaving the password field empty sets up your new local account without one, meaning anyone with access to your PC can log in.
Once you’ve created a username and password, click Sign out and finish at the bottom of the screen to create your local account. You now have the ability to sign in to Windows using the created local account.
Note: If you ever want to switch back to using a Microsoft account, simply visit your account settings page and click the link saying “Connect to a Microsoft account.”
Extra information
Once you decide to disconnect your Microsoft account any settings you’ve linked no longer sync when signing in on other devices. They remain present in the cloud, however. These steps only remove your Microsoft account from Windows – they don’t delete the account.
Related: Microsoft tries to kick deceptive apps out of the Windows Store
Access to Microsoft’s Windows Store, as well as access to special features in some applications, require a Microsoft account to use. While there are ways to recreate some of the lost features, it proves easier to use these with a proper Microsoft account. If you rely heavily on any of the synchronization features we recommend against setting up a local account in Windows 8.1.