
“The Ultimaker 2 earns its reputation with impressive detail, the ability to crank out rough objects in a hurry when you need it to, and a robust, easy-to-service design.”
- High maximum resolution
- Excellent build quality
- Easy to maintain and repair
- Expensive
- Struggles with certain fine details
“Why you can trust Digital Trends – We have a 20-year history of testing, reviewing, and rating products, services and apps to help you make a sound buying decision. Find out more about how we test and score products.“
Along with MakerBot, Ultimaker is arguably one of the biggest names in 3D printing — and for good reason. For the past few years, the company has been pumping out some of the best fused deposition modeling (FDM) machines in the biz, and the brand has become immensely popular as a result.
The first-generation Ultimaker (which was sold as a DIY kit) was released back in 2011. A couple years later, the company launched a new-and-improved version dubbed the Ultimaker 2. Then came the Ultimaker 2 Extended (a taller version) and the Ultimaker 2 Go (a smaller version).
Aside from the dimensions, the core print specs are pretty much the same for all the company’s machines. To get an idea of how they hold up in a market crowded by all manner of upstarts, we took the flagship Ultimaker 2 for a whirl.
Features and specs
Out of the box, the Ultimaker 2 boasts some impressive numbers. In addition to massive build area, it also sports a maximum resolution of 20 microns — the smallest layer thickness offered by just about any consumer-oriented FDM printer on the market right now. It’s no slouch in the speed department either. A well-adjusted Ultimaker can supposedly spit out ABS or PLA (it can handle both, regardless of the brand) at a top speed of 300 millimeters per second.
Setup and configuration
Whereas the original Ultimaker required a fair bit of assembly, the Ultimaker 2 comes almost completely pre-assembled and ready to print. Once you’ve got it out of the box, all that’s left to do is insert the build plate, plug in the machine, and flip the switch to “on.”
It only takes a couple minutes to get the machine set up and powered on, but after that, there’s bit of configuration required before you can start printing off that Hello Kitty toothbrush holder you’ve been dreaming about. The next step is to calibrate the machine and make sure that the build plate is in the correct place.


You have to manually level the printer’s glass build plate by adjusting the extruder tip so that it’s exactly 1 millimeter away from the glass at all four corners. The quick-start guide suggests putting a piece of paper underneath the tip, and lowering it until you can feel some resistance when you pull the paper out — which is simple enough. Without this guidance, it’s nearly impossible to eyeball a single millimeter.
The next step is feeding filament into the extruder. This is where we ran into some trouble. Our unit was a bit fickle, and we had to manhandle it a bit (more on that later) in order to get the filament through the feeder — but after this initial hiccup, everything went swimmingly.
Build quality and design
You wouldn’t want to keep it on your mantle, but as far as 3D printers go, this is one of the more attractive options. It doesn’t try to hide the fact that it’s a 3D printer, but it also doesn’t look scrappy and cobbled together like a lot of printers do. The motors are enclosed inside the machine’s main structural supports, and all the other moving parts are neatly hidden behind Ultimaker’s opaque plexiglass walls.
This thing could probably withstand a low-magnitude earthquake.
The Ultimaker’s looks are only outdone by its build quality. The machine’s frame is made from this stuff called Dibond — which is basically two pre-painted sheets of aluminum, bonded to a solid polyethylene core. It’s commonly used in sign-making, and it’s an extremely durable material.
These supports, and everything else on the printer, are held together by a myriad of steel bolts, which makes for a very sturdy little box. It’s almost unnecessarily strong. Your printer probably won’t need to endure much abuse over the course of its life, but this thing could probably withstand a low-magnitude earthquake — let alone the occasional bump, drop, or wayward football.
User interface and software
A single knob that also function as a button handles every control on the Ultimaker 2, which should be simple and intuitive for practically anyone. If you’ve ever used an iPod or a car stereo, you’ll have no trouble using this thing. Just spin the knob to scroll through your available options, and press it to make a selection. Ultimaker’s menu trees are extremely logical and well-designed, so you’d be hard pressed to get lost or confused while using them.

To start printing, you first download a print file (.stl or .obj) and then run it through Ultimaker’s accompanying (and free) slicer program called Cura. This is the software that “slices” your digital model into individual layers that the printer can understand. We won’t delve too deep into a software critique here, but compared to the other slicer programs out there, Cura is definitely one of the best. The learning curve isn’t super steep, and the interface makes it easy to use without limiting your access to advanced features.
Once you’ve run your file through Cura, all that’s left to do is load it onto an SD card, pop it into Ultimaker’s slot, and hit go. You can also connect the machine directly to your computer via USB 2.0, if you prefer, but we preferred the SD method because it doesn’t require you to be tethered to the machine.
Print performance
There’s no two ways about it — the Ultimaker 2 prints like a boss. It’s extremely dynamic, and excelled in dozens of ways during our tests.
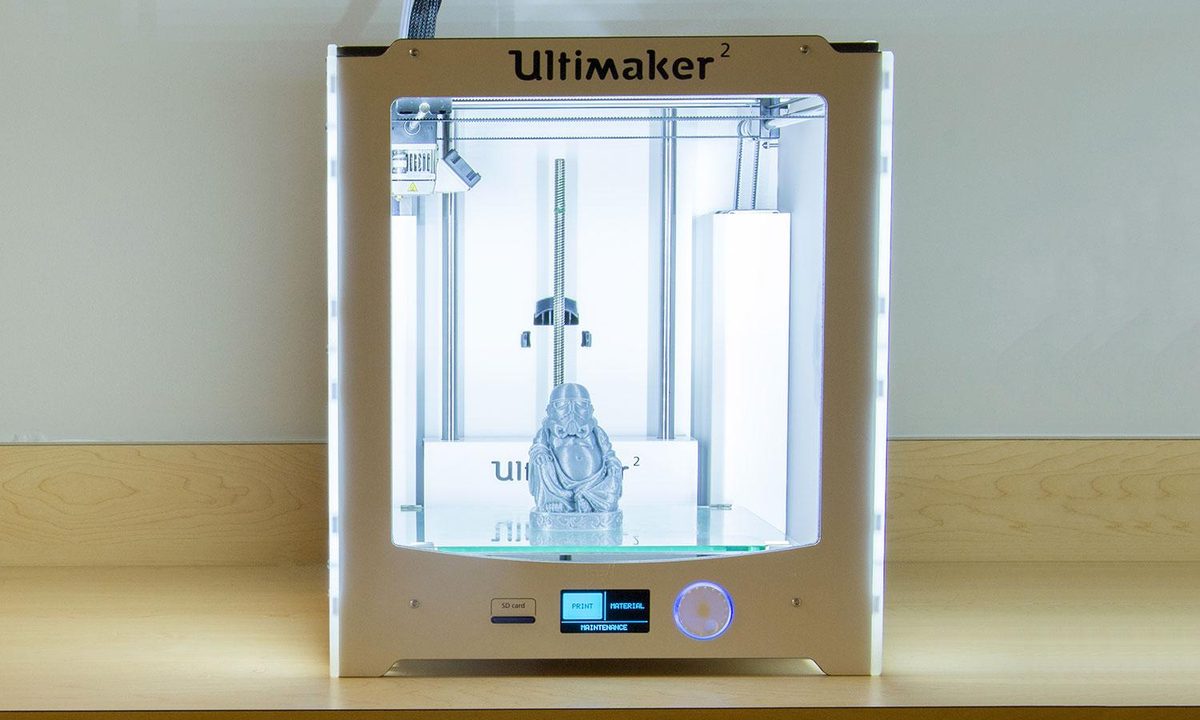
To start, we went after print quality. The biggest selling point of this machine is its incredible 20 micron print resolution — which is currently the lowest layer thickness offered by a consumer-level 3D printer. To test this, we printed something with extremely subtle details and curves — a statue of Buddha wearing a stormtrooper helmet — at the highest resolution settings. The print took nearly half a day to finish, but when it did, we were quite impressed. With layers that thin, you can barely tell there are layers at all, even on the most drastic curves.
The Ultimaker 2 can pump out some of the highest resolution objects we’ve ever seen.
If you don’t mind waiting around, Ultimaker boasts incredible print quality — but you won’t always have 12 hours to wait around for a print to finish, so next we tried to figure out how quick it goes.
To test speed, we first printed a 1x1x1 centimeter cube, at a mid-range layer thickness of 100 microns. Ultimaker can go much higher and much lower than this, but we always start with 100 microns because it keeps things mathematically simple, and it’s also the minimum layer height for most 3D printers.
Ultimaker 2 pumped out the cube in about 7 minutes 50 seconds, which is pretty good. To put that in perspective, the more expensive Form 1+ SLA printer from FormLabs took about 9 minutes running at similar settings.
After that initial test, we kicked up the print speed settings to 300 millimeters per second –the highest possible print speed– and printed the same 1x1x1 cube at the same resolution. It came out fairly sloppy, but the whole process only took about 3 minutes and 30 seconds, which is pretty damn quick. As far as we can tell, Ultimaker’s claimed print speed specs are completely accurate — it all just depends on your resolution/speed settings.

But of course, speed is just one part of the equation. To get an idea of how the printer handles other things — overhangs, unsupported spans, etc. — we also printed a special object designed by Thingiverse user Cntrl V, which you can see here. The idea is to adjust your quality/speed settings so that the printer finishes the object in under an hour, and then see how the piece comes out.
After running this test a handful of times, it’s pretty clear where the Ultimaker excels and falls short. Overhangs and unsupported spans don’t seem to be much of a problem, and even at higher speeds the machine handles them with ease.
The entire machine can be disassembled with three hex keys.
Some of the finer details, however (such as small numbers and letters), tend to smash together when the printer is moving super quickly. We also got a fair amount of plastic burrs and imperfections caused by overextrusion — but that’s to be expected from just about any 3D printer that’s working at high speeds, so we can hardly knock Ultimaker for this.
Overall, the big take-away here is that Ultimaker 2 is a very dynamic machine that offers impressive quality and speed. There’s always going to be a “time vs quality” tradeoff with any 3D printer you use, but the great thing about Ultimaker 2 is that you can choose which side to favor. It can do really high-quality, high-resolution prints if you don’t mind waiting, but can also spit out prints at a blistering pace if you’re only after low- or mid-quality resolution.
Maintenance, reparability, and upgradability
One of the things we really liked about the Ultimaker was the fact that the entire machine can be assembled and disassembled with just three different hex keys. Most of the screws and bolts are the same size too, so if you ever run into trouble with something, taking the machine apart to assess the problem is fairly simple.
For example, when we first unpacked our demo machine, we had a bit of trouble getting the filament feeder to accept the strand of ABS we were trying to give it, and after a half dozen unsuccessful attempts, we decided to take the entire module apart to see what the problem was. A few minutes and a couple hex key turns later and we had successfully cracked it open and identified the culprit — an overtightened knurled wheel (the thing that grips/pushes the filament through). A quick adjustment solved the issue, and a few screws later we were back in business.

As we mentioned before, the Ultimaker 2 is a pretty solid little machine, but in the event that something does break or stop working (which is inevitable, really), Ultimaker offers a full suite of replacement parts for for the printer. Hot end cooling fan crap out? Need a new stepper motor? Accidentally broke a belt? Not to worry — the company’s website has it all, ready to ship out to your doorstep with just a couple clicks.
Upgradability is pretty decent as well. The back of the machine features a spare set of mounting holes for an extra filament feeder, making it possible to upgrade your machine to make it a dual-extruder if you’re so inclined. Granted, Ultimaker doesn’t sell all of the parts you’d need to make this happen, but there’s at least one third-party provider out there that sells kits for it.
Conclusion
The Ultimaker 2 has built up quite the reputation in the three years it’s been available, and after using one for the better part of a month, we can say with confidence that it definitely lives up to that reputation.
The prints are fast, detailed, and accurate — and if you don’t mind waiting a few extra hours for them to finish, the Ultimaker 2 can pump out some of the highest resolution objects we’ve ever seen from a consumer-level 3D printer. On top of that, it’s also extremely well built, easy to maintain, and built to accommodate upgrades.
At $2,500, it’s definitely one of the more expensive printers you can buy, but that extra cash isn’t going to waste. In this case, the high price tag directly correlates to a high level of quality — in just about every aspect.
Highs
- High maximum resolution
- Excellent build quality
- Easy to maintain and repair
Lows
- Expensive
- Struggles with certain fine details