
Destiny 2 Iron Banner guide: How to earn the Iron Lord title

Lord Saladin, the legendary Titan in Destiny 2, has returned to the Tower and has brought his Iron Banner with him. There are some major changes to how this PVP-focused mode operates, and some of the tasks are, frankly, a bit confusing. Never fear, your friends at Digital Trends have braved the skirmishes and stood over defeated foes to break it all down for you in this guide. We will show you how to complete the Forged in Iron quest and get you started on the path to earning the Iron Lord title.

Difficulty

Moderate

Duration

20 hours

What You Need

  • Complete "Forged in Iron" quest

The Iron Banner menu of Destiny 2, showing a weekly objective to complete 3 matches.
Image used with permission by copyright holder

Forged in Iron

Your first stop will be the central courtyard in the tower. Saladin has relocated from his normal haunt on the balcony and instead occupies the center event space. Approach the large ring of fire, and speak to Saladin for an introduction to the Forged in Iron quest and to receive your first task: Complete one match of Iron Banner. Open your director, navigate to the Crucible tab, and launch.

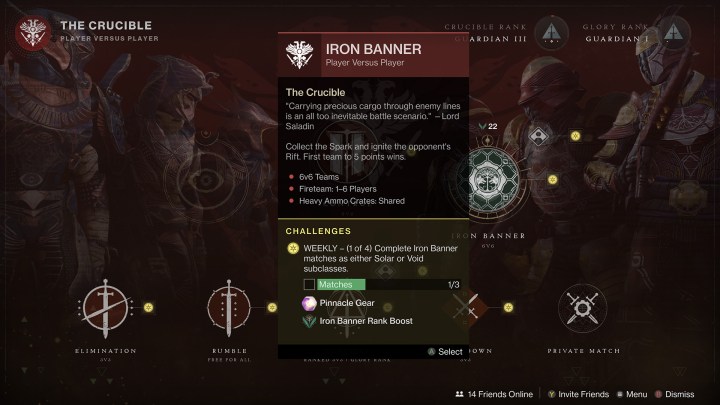
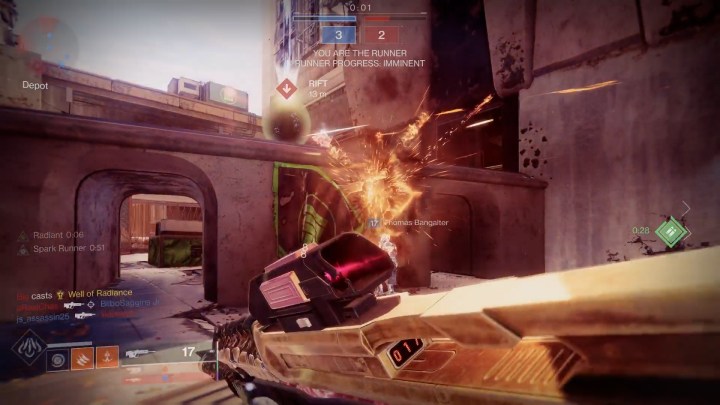
The Iron Banner for this cycle features Rift. In it, two teams of guardians are fighting to collect a Spark at the center of the map and carry it into the enemy base to detonate. After each detonation, the round resets. First to five detonations or whoever has the most detonations when time expires wins. Unlike previous years of Iron Banner, power level is no longer factored into the gameplay. Feel free to wear or use whatever you want, regardless of if it is no longer viable in other game modes.

You don’t actually need to win your match (but out of respect for your teammates, you should give it your best shot); just finish and head back to Saladin. Now he wants you to complete a daily challenge. This can be extremely confusing, as nothing associated with the Iron Banner seems to reference a daily challenge. If you visit the Iron Banner launcher from the Crucible section of the Director, you will see a Weekly Challenge. For example, “Complete three matches as either a Solar or Void subclass.” Doing that will satisfy the daily challenge requirement.

Fire burns as a guardian rushes an objective in the closing seconds of a Destiny 2 match.
Image used with permission by copyright holder

Iron Banner Rank points

Next you need to earn Iron Banner Rank points. These come from completing matches. The amount you earn can also be boosted by wearing Iron Banner armor, an Iron Banner Emblem, and completing challenges (like you did in the previous step). Once you’ve earned 300 points, your next step will ask you to visit Saladin and receive an Engram.

Once that is complete, you will need to complete matches while wearing at least one part of Iron Banner armor. Just like the Iron Banner Rank points before, more pieces earns you faster progress. Just keep playing while dressed as some sort of Space Knight, and eventually you will complete this phase. Lastly, speak to Lord Saladin and the Forging Iron Quest is complete.

The Iron Lord triumph screen of Destiny 2, showing the challenges to complete to earn a title.
Image used with permission by copyright holder

Earning the Iron Lord title

Now that you are an Iron Banner expert, it’s time to let the world know by earning the Iron Banner Title. Open the Triumph Tab of your character, and locate the Iron Lord seal. Open it, and you will see the seven challenges that you need to complete in order to unlock this title. These are the challenges:

  • Jolder's Vistroy: Win Matches in the Iron Banner Playlist
  • Gunnora’s Seal: Acquire Iron Banner Armor (duplicates do not count)
  • Orimund’s Taste: Acquire Iron Banner Weapons (duplicates do not count)
  • Orewing’s Spirit: Earn points by completing objectives in Iron Banner
  • Frostmire’s Will: Complete Iron Banner Challenges
  • Crimil’s Dedication: Reset Iron Banner Rank twice
  • Jorum’s Howl: Complete Iron Banner matches while wearing Iron Banner Armor (more pieces increases rewards)

Most of those will occur naturally over time. Some, like Jolder’s Victory, account for matches you’ve played previously, so some players may start with certain steps already complete. The objectives in Orewing’s Spirit refers to things like dunking the Rift. Crimil’s Dedication will require you to max out your rank in Iron Banner, which enables a reset twice, so it may be time-consuming. Make sure to take advantage of the bonuses for wearing the proper gear, emblem, and daily challenge completion.

Editors' Recommendations

Justin Koreis
Justin is a freelance writer with a lifelong love of video games and technology. He loves writing about games, especially…
How to beat the Nightweaver in Remnant 2
A gunslinger shooting a glowing wraith.

Remnant 2 has a smorgasbord of unique and punishing boss encounters to push through if you want to see everything in its Soulslike world, but few are as frenetic and occasionally jarring as the Nightweaver. The showdown against this nightmarish foe caps off a long and unsettling trek through Losomn's creepy Sanatorium. If you've come across her and find yourself struggling with her rapid movement and constant barrage of attacks, we'll offer some tips here that might help you make it through the fight alive.
How to beat the Nightweaver in Remnant 2
The Nightweaver is located in Losomn within The Tormented Asylum. She's one of Remnant 2's most challenging bosses due to how fast and erratically she moves around the battlefield. It doesn't help that she has multiple phases throughout different areas of the Sanatorium, eventually making for a very claustrophobic fight once you reach the interior.

At the beginning of the fight, you'll be outside the Sanatorium facing down the Nightweaver as she flies around in various directions, which can make her difficult to hit. During this first phase, the biggest things to look out for are her Spectral Lunge and Icy Spikes attacks. The former is telegraphed by her ascending into the air and beginning to dive, at which point she'll begin swiping viciously in your direction until she reaches you – but careful timing can help you dodge right through her attack to survive the onslaught. The latter is a ranged homing attack, meaning you'll have to either strafe left or right to avoid them or dive out of their way.

Read more
Remnant 2: How to cross the floating pillars in The Lament
Floating pillars in The Lament

If you work your way through the various maps throughout Remnant 2's biome of Yaesha, you may stumble upon an area called The Lament. There are a few different puzzles on this map, but perhaps the most head-scratching one is located in its depths where you'll encounter a selection of floating pillars. If there doesn't appear to be a solution in sight, don't worry – we'll fill you in on the tricks to solving this mystery.
How to cross the floating pillars in The Lament
The floating pillars in the Lament can be crossed via invisible walkways, but before you can discern which ones possess these paths, you'll first need to look at the symbols on top of them. There are three different symbols, but only one will provide safe passage. To find out which one, you'll need to do one of two things.

The official method would be to return to the beginning of the map and find the symbol, which is extremely easy to miss. Make your way to the very start of the gauntlet where you must evade the darts being fired at you. Turn on your flashlight and look up above the first crawlspace to spot the symbol.

Read more
How to beat Mother Mind in Remnant 2
Three characters shoot at a boss in Remnant 2.

Remnant 2 comes with a pretty substantial number of bosses to take on across its various biomes, and some playthroughs will yield different encounters than others. So if you come across The Nameless Nest in Yaesha during your travels, you'll soon find yourself facing off against an optional boss named Mother Mind. This huge creature looks pretty scary, and if you're not sure how to handle the fight, it can put an end to the battle quite quickly by making you fall to your death. However, we'll share with you some tips for taking on Mother Mind and making the most of its big, ugly weak spot so you can drop this monster and get on with your business.
How to beat Mother Mind
Mother Mind is a mix between a standard DPS-driven boss battle and a mechanics-based encounter, meaning you'll need to dish out plenty of damage while also watching out for the enemy's special move that can send you spiraling down to an instant death. Because of this, be sure you're prepared to stay mobile and understand how to sprint and jump before entering the door to the creature, as you're going to be doing a lot of both.

The boss battle against Mother Mind takes place in a large, circular arena with a total of four stone platforms. You'll walk through the door facing the boss, and you can instantly begin firing at the cross-shaped weak spot on his face, getting in as much damage as possible right off the rip. If you have the Hot Shot weapon mod (or any mod that will grant additional damage per bullet), the beginning of this fight is a great time to pop it and move things along.

Read more