
How to complete Fia’s questline in Elden Ring

FromSoftware games really put the “character” in NPCs. Sure, they may not make much sense when they talk to you, but just about every NPC you meet in their games has a history, goal, and story of their own that you can choose to participate in or not. Sometimes participation is obvious, like giving them an item or helping them in a fight, but most other times, you will have no idea what you can or should do to move a character’s quest forward — if you even can. Other times, you might just go about your business only to realize that you went too far in the game and it caused that NPC to move forward without you, possibly ending in their death.

Elden Ring has perhaps the most forgiving system for following NPC quests of any Souls game. Not only are they much more clear, at least for a FromSoftware game perspective anyway, but thanks to a patch, you can even locate them on the massive open-world map far easier to progress their stories. On the other hand, the scope of the game also allowed the developers to make quests far more complex and intricate, leading to some confusion being inevitable. For Fia, the Deathbed Companion’s quest, you will go on a journey all across the Lands Between. Let her hold you once last time if you like before we dive into how you can complete Fia’s questline in Elden Ring.

Related Videos

See more

How to complete Fia’s quest

Talking to Fia by a fire.

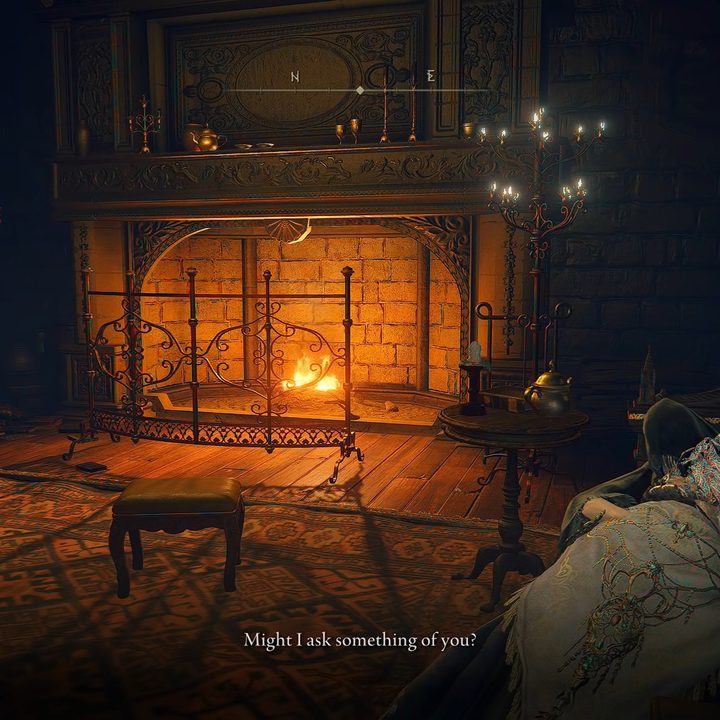
Fia is one of the earliest NPCs you can meet in Elden Ring. Once you gain access to your hub area, the Roundtable Hold, you can find her in the room behind Hewg the blacksmith sitting on her bed. You can talk to her and let her hold you if you want, but for the time being, there isn’t much else you can do to interact with her. You can talk to her a few times, but to really begin her quest, you also need to start Ranni the Witch’s quest.

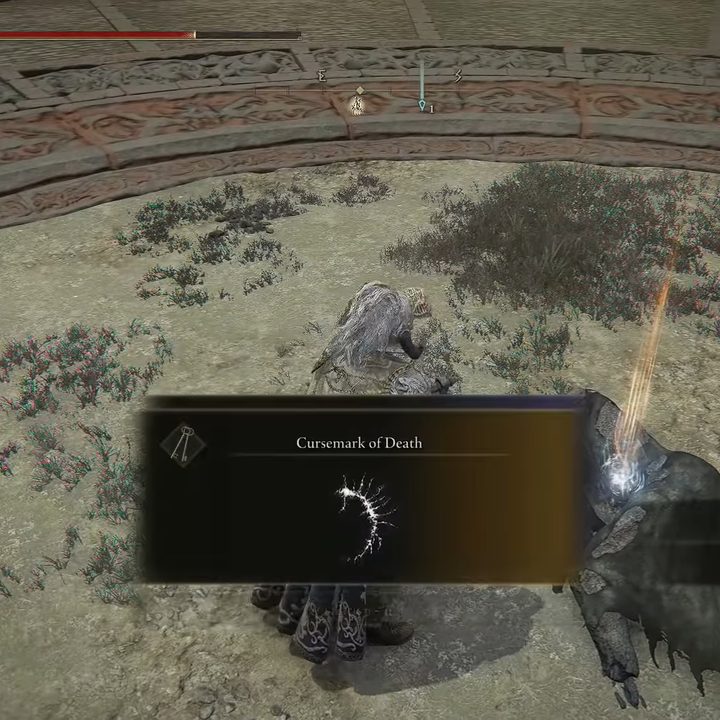
Without going over an entire other NPC’s questline, you need to get the Carian Inverted Statue item and use it to progress through the Carian Hall in Liurnia. This will lead you to the Liurnia Tower Bridge, which you can cross and reach the Divine Tower of Liurnia and locate a body you can collect the Curesmark of Death from. Take this back to Fia at Roundtable Hold, where you will be able to have a secret conversation with her.

Picking up a curesmark from a corpse.

At this point, Fia will tell you some bits of lore and ask you to go return a dagger to its owner in a somewhat sinister way. First, make sure you’ve found D, Hunter of the Dead, and gotten him to appear in Roundtable Hold as well. If he’s already there, talk to him about the dagger. You can give it to him since he claims to know the owner and will deliver it himself. Leave the area, come back, and go into Fia’s room to continue the quest.

Well, D’s hunting days are over at this point. You will find him dead by Fia’s hand beyond the closed door, past Hewg. Fia will leave the Roundtable Hold, and the only way to track her down is to have moved Rogier’s quest far enough to get the note that tells you about D’s brother. Rogier explains that he can be found sleeping in “the aqueduct beside the Eternal City of Nekron. And it’s said he stood before the Prince of Death not far beyond that spot.”

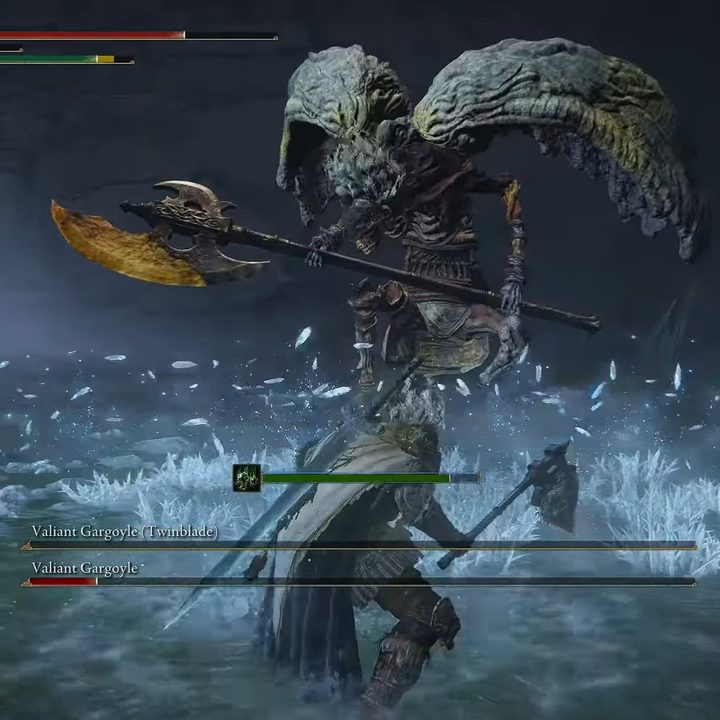
To reach the Eternal City of Nekron, first head through the Siofra River to the Ancient Grounds Site of Grace. Rather than go deeper into Nekron itself, go north toward the aqueduct. You’ll know you’re in the right spot if you run into two crucible knights near the waterfall. Go left from here and you will find D’s brother at a dead end. Speak to him and move forward to a boss fight against a FromSoftware staple, two Valiant Gargoyles. Once you beat them, use the coffin at the end of the boss arena to reach a new area.

A knight fighting a giant gargoyle.

Now in the Deeproot Depths, you will have to carefully navigate a bunch of branches to hit the Across the Roots Site of Grace. Continue forward from here, through a hole in the wall and into a bit of a gauntlet against Fia’s champions.

Along with generic champions, you will also need to fight the spirits of Lionel the Lionhearted and Rogier. You’re outnumbered here again, but if you can take out her bodyguards, you will be able to reach Fia once again and talk to her. Show her the Curesmark of Death and talk again, learning more about her goals and plot with Godwyn. Either teleport away and come back or just rest at the Site of Grace, but return to Fia to get new dialogue and the option to Enter the Deathbed Dream, which you should do.

A knight facing off against a red and black dragon.

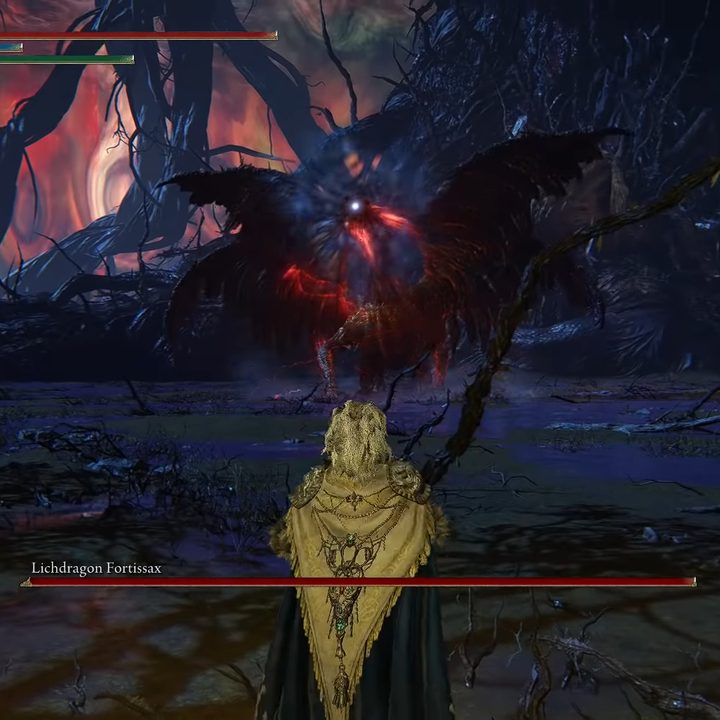
Ready for yet another boss fight? This is probably the toughest of the entire quest against the Lichdragon Fortissax. Thankfully, this is your final challenge for this quest. Overcome this demonic dragon and you will get the Mending Rune of the Death Prince, thus unlocking a new possible ending for the game and finally wrapping up Fia’s quest.

Editors' Recommendations

Fortnite Cipher quests: how to complete all Cipher and Encrypted quests
Fortnite Cipher quests reewards.

A new set of objectives has been added to Fortnite, and they're called Cipher quests. These quests offer a wide variety of objectives, with some requiring you to find hidden items around the map, while others are more action focused. The quests are mostly straightforward, though a handful of them might cause some confusion, especially if you don't play often. In this guide, we'll show you how to complete the new Cipher quests, including the mysterious Encrypted challenges.

Recommended reading

Read more
All Landing Platform locations in Hogwarts Legacy
A magical landing platform.

No open-world game would be complete without a bunch of collectibles. Among the many types in Hogwarts Legacy, the Landing Platforms are perhaps the most difficult to actually find. Unlike most objectives, places, and items that appear on your map, Landing Platforms have to be spotted by eye, with no help from your map. Aside from getting you one step closer to doing everything there is to do in this massive game, there are several rewards you can unlock by finding them, plus it is required if you want to get that Collector's Edition trophy/achievement. To save you the hassle of flying around aimlessly, here are all the Landing Platform locations in Hogwarts Legacy.
How Landing Platforms work

Landing Platforms are special, ornate-looking platforms that have four unlit braziers. You can only reach them once you've unlocked your broom, after which you can fly around and land on them to ignite the fires and "collect" them. Make sure you stand on them long enough for the platform to rotate and the fires are fully alight or it may not count. There are 20 in total, and as you find and activate them, you will get four total rewards from your Challenge menu.

Read more
Hogwarts Legacy: how to solve every Merlin Trial
A student waving a wand in Hogwarts Legacy.

Even in the universe of Harry Potter, the mythical Merlin is still a legendary figure of the wizarding world. In the case of Hogwarts Legacy, you will have plenty of side activities, quests, and challenges to complete around the open world, however one set is inspired by this powerful magician. Merlin Trials are unlocked and placed all over your map after you complete the "Trials of Merlin" main quest. This will introduce you to the type of magical challenges these trials will present you, but not all of them. Here are all the different types of Merlin Trials in Hogwarts Legacy, and how you're intended to solve them.
How to beat all Merlin Trials

While there are many of each, 85 in fact, there are nine basic trial types you will encounter. They will all be changed up in some way, but still require the same solution. Bear in mind that some trials do require your character to know specific spells, so if you don't have those unlocked yet, the trials won't be able to be solved. If you're ever unsure of what to interact with during the trials, use Revelio to light up interactable objects.
Roll the ball (Depulso required)
This trial type asks you to use the Depulso spell to knock a big sphere to a designated pit in the ground. Simply keep nudging them until you roll them into the slot. Some trials may require you to burn debris off the hole first, so keep that in mind.
Stack the balls (Accio required)
This is another ball-moving puzzle, but this time the balls are small and you need to lift and place them into slots on different platforms.
Blast the balls
One of the most simple trials, this one just asks you to shoot a bunch of targets around the area with any attack spell. The only tricky part can be finding them all.
Blast the slabs
Almost identical to the prior trial, but this time you just need to blast the green stone slabs.
Light the torches (Confringo required)
This type of trail asks you to ignite three torches before any of them go out. As soon as you light the first torch, it will begin sinking into the ground and extinguish the flame once it is fully submerged. Some torches are on higher platforms than others, so it is usually best to start with those to give yourself the most time.
Escort the moths (Lumio required)
Using your Lumio spell, you need to lead three clusters of moths to a glowing statue. Once you bring all three groups of moths to the statues, you're done.
Fix the statues (Reparo required)
A simple trail, this one tasks you with finding the three broken statues and fixing them up with your Reparo spell.
Match the symbols (Flipendo required)
A set of three columns, each with two sections, will be in the area. Each face of the sections bears a symbol you need to rotate through using Flipendo to match the symbols on each column.
Platforming
The last trial type is a simple test of your platforming skills. You just need to navigate an obstacle course of stone platforms all the way to the end without falling. During some trials, we've found that you can actually get on your broom and fly over platforms to activate them. While we're not sure if that's a bug that might get patched out down the line, it currently makes these challenges much easier.

Read more