
FromSoftware has always been tweaking its health systems from game to game. In Demon’s Souls there were different consumable healing items you needed to farm from enemies or buy. The healing method was refined slightly in Bloodborne with one type of consumable blood vial. The Dark Souls series proper had what many consider the best healing method: The Estus Flask. In the first game, you started with five charges, but could upgrade it to hold five more at a time. Dark Souls 2 tried making your starting amount of drinks smaller, with items you needed to find able to increase it by one each time. Dark Souls 3 used a system more close to the first, but also let players allocate the number of uses between healing and magic regeneration.
Elden Ring takes the best aspects of the Estus system from the previous series and rolls them into one. You start out with a limited number of charges while needing to choose how many go to healing or magic, but the number of drinks you get can be upgraded, as well as how much health each swig will replenish. Both upgrades require their own unique material to utilize, and because of how powerful they are, they can only be found in set locations in The Lands Between. If you want to make your flask more potent, increasing how much health a single drink restores, you will need to find all the Sacred Tears in Elden Ring.
See more
- What are Evergaols in Elden Ring?
- Fastest way to farm runes in Elden Ring
- How to duplicate Remembrances in Elden Ring
How Sacred Tears work
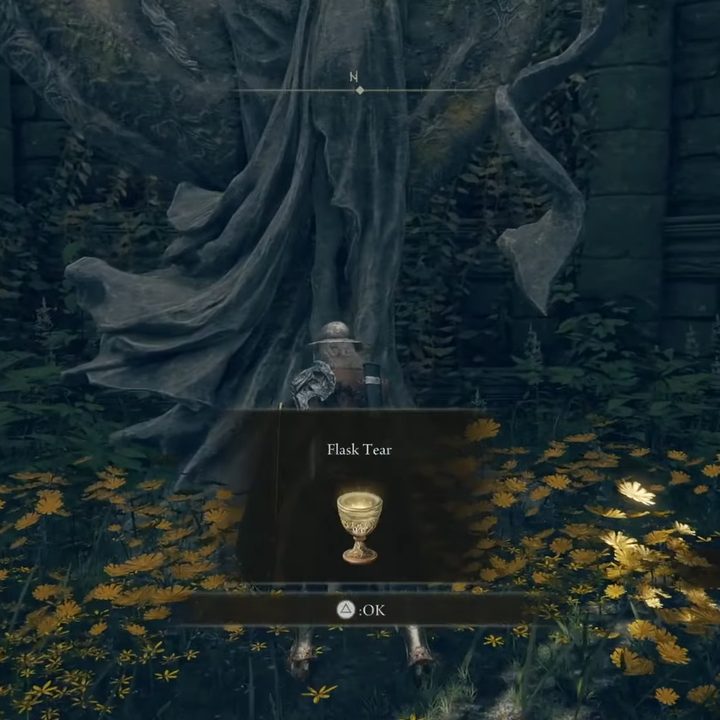
Sacred Tears are special items that appear in churches all over The Lands Between in Elden Ring. When you collect one, you will be able to visit a Site of Grace and upgrade your flask with it, making it restore more health every time you use it, and appearing as a “+” symbol next to your flask icon for each time you upgrade it. This works for both healing and FP flasks, so you don’t need to decide which type to improve. Each spot you need to visit is a point of interest on the map, making them a bit easier to locate compared to other secrets in the game. Just remember to actually use them because your flask won’t automatically upgrade just by picking them up.
Limgrave Sacred Tears

Starting out in the first region of the game, we have four Sacred Tears to pick up.
The first is on the southern island just off the mainland called the Weeping Peninsula. Cross over the bridge and follow the road to the Castle Morne Rampart Site of Grace. To the west of this spot, go up the hills to the Callu Baptismal Church, where you can grab the first Sacred Tear inside.
Way over on the west coast of the Weeping Peninsula, almost directly west from the Callu Baptismal Church, is the Fourth Church of Marika. You can find it just a bit north from a poison swamp area, and southwest from the Weeping Evergoal.
The last Sacred Tear on the Weeping Peninsula is on the north-most tip, straight north from the Minor Erdtree icon near the center of the island. A road leads directly to the Church of Pilgrimage, going right past the Demi-Human Forest Ruins on the east side of the path.
On the mainland of Limgrave now, the Third Church of Marika might end up being the first Sacred Tear you find naturally. This church is due east from where you first enter The Lands Between. Follow the path north, then head east rather than west toward Stormveil Castle. Follow this path up and around the woods to the boarder of Caelid. Right at the end of the path is this church and the Sacred Tear.
Caelid Sacred Tears
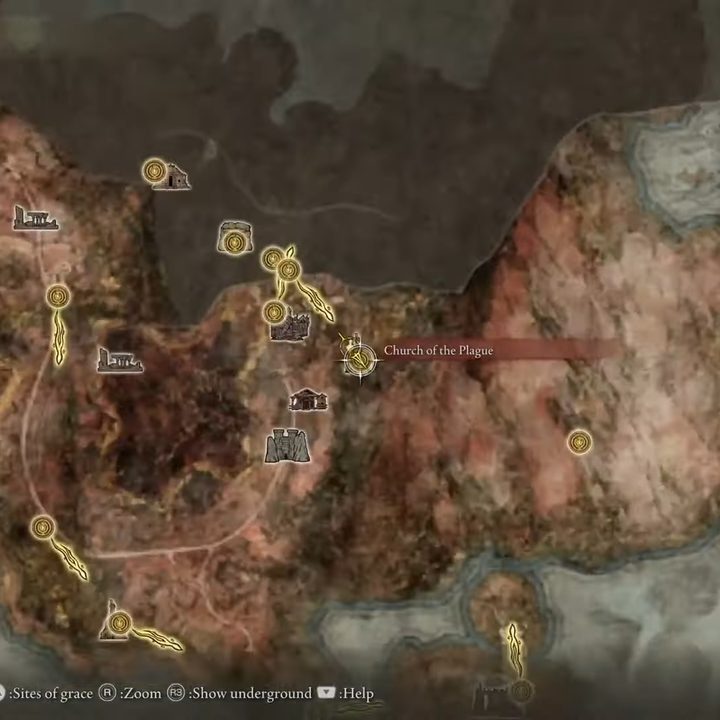
Speaking of Caelid, there’s only one Sacred Tear in this region proper, and that’s in a place called the Church of the Plague. This spot is almost dead center of the region, but a bit southeast from Sellia, Town of Sorcery. If you’re riding north toward that location, it would be just off to the east side past Gowry’s Shack, although it is sitting on the top of a cliff that you will need to circle around to get up.
Liurnia of the Lakes Sacred Tears
The next trio of Sacred Tears is in Liurnia of the Lakes, the next major zone you reach after completing Stormveil Castle, although you don’t have to actually go through it to reach this area.
First up is the Bellum Church, which is way up to the north of Liurnia on the way to the capital on top of some cliffs right before the next zone. It is just north of the main bridge crossing over a patch of forest.
Now, the Sacred Tear at the Church of Irith is much closer to where you come out into Liurnia from Stormvail, but is technically harder to get since it requires you to go through that entire dungeon and beat the boss. If you’ve managed that, however, as soon as you exit, just go west right away to find the Church of Irith. If you follow along as close to the wall of the castle as you can, you won’t miss it.
Last up is the Church of Inhibition. This one is not too far from the Bellum Church, due east and up some cliffs, and northwest from the Minor Erdtree. As long as you don’t stop along the way, you won’t have any trouble.
Atlus Plateau Sacred Tears
Way out of order, the Second Church of Marika is just off the Atlus Highway Junction road. Ride up from the Site of Grace and look for it on the east side of the road. If you come to a T junction, you’ve gone too far.
Once again starting from the Atlus Highway Junction Site of Grace, go northeast along a plateau, sticking a bit more to the north, and find the Stormcaller Church tucked inside the cliffs.
Mountaintops Sacred Tears

Our last pair of Sacred Tears are in the late-game area known as the Mountaintops. As eager as you might be to max out your flask, you should probably wait a while before braving this zone.
On the south side of this zone is an ice-covered lake where we can finally visit the First Church of Marika. The church is right off the southernmost coast of the lake.
Our final church is the Church of Repose, and is protected by a pretty challenging NPC, although you can always run past if you want. This church is in the forge, a bit southwest from the First Church of Marika and along the southwestern edge of this section.


