
How to tame animals in Fortnite

One of the most noteworthy features added to Fortnite season 6 is the inclusion of wild animals. These creatures often are found roaming around the map and some can actually inflict damage to you if you aren’t careful. In total, there are four different creatures: Chickens, frogs, wild boars, and wolves. Of these creatures, the wild boars and wolves are deadly, packing a serious punch if you aren’t prepared. Though, thanks to Fortnite’s new crafting system, you’re able to tame these animals and bring them to your side. In this guide we’ll show you exactly how to do that, step by step.

Here’s how to tame animals in Fortnite.

Recommended reading:

Craft a Hunter’s Cloak

fortnite-how-to-tame-animals
Image used with permission by copyright holder

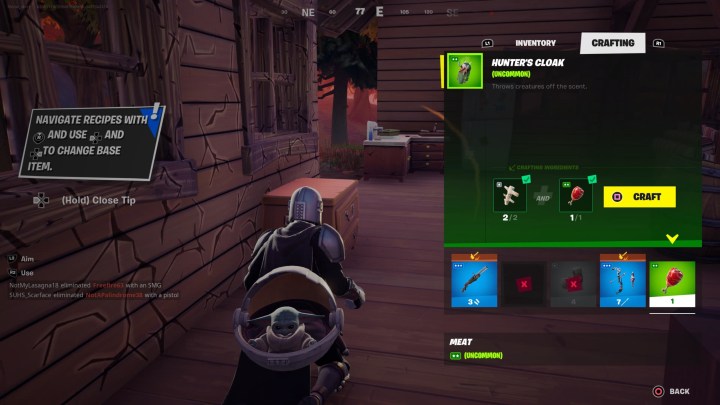
The first thing you need to do if you plan on taming animals is to craft a Hunter’s Cloak. We go into more detail about that process in our dedicated guide here, but the main point is that you need to gather two animal bones and one piece of meat to make a Hunter’s Cloak.

There are a few different ways to get these materials, but the easiest method is to eliminate a boar or a wolf. Other animals drop the materials, too, but you’ll have to take out multiple frogs or chickens to get all the materials you’ll need. If you eliminate either one boar or one wolf, they’ll drop two animal bones and one meat, which is exactly what you need.

Once you have the required materials, go into the crafting menu by pressing up on the D-pad and navigate to the Crafting section. Here, you’ll find the Hunter’s Cloak, so press Square on PlayStation, X on Xbox, or Y on Nintendo Switch to craft the item. After that, it will be added to your inventory and once that happens, go ahead and use the item like you normally would. This will prevent hostile enemies from attacking you.

Tame an animal

fortnite-how-to-tame-animals
Image used with permission by copyright holder

Now that you’re effectively cloaked from deadly creatures, you can approach them and a Tame prompt will appear. Again, it’s Square on PlayStation, X on Xbox, or Y on Nintendo Switch. Sometimes, the creatures will run around, making it hard to actually get the button press to register, so we advise standing right in front of the animal so it can’t move. Once you’ve successfully tamed it, the animal will not only be friendly towards you, but it’ll also attack other enemies such as animals, NPCs, or even enemy players (almost like hiring an NPC to protect you).

If you’re having trouble tracking down these creatures, we advise you to turn on Visualize Sound Effects from the Settings. Head to Audio and scroll down to find this option. This will trigger iconography to appear when you’re near an animal, so it’s highly effective. There are different icons depending on the animal, as well, making it easy to tell what kinds of creatures are nearby.

Editors' Recommendations

Topics
Joseph Yaden
Joseph Yaden is a freelance journalist who covers Nintendo, shooters, and horror games. He mostly covers game guides for…
All status effects in Lies of P and how to cure them
Pinocchio in Lies of P.

Lies of P is a challenging role-playing game that will test your mettle at every turn with deadly enemies and dastardly environmental traps. But to make things even a bit more difficult, you'll have to contend with a collection of status effects that can majorly affect your character and make things much harder for you in battle. We've compiled a list of all status effects in Lies of P, as well as a list of ways to cure them.
All status effects
There are a total of seven status effects, with each either dealing damage or having a noticeable impact on your ability to perform in battle. Here are all of them and how they work.
Overheat
Overheat is caused by taking too much fire damage too quickly. When the Overheat bar fills entirely, you'll begin to burn and lose health until it is cured or wears off naturally. During this time, your Guard Regain recovery amount will also be reduced, which can drastically impact your survivability in fast-paced encounters.
Shock
When Shock is applied, your character's stamina recovery will be reduced significantly, which can have devastating consequences. Until this effect is cured or wears of naturally, you'll be stuck with very limited movement and attack opportunities due to your decreased stamina.
Electric Shock
Not to be confused with standard Shock, Electric Shock is caused by taking too much Electric Blitz damage in a short period of time. When this happens, you'll take increased Electric Blitz and physical damage for the duration of the effect, and your Fable meter will drain continuously, which can reduce your attack options in combat.
Decay
Decay is caused by taking too much Acid damage within a small time window. This will cause constant weapon and acid damage, both of which can make life difficult for you in battle since letting it go on for too long can result in needing to repair your weapon while also dodging your foes' attacks.
Corruption
Corruption is caused by a buildup of, well, Corruption. When this happens, you'll be afflicted with what is essentially your textbook poison effect, meaning your HP will drain continuously until it wears off or is healed with an item. This can be especially challenging to cope with when also fighting enemies, so avoiding sources of Corruption is highly advised when possible.
Break
Break is an annoying status effect to contend with, as letting its bar build up entirely will temporarily decrease how much health your Pulse Cells heal. This can be especially frustrating when you already find yourself at low health and don't have many Pulse Cells left, but it's usually best to wait until the effect wears off before healing so you can ensure you get the maximum amount of health possible.
Disruption
Disruption is perhaps the most concerning of all status effects in the game, as you'll be instantly killed when the Disruption bar fills up entirely. If you find yourself in a situation where a lot of Disruption damage is being doled out, it's best to back off until the bar depletes some or you'll soon be seeing a Game Over screen.
How to cure status effects
There are multiple items in the game designed to help you cure specific ailments, as well as items that can increase your resistance to them so that you can reduce your chance of becoming infected to begin with. You can find these cure and resistance items in various places while exploring throughout the game, or you can buy them with Ergo from Polendia at Hotel Krat.

Attribute Purification Ampoule - Cures Overheat, Electric Shock, Decay, and Corruption
Special Purification Ampoule - Cures Shock, Break, and Disruption
Attribute Resistance Ampoule - Enhances resistance to Overheat, Electric Shock, Decay, and Corruption
Special Resistance Ampoule - Enhances resistance to Shock, Break, and Disruption

Read more
How to unlock all Kameo Fighters in Mortal Kombat 1
Rain stands next to Sektor in Mortal Kombat 1.

Despite always sticking to the traditional one-versus-one format for the main series, Mortal Kombat 1 has introduced a secondary system using Kameo Fighters that you can call in to assist you during a fight. This helps expand the roster from its already impressive ranks by including some fan favorites, but more importantly, it adds a new level of depth to the fighter to consider when picking your backup. These assists even have their own unique Fatalities as well! Even so, just like Havik, you have to do a little work to unlock these Kameo Fighters. If you want to take the fight to the online ranks, you will need to have all the Kameo Fighters at your disposal. Here's how to unlock them all in Mortal Kombat 1.
How to unlock all Kameo Fighters
Unlocking Kameo Fighters is tied to your overall profile level. You level up your profile by doing basically any activity in the game, such as playing Invasions mode and the Tower. Whatever you pick, every five levels you reach will reward you with one new Kameo Fighter. Here's which ones you unlock at each milestone:

Level 5 - Scorpion

Read more
How to change your appearance in Baldur’s Gate 3
A party of four adventures walking through a mushroom forest in the Underdark

Making your character can take a long time if you really want to get all the details right. From your race, class, hairstyle, and more, you have a lot of options to tweak before ever starting your adventure. If you're a little too excited, you might end up slacking off on making your character and assuming you can update it later just so you can get right into the action. If so, or you simply want to change up your look after a couple of hours into this massive game, you'll be at a loss as to how, if you even can, change your appearance in Baldur's Gate 3. You may not fully like the answer, but here's the best you can do in terms of altering your appearance after you've exited the character creator.
Can you change your appearance in Baldur's Gate 3?

The answer to this is technically yes, but not in the way you would hope. To get it out of the way, no, there's no way to return to the character creation screen after you've finalized your character. Unlike respeccing your character, there's no NPC, item, or magic mirror anywhere in The Forgotten Realms that will let you change your appearance.

Read more