Xenoblade Chronicles 3: Colony affinity guide

If you have played either of the previous Xenoblade Chronicles games, then there will be a lot of familiar elements when you get started in Xenoblade Chronicles 3. Many of the same terms and mechanics from prior games are reused, as is the general flow of the game. At the same time, nearly everything familiar will be somewhat changed or expanded upon in this title to make them that little bit more interesting. One prime example of this is the Colonies.

The world you can explore in Aionios is more vast and dangerous than ever, but Colonies are your kind of safe haven from the wilds once you’ve liberated them. While you can count on them as a safe place to rest most of the time, they offer way more possibilities and functions for those willing to put in some work to make the people of each Colony like you. This is an important part of ending the conflict between two warring nations as well, so the rewards you get are just icing on the cake. Here’s everything you need to know about Colony affinity in Xenoblade Chronicles 3.

Further reading

How to increase Colony affinity

A colectopedia request.
Image used with permission by copyright holder

We touched on it in the intro, but Colonies all need to be liberated from their commanders before you can start exploring them freely and earning the people’s trust. You will need to wait until you make it to Chapter 3 before the option to liberate a Colony opens for you, but once it does, you should be liberating every one you are able to as soon as possible. Once liberated, you will see that each Colony has its own affinity ranking of one to five stars, with five being full affinity.

While you might think that simply liberating a Colony would go a long way toward raising the affinity, it doesn’t. In order to actually start boosting your fame around a Colony, you have a few options. The easiest way is to simply explore the Colony looking for NPCs that have a gold star icon above their heads. All you need to do is talk to these specific people to get a small bump to your affinity rank. You can also get a small increase by eating at their local canteen and ushering fallen soldiers to the afterlife with your flute. You can spot these trapped spirits on your map via the flute icon.

Another potentially quick source of affinity is the Collectopedia Cards. Every liberated Colony will give you tasks in your Collectopedia to collect specific materials in exchange for affinity, XP, and a reward the first time you complete it. You can complete them multiple times too, only you won’t get that reward again. If you’ve been gathering up tons of stuff, you can easily grind out affinity just by turning in these requests.

For a more substantial boost to affinity, you will want to focus on completing side quests that you pick up from that Colony. Each one only has a set amount, so you will need to still do some of the other methods to fully max out a Colony, but these quests should give you a majority of the affinity needed — and always be on the lookout for when one quest opens up another new one, too.

What do you get for raising Colony affinity?
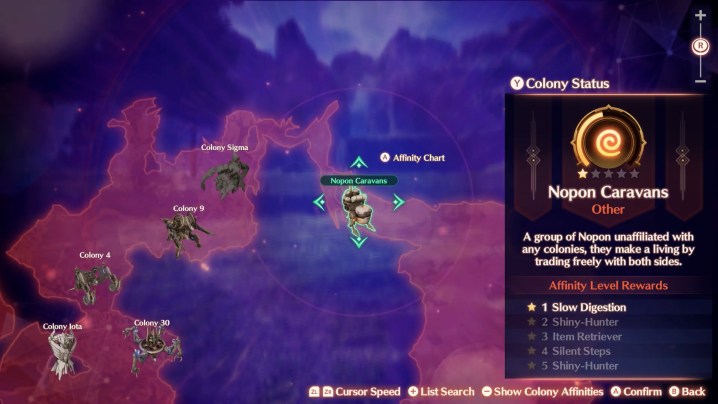
A map showing a Colony.
Image used with permission by copyright holder

Aside from the satisfaction of helping all the local people, you do get some very valuable rewards for going the extra mile to max out your affinity rank with each Colony. Every star level you hit will reward you with a different passive stat bonus, with seven possible options. This also means there will be a lot of overlap in what bonuses you get from different Colonies. While that might sound disappointing, these bonuses all stack, so the more you get, the better your buffs become. You can check the level for each of these bonuses in the Party skills menu. Here are all the bonuses and what they do for you:

  • Speed Jogger: increases running speed
  • Item Retriever: increases item collection range
  • Silent Steps: reduces monster detection range
  • Shiny-Hunter: increases chances of encountering rare monsters
  • Slow Digestion: increases meal effect duration
  • Swift Swimmer: increases swimming speed
  • Caravan Call: causes Nopon Caravans to visit the Colonies

Editors' Recommendations

Jesse Lennox
Jesse Lennox loves writing, games, and complaining about not having time to write and play games. He knows the names of more…
The best free Nintendo Switch games
Cars fly off and away from a goal explosion in Rocket League.

The Nintendo Switch offers an unparalleled gaming experience, allowing you to enjoy games big and small, no matter whether you’re on the couch or on the go. That said, Switch games rarely receive a discount, even if you’re constantly checking for the best Nintendo Switch deals. Our list of the best free Nintendo Switch games is here to help.

We've rounded up the top free-to-play games on Nintendo Switch, from Switch Online exclusives like Tetris 99 and Pac-Man 99 to third-party hits like Fortnite and Rocket League. 

Read more
Best Perk-a-Colas in Modern Warfare 3 zombies, ranked
A lineup of perk sodas from Call of Duty: Modern Warfare 3.

Ever since perks were introduced to the series, they've been a staple in every game mode in Call of Duty. For Call of Duty: Modern Warfare 3, you can obviously pick your perks during multiplayer, but not so in Zombies. This mode has always made perks work slightly differently, using different names, but similar mechanics. This time around, the Perk-a-Colas have returned, and these cans of refreshing soda just so happen to give your character a massive improvement. You can grab one from a vending machine on the map in exchange for your points, but they don't come cheap. Since these perks last you the rest of the match (or until used for some of them), you will want to choose your flavor wisely. These are all nine Perk-a-Colas in Call of Duty: Modern Warfare 3 ranked from best to worst.

It is important to note that the location where each perk machine spawns on the new Zombies map is random for every match. There's no way to know where any specific perk will be, but you can see where perk machines spawn on your map as indicated by a downward pointing arrow.

Read more
The best field upgrades for Modern Warfare 3 Zombies
A man holding a mysterious glowing vial.

Call of Duty: Modern Warfare 3's Zombies mode puts a slight twist on the mechanics you are already familiar with. It now plays much more like a souped-up DMZ mode rather than its old round-based format. And Field Upgrades have been modified in terms of both their effects and how you get them just for this game type. There are six different Field Upgrades you can bring into the map and use on a cooldown timer to help improve your chances of survival, but you can only pick one at a time. You will begin the game with only one option, but steadily unlock the rest as you level up. Once you have them all, the question then becomes which is the best Field Upgrade? We've managed to exfiltrate with the answer.

Healing Aura
Regardless of whether or not you're playing with a team or running solo, Healing Aura is no doubt the best Field Upgrade to bring on any Zombie run. When activated, you and any teammates in the area will not only gain immediate healing, but it will also instantly revive any downed teammates. The downside to all this power is that this upgrade has the slowest recharge time and is unlocked at level 19.
Aether Shroud
This is another upgrade that you will be glad to have. Aether Shroud makes you you temporary invisibile to all Zombies. This won't make you invincible, mind you, and PMCs can still take shots, but if you're getting swarmed and have no way to escape, becoming instantly invisible to a bloodthirsty pack of zombies can save your skin more often than you think. This upgrade has a medium recharge rate and is unlocked when you hit level 39.
Frenzied Guard
Just past the halfway mark, Frenzied Guard has a massive upside, but not without some risk. When you pop this Field Upgrade, you instantly repair all your armor, but also draw all the aggression of any enemy nearby for 10 seconds. However, another perk is that anything you kill during this time also repairs your armor, so situationally, it can be great or detrimental. This one recharges slowly, unlocking at level 9.
Frost Blast
Frost Blast does exactly what you expect: it fires a freezing blast that will slow down any enemy you hit with it and deal a bit of damage. It's decent in a pinch, but not a game-changer. You can get it when you hit level 29.
Tesla Storm
An odd ability on paper, Tesla Storm is only good if you have a team working together. Activating it will create a lightning chain between you and your team that will damage and stun enemies that get close to any one of you. It lasts for 10 seconds and can be great in the final moments while holding out for an extraction, but not in other situations. It recharges slowly and is the last upgrade you unlock at level 50.
Energy Mine
This is your default Field Upgrade, so it makes sense that it's the "worst" on the list. Energy Mine isn't exactly bad; you simply lay down a mine that does what a mine does -- explodes. It's just that setting up traps like this in Zombies isn't all that applicable except when kiting a boss around or waiting for the helicopter. It has a medium recharge speed.

Read more