
Have you ever ventured deep into the audio settings on your PlayStation 3? Unless you have a working knowledge of audio encoding formats, it might as well be written in a foreign language. While the audio purist inside me definitely loves Sony for offering up such a vast array of possible options, it’s incredibly daunting to understand what’s the perfect option without investing time learning about the pros and cons of each format.
One of the biggest hurdles for a home theater setup with a PS3 at its core is transitioning from lossy audio formats like Dolby Digital 5.1 and DTS 5.1 to lossless formats like Dolby TrueHD or DTS-HD Master Audio. The advantage of lossless audio in entertainment media is that you are hearing the audio track in it’s purest form. Lossy formats use data compression and alter how the overall audio track sounds.
It’s the same concept as a photo being compressed from RAW format to JPEG or a movie file being converted to a file type like QuickTime or Windows Media. That’s why some people are shifting from lossy Mp3 files to 24-bit/192kHz music on sites like HDTracks. It’s also starting to become more prevalent on streaming video services like CinemaNow on Samsung televisions.
But fear not! We have put together a guide to help walk you through the process of connecting your PlayStation 3 to your home theater system and get amazing lossless audio from your home theater system.
The Basics: Connecting Your PS3
If you are using an optical TOSLINK or digital coax cable to transfer audio from the PlayStation 3 to your receiver, you are not going to be able to take advantage of more advanced codecs like Dolby TrueHD or DTS-HD Master Audio. You will be stuck with standard Dolby Digital, standard DTS or lossless two-channel PCM audio. It doesn’t matter what audio track you attempt to choose in a Blu-ray disc menu, it’s always going to default back to the limitations of the S/PDIF transmission that get sent down those kinds of cables.
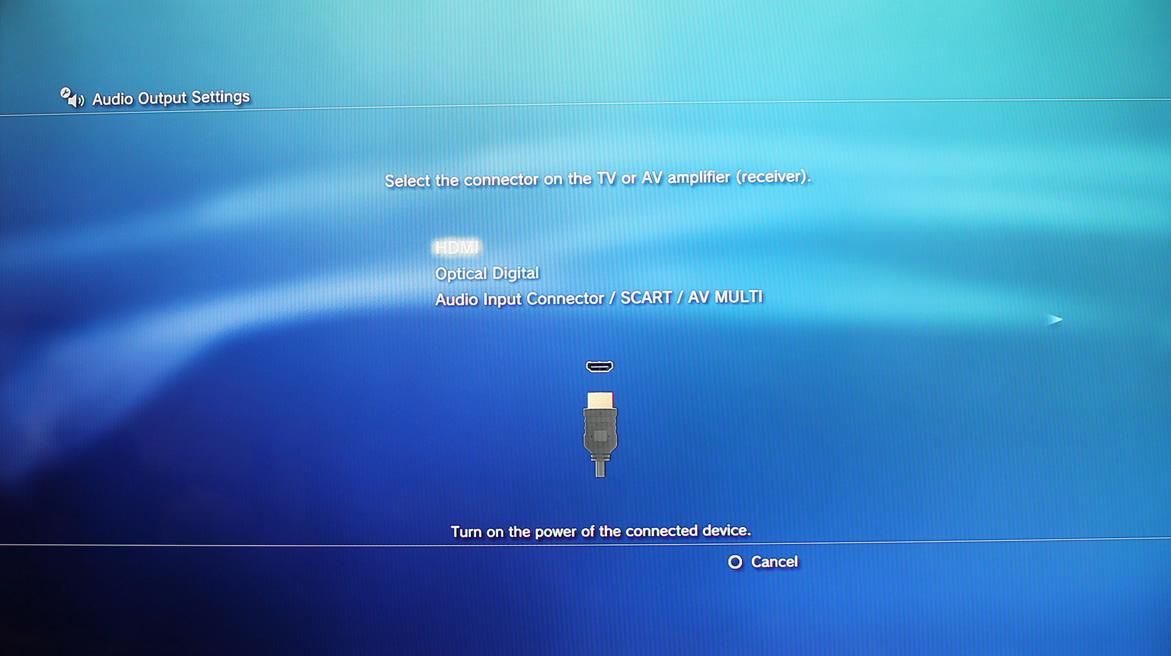
If you haven’t made the jump already, it’s time to switch to HDMI to access more advanced formats and explore the true capabilities of the PS3. Of course, you will need a receiver with HDMI 1.3 (or higher) ports to input the audio data from the PS3 and output the video data to your HDTV. The vast majority of new receivers have multiple HDMI inputs and outputs. For instance, the Yamaha RX-V773 offers five HDMI inputs and dual HDMI outputs.
Bitstream versus Linear PCM
Choosing between Bitstream and Linear PCM is one of the first choices within the PS3 audio menu. The choice between the two options depends on what audio formats your receiver can decode. Basically, Bitstream leaves the work of audio decoding to your receiver and Linear PCM assigns that task to the PlayStation 3. Bitstream is a good option if you are stuck with an optical TOSLINK or coax cable connection. It’s also a solid pick if you really aren’t interested in messing with your audio settings and want to see your receiver light up with the name of the codec currently being decoded (Dolby Digital, DTS, etc).
Bitstream is also perfectly fine if you have one of the newer slim PS3 models. Models early in the PlayStation 3 life cycle weren’t capable of sending lossless audio via bitstream. However, the new slim models (most models late in the PS3 life cycle) include this feature and can send Dolby TrueHD or DTS-HD Master Audio streams to your receiver. That being said, you will also need a receiver with HDMI 1.3 or higher to bitstream lossless audio. Earlier versions of HDMI will not be able to pull this off.
The simplest way to figure all of this out is to set your PS3 to Bitstream, pop in a Blu-ray disc, choose a Dolby TrueHD or DTS-HD Master Audio audio track in the Blu-ray disc menu and watch what codec pops up on the front of your receiver when the video starts up. If it says anything other than Dolby TrueHD or DTS-HD MA, you probably have an incompatible PS3 or the HDMI version on your receiver is too old. Check with your receiver’s manufacturer before purchasing a new receiver; there may be a firmware update available to upgrade the HDMI version.
However, don’t fret! You can still take advantage of lossless audio by switching over to Linear PCM rather than Bitstream. This is the ideal setting for the older (fat) PlayStation 3 models or basically for anyone that wants a granular level of control over audio formats. Since the PlayStation 3 is handling all the decoding, the Sony console can take a Dolby TrueHD or DTS-HD Master Audio audio stream, decode it and send a multi-channel, linear PCM stream to your receiver. Identical to the advanced formats, it’s completely lossless and will provide the best audio experience compared to lossy alternatives.
The nice thing about a LPCM stream is that the majority of modern receivers can handle this format without any issues. However, be aware that your receiver will display something like “Multi-CH” or “PCM” on the front LCD display. It’s not going to display “Dolby TrueHD” or “DTS-HD MA” because that’s not what the PS3 is sending to the receiver. Rest assured, you are listening to the lossless version of the audio mix.
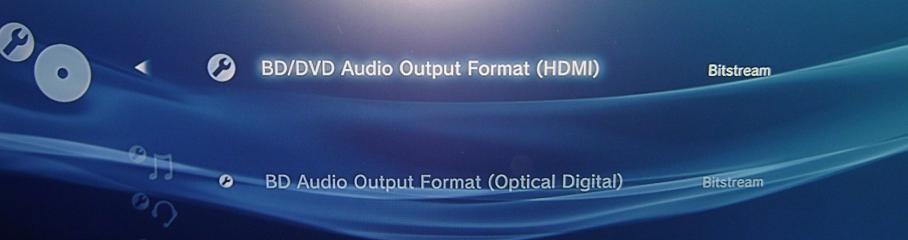
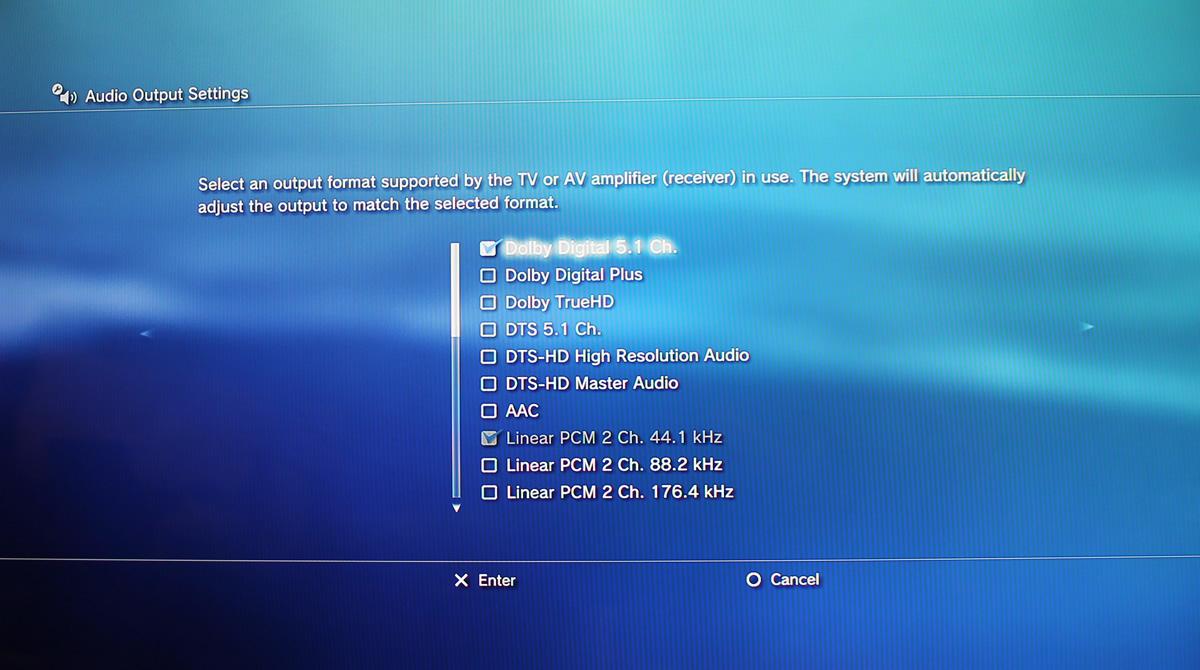
In order to set LCPM up correctly, head into the PS3 XMB interface and select “Settings”, then “Video Settings.” Under “BD/DVD Audio Output Format (HDMI),” switch the stream from Bitstream to Linear PCM. Now, you will need to pop over into the “Sound Setting” section of the Setting menu. Make sure the PS3 is outputting audio from the HDMI cable and check all the appropriate lossless formats, namely “Linear PCM 5.1 Ch. 96 kHz” and “Linear PCM 7.1 Ch. 96 kHz.” as well as all the rest of the Linear PCM formats you are interested in using.
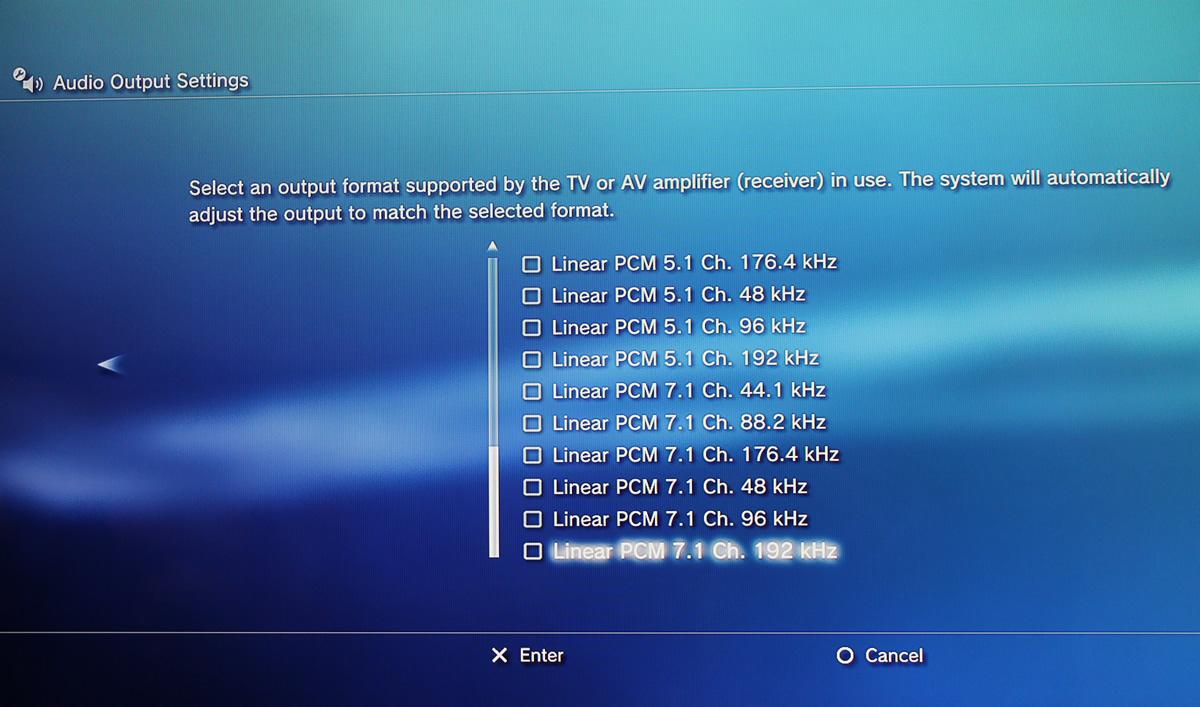
Interestingly, if you have a PS3 Slim, you can take the LPCM route in order to specifically choose which audio formats you want to send over to your receiver and which ones you would prefer not to use. This is ideal if you want to stick to a specific speaker setup like 5.1 or 7.1 or if you have a preference of codecs, DTS over Dolby for instance. If you happen to check all the codecs, the PS3 will decide which format to send to the receiver automatically. More often than not, that’s going to be the Linear PCM stream.

Other PS3 Audio Tips and Tricks
- While the majority of Blu-ray movies have multiple options for audio tracks, some games also include this option. Look for varied types of audio tracks in the audio settings of your game.
- When playing a Blu-ray disc on your PS3 while converting to Linear PCM, you can check what’s being decoded by looking at the logos at the top of the screen after pressing the “Select” button on the PS3 controller.
- If you are having audio volume issues between various speakers (specifically problems hearing dialog through the center channel), try turning ” Dynamic Range Control” off in the Video Settings menu. It’s set to automatic as a default on all new PlayStation 3 models.
- HDMI cables do not have version numbers. You do not need to purchase a new HDMI cable just because it’s advertised as being compatible with HDMI 1.3 or higher.
- The PlayStation 3 can output audio through multiple channels, ideal for a wireless headphones, v perhaps. Within the Settings menu, turning on the multi-output feature will allow you to send audio to a secondary source though the optical digital out or the AV multi out connector. Be aware that this puts limitations on the output through the HDMI port, namely limitations on providing lossless audio.
Editors' Recommendations
- Hurry! Beats Studio 3 headphones are down to $159
- Spatial audio via headphones: how science crams 9 speakers and a subwoofer inside your head
- What is spatial audio? The 3D sound experience fully explained
- How to set up your TV for Super Bowl Sunday
- You Asked: Samsung QD-OLED conundrum, ATSC 3.0, and audio outputs


