Your IP address is kind of like your computer’s networkable name-tag. It’s the numeric identifier your internet connection uses to catalogue your desktop or laptop, on top of all your mobile devices and other web-connected gear. By default, your Windows or MacOS machine will assign an IP address to your peripheral, but you also have the ability to change that identifier, along with some other networking info.
Doing so isn’t too complicated either. And to help you along the way, we’ve put together this guide for changing your IP address in Windows and MacOS. We also have a section toward the end on how changing your public IP address.
Changing your private IP address in Windows 11
Your private IP address is the one that your local network — be it your home or office — uses to identify your system. It’s probably some variation on 192.168.0.XXX, with the latter few numbers being the main differentiator between your PC and your phone or other device connected to the network. You can find out your current IP address by searching for CMD in the Windows 11 search bar and selecting the corresponding result. Then type IPConfig and hit Enter in the Command Prompt window. The numbers next to IPv4 Address are your IP address. It’s a good idea to note this down, along with your Subnet Mask and Default Gateway, as those will be important if you want to change your IP address manually.
For more tips on finding out your IP address, we have a guide just for that.
If you don’t care about what your IP address is — just not that one — then you can reset your router. It should reassign IP addresses to all connected devices once it comes back online. If it doesn’t, or you want a specific IP address instead, follow these steps.
Step 1: Click Start, then click Settings > Network & internet.
Step 2: If you’re using a Wi-Fi network, click Wi-Fi > Manage known networks. If you’re using an Ethernet connection, choose Ethernet.
Step 3: Click the Edit button next to IP assignment.
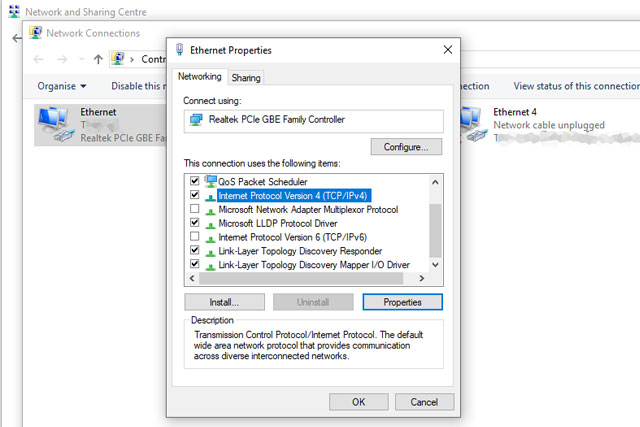
Step 4: You should see two options: Edit network IP settings and Edit IP settings. Choose one of these, then click Manual. Then, toggle on IPv4.
Step 5: Type in your new address, then click Save.
We would recommend sticking to a similar numbering convention as the one you have automatically supplied by your router, but change the final number to whatever you want between 0 and 255 (some routers may specify a different range, so consider sticking to the lower end of it).
You must then put in your network’s Subnet Mask and Default Gateway, which we learned to find earlier in this guide. Finally, set your Preferred DNS server to the same as your Default Gateway, unless you have another DNS server in mind. Then press OK and OK again to confirm your settings.
Step 6: To confirm your IP address has changed, run IPConfig in a Command Prompt window again. When you’ve definitely changed your IP, try loading up a website to make sure that you’re still able to get online. If you can, congratulations, you’ve changed your IP address. If you can’t, make sure you’ve input the right information. In the worst case, set everything back to how it was, and you’ll be able to get online again.
Changing your IP address in MacOS
The process for changing your IP address on MacOS is different but no more complicated than it is on Windows. You jump through similar hoops to find out what your IP address is on MacOS, so we’ll dive right into the steps.
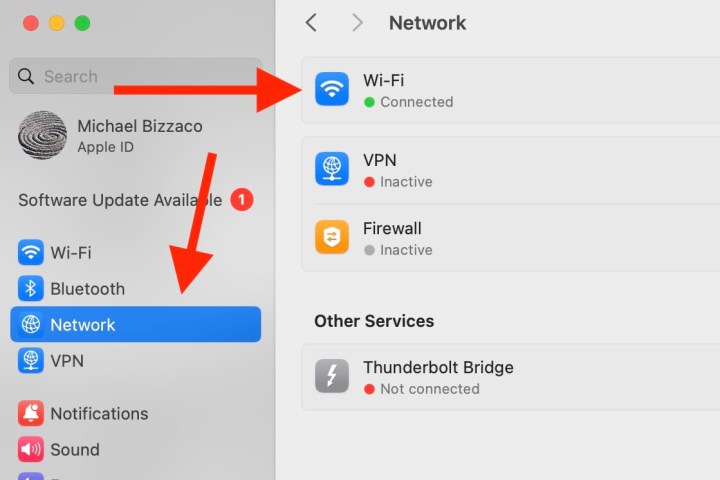
Step 1: To gain access to your network settings on MacOS, select the Apple logo in the top left-hand corner and choose System Settings from the drop-down menu. Then, click the Network icon in the left-hand column.
Next, select your network — Wi-Fi or Ethernet depending on your connection type.
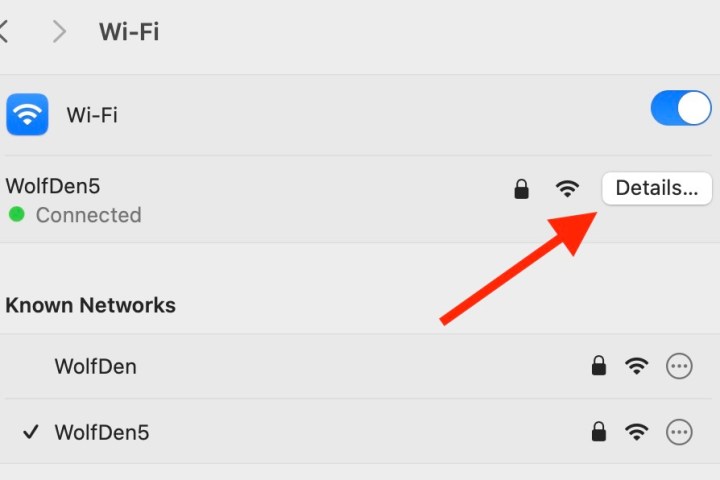
Step 2: Click the Details button, then click open the TCP/IP tab.
Step 3: Click open the dropdown menu next to the Configure IPv4 option. Then, click Manually. Now, enter your new IP address. We recommend sticking to the numbering convention that your router initially assigned you.
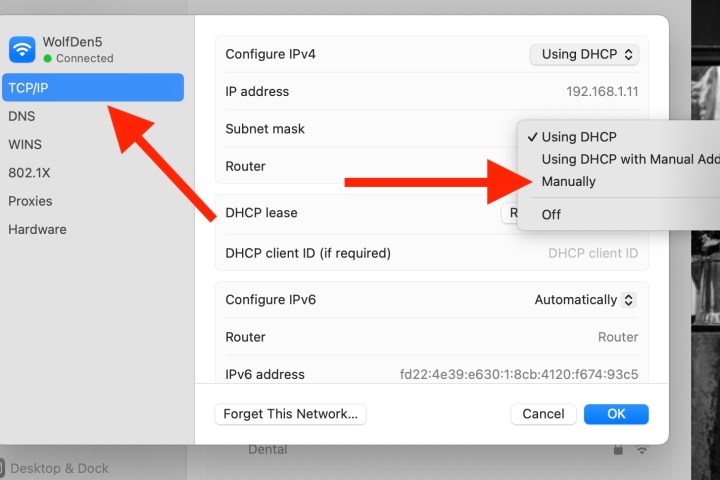
Step 4: When you’re happy with your selection, confirm it, and select Apply to complete the settings. Then see if you can connect to the internet. If you can, congratulations — you’ve changed your IP address. If you can’t, then go back and double-check to see if you missed a step along the way. If you’re stuck, set everything back the way it was, and once you can get back online, try again to see if you can spot the problem.
Changing your public IP address
Whether you’re running a Windows or MacOS machine, changing your public IP address is a little more complicated. Internet service providers typically determine the IP addresses they distribute to their users, so it’s not something the customer has the ability to change on their own. Most will offer a Static IP service that allows you to choose your public-facing IP address, but often they charge for the privilege. If you want to permanently change your public IP address, your best bet is to contact your ISP and inquire about it.
On the plus side, if you were trying to change your IP address for privacy, you can just opt to hide it instead. Hiding your IP address will also let you access websites from different countries, like if you want to see shows from a different version of Netflix. To learn about hiding your IP address, using a Proxy, or going through the Tor network, check out our guide about how to do so.
A more permanent solution is to use a VPN service. We have a list of favorites that range from free to a few dollars per month, but they all give you the ability to change your public IP address to one found in an entirely different country of your choice, with myriad server options to help you fine-tune it. While you won’t determine the numbers yourself, you’ll get an entirely new address, which is the whole purpose.
Editors' Recommendations
- How to change margins in Google Docs
- How to choose the best RAM for your PC in 2024
- How to check your CPU temperature
- How to download Vimeo videos on desktop and mobile
- How to dual boot Linux and Windows


