A stocked computer cache may be convenient for logging into and out of go-to sites in seconds flat, but a major buildup of these tracking codes could significantly impact your PC’s performance. If you’ve noticed that your PC has been running rather slow of late, or you’re using a new browser and don’t know how to clear its cache, we’ve got you covered with the following guide.
- Why you might want to clear your cache
- How to clear cache in Google Chrome
- How to clear cache in Firefox
- How to clear cache in Safari
- How to clear cache in Opera
- How to clear cache in Microsoft Edge
- What’s the difference between a cache and cookies?
- What happens after I clear my cache?
- How often should I clear my cache?
Why you might want to clear your cache
Clearing your browser’s cache can prove fruitful for several reasons. First off, purging the stored data in your cache forces your browser to seek and retrieve the most recent webpage elements instead of recycling the same old components, whether they’re up to date with the developer’s standards or not.
Furthermore, resetting your cache will potentially help in the event of 404, 502, and other errors that may result from a corrupt cache. You can also clear any private data you have stored in the form of login IDs, passwords, and additional sensitive info you’d prefer not to save on your machine. It’s also a simple trick you can employ to shed any unnecessary data, which could slow down your browser.

How to clear cache in Google Chrome
Step 1: Launch Google Chrome and select the Chrome Menu icon represented by three vertical dots in the upper-right corner of the browser window, and then choose Settings near the bottom of the resulting drop-down menu. (You may need to select the Down arrow first to access the Settings option).
Step 2: Then, select Privacy and security in the left sidebar. You’ll then want to look for the Clear browsing data option. Select it, and make sure the box for Cached images and files is checked. You can uncheck the other boxes for Browsing history, Download history, Cookies and other site data, and so on … unless you also want to delete these at the same time for privacy reasons.
Step 3: When ready, select Clear data to begin the process. If it’s been a while since you cleaned Chrome out, this step could take a long time, so schedule accordingly.
If you want to improve Chrome’s functionality now that the cache is cleared, here are our favorite Chrome extensions.
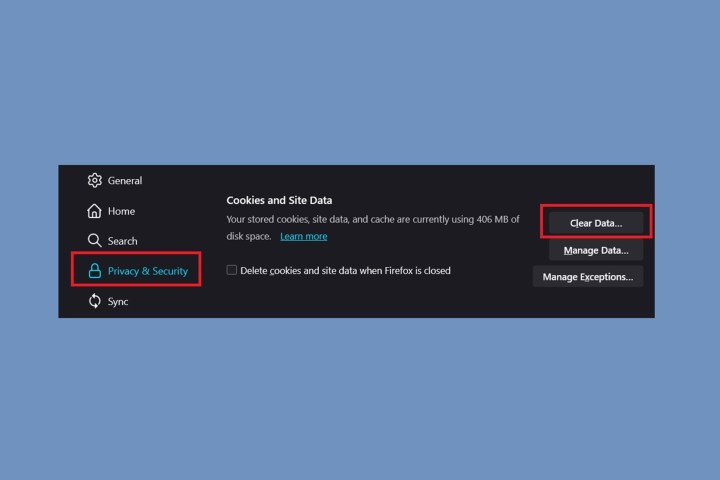
How to clear cache in Firefox
Step 1: Open Firefox, select the button with three bars in the upper-right corner of the browser window, and select Settings from the resulting drop-down menu.
Step 2: Select the Privacy and security tab located on the left side of the screen and head to the Cookies and site data section.
Select Clear data. You’ll want to make sure that the option for Cached web content is checked, and then select Clear.
You can also check the box next to Delete cookies and site data when Firefox is closed to do so automatically when you close the browser.
How to clear cache in Safari
Step 1: Launch Safari, and then select Safari in the upper-left corner of the main menu bar, and choose the Preferences option near the top of the drop-down menu.
Then select the Advanced tab located in the top navigation bar and check the box directly on the bottom that says Show develop menu in Menu Bar. Doing so will add a new menu to Safari by default.
Step 2: Select the Develop menu near the middle of the upper macOS menu bar and then choose the Empty caches option.
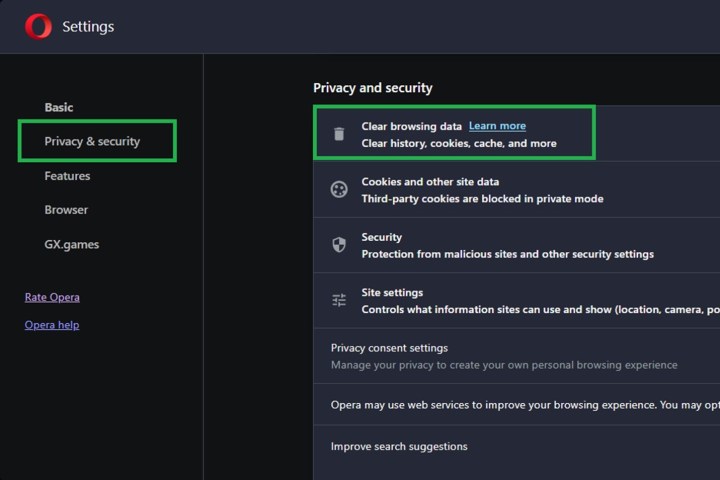
How to clear cache in Opera
Step 1: Launch Opera, and then select the Menu button in the upper-left corner of the browser window.
Choose the Settings option from the drop-down menu.
Step 2: Select Privacy and security. Then choose Clear browsing data.
Check the box Cached images and files, along with any other browser data you wish to clear. Then, select the time frame you want to erase — to completely clear the cache, choose All time — from the drop-down menu. Afterward, select the Clear data button in the bottom-right corner.
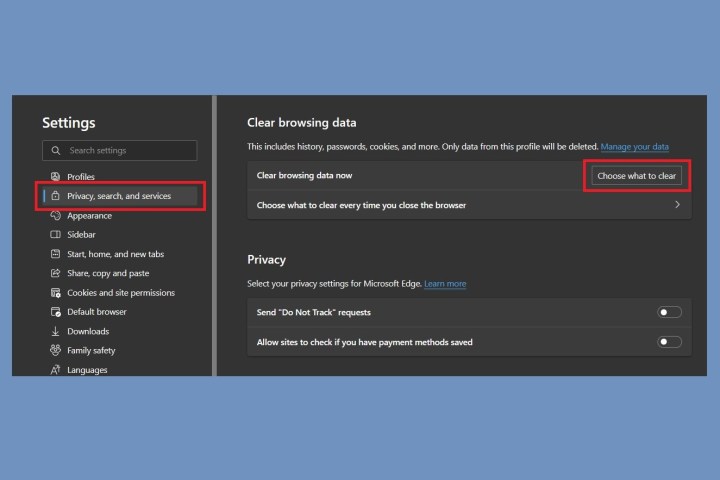
How to clear cache in Microsoft Edge
Step 1: Launch the Microsoft Edge browser. When it loads, click Settings.
Step 2: Click Privacy and services. Under Clear browsing data, click Choose what to clear.
Step 3: Put a check under Cached images and files, then click Clear now.
What’s the difference between a cache and cookies?
Another popular term that comes up when researching cache-clearing is “cookies.” While both your PC’s cache and its cookies are similar, they’re also a little different.
Cookies are bite-sized pieces of info that your browser stores to save things like passwords and page settings. A web cache is information that is stored about the sites you visit. This could be things like HTML coding and page images.
What happens after I clear my cache?
Clearing your cache is one of the best things you can do for the overall performance of your computer. If you’ve noticed that your PC has been running slow, there’s a good chance that clearing your cache will improve your speed. When you clear your cache, you may even notice websites you regularly visit start to load faster. Certain formatting problems you were having on sites may also be gone.
When you clear your cache, you may also wipe saved login info on certain websites. So before you go ahead and clear things, make sure you’ve written down any important usernames or passwords you may need.
How often should I clear my cache?
For optimal computer performance, it’s a good idea to clear your cache at least once or twice per month.
Editors' Recommendations
- How to insert a signature in Apple Pages
- How to change your Google background in Chrome
- How to keep your Microsoft Teams status active
- How to change your MAC address on Windows and Mac
- How to change your Yahoo password on desktop and mobile