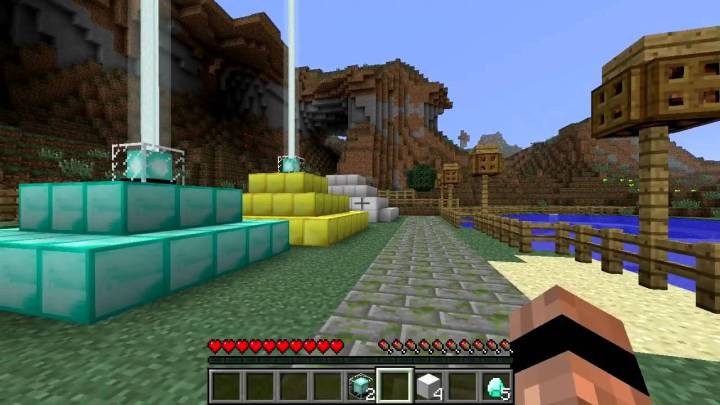
Minecraft beacons are a high-end crafting goal that helps you show off, find your way, and get some valuable bonuses. When constructed, the beacon shoots, well, a beacon into the sky — a tower of light players can see from a fair distance away.
You can use this beacon to mark your favorite village, the castle you’ve created for yourself, or a wide variety of creative options. When completed, you can level up your beacon to provide a variety of boosts just from activating it. Here’s everything you need to know!
Gather beacon materials
Minecraft beacons are one of the more challenging items to create, suitable for ambitious players (who want to show off a little). Here’s what you need and where you can find it.
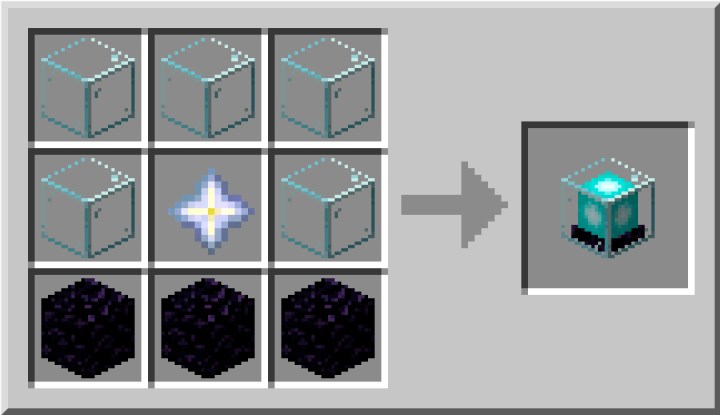
Step 1: Five glass blocks. You can get glass by mining blocks of sand and combining five or more in a furnace, making this a particularly easy step.
Step 2: Three obsidian blocks. Obsidian is a rare ore, and isn’t traded, so you can’t really count on old-fashioned RNG to find it. Instead, you can either search underground until you happen to stumble across a site, or find a handy pool of lava and pour buckets of water on it to create layers of obsidian.
However, normal pickaxes won’t work when mining obsidian. You’ll need a diamond or Netherite pickaxe to make a dent, so make sure you’ve crafted one of these before you begin.

Step 3: One Nether Star. This is where things get really challenging. You only get Nether Stars from The Wither, a boss you must construct in the Nether itself. The Wither requires materials like soul sand and wither skeleton skulls, so it will take some time to build itself. When animated, The Wither is considered one of the most dangerous bosses in Minecraft, so be prepared for a tough fight against the undead monstrosity. The good news is that The Wither is guaranteed to drop a Nether Star when it is defeated.
Create your pyramid and construct your beacon
Now you’re ready to build your beacon. But there’s a catch — beacons only work when placed on top of a pyramid. You can build a pyramid up to four levels — here’s how.
Step 1: Your pyramid must be made of iron, gold, emerald, diamond, or Netherite blocks. Luckily, it doesn’t matter which — the materials you choose are entirely for showing off. The easiest method will be using iron. However, you will need a lot of blocks to build up your pyramid.

Step 2: The simplest pyramid is one 3-by-3 base, which takes nine blocks. A two-level pyramid has a 5-by-5 base and 3-by-3 second level, for a total of 34 blocks. By the time you get to level four, the base of the pyramid is 9-by-9, then 7-by-7, 5-by-5, and 3-by-3, for 164 blocks total. Time to get started crafting!
Step 3: Note you cannot use your beacon underground or under a covering, so make sure your pyramid has access to the sky when you build it.

Step 4: Construct your beacon by placing the five blocks of glass in an arch at the top of the crafting window, the obsidian in a layer at the bottom, and the Nether Star in the center. In the center of the highest pyramid level, place your beacon, and it should light up if everything is right.

Step 5: You can cover your beacon with a glass pane without blocking it. If you add a dye into your glass pane recipe, it will change the glass color, and will also change the light of the beacon shooting through it. Use this method to change the color of your beacon.

Using beacon power-ups
Now you are ready to use beacon power-ups! Approach and open its menu. You can sacrifice iron and gold ingots, diamonds, or emeralds to customize it with the power-ups that you want. The more levels to the pyramid, the more you can level up the power-up tree and enhance the benefits. Boosts include speed, jump boost, health regeneration, strength, and more.
Editors' Recommendations
- How to get to Monkey Island in Sea of Thieves
- How to increase your population in Manor Lords
- How to play the Smite 2 alpha test
- How to add friends in Sea of Thieves
- How to increase your approval rating in Manor Lords


