It’s a great tool for anyone who’s thinking about purchasing a Chromebook but wants to take it for a test drive ahead of time. However, it’s also a rather interesting diversion for the user who’s simply curious about the world beyond Mac OS X and Windows 10.
The process is simpler than installing something like Linux, but by the end of it you’ll have a system quite different to the one that you started out. Who knows — you might end up broadening your horizons a little bit.
Getting Started
First, you’re going to need to gather your materials — a couple of pieces of hardware and a couple of pieces of software. You should also be aware that if you’re going to install CloudReady rather than just run it from a USB stick, it’s going to completely wipe everything on your computer.
CloudReady is a full OS, and that means that it needs a blank canvas to be installed upon. For that reason, it’s best to use an old PC if you’re just looking for a test drive, to ensure that you don’t love important content on your primary system.
As of the time of writing, dual booting is not supported. You can only run the CloudReady version of ChromeOS alongside another operating system by installing each on entirely separate hard drives and choosing which to boot to through the system UEFI/BIOS. In theory, you might be able to install to a virtual drive from within another OS, but we’ve yet to try that option.
Once you’ve considered the dangers of the process, grab an 8GB or 16GB memory stick and head to the CloudReady website. There, you’ll be able to download the correct install package for the type of system and OS that you’re running at the moment — make sure you make note of where the downloaded .bin or .bin.zip file lands on your hard drive.
Next, download Google’s Chrome recovery tool from the Chrome Web Store. Once it’s downloaded, launch it directly from the same page to ensure it installed correctly, and you have everything that you’ll need to create the CloudReady installer for your system.
Creating an Installer
From the Chrome Recovery App, use the cog icon in the top right corner to access the settings menu and select Use local image. Navigate to the location of the package we downloaded from the CloudReady site earlier and select that file.
The app should ask you if you’re ready to clear the contents of your USB stick, if you haven’t done so already (it most format the disk, and that means deleting everything on it). With that done, it should be ready to start creating your recovery image, leaving you with an installer that you can use to run CloudReady. One formatted and installed with Chrome OS the disk won’t be able to hold additional data compatible with Windows or OS X until it’s formatted once more, so we recommend using a drive that you don’t need for other purposes.
However, to use that installer, you’re going to need to enable USB Boot on your computer. The method will change depending on your system. On older systems, you should be able to select the USB drive as a boot drive easily through the UEFI/BIOS. Newer systems with Secure Boot enabled may require that you turn the feature off. Systems that don’t let the user remove Secure Boot won’t be able to use CloudReady.
Once that’s done, make sure your flash drive is inserted into an appropriate port and boot the installer from USB.

You’ll now be able to use CloudReady from your USB stick, or alternatively begin the installation process if you want to make things more permanent. This will wipe all data currently on your computer, so think carefully about whether or not you really want to do so before taking the plunge.
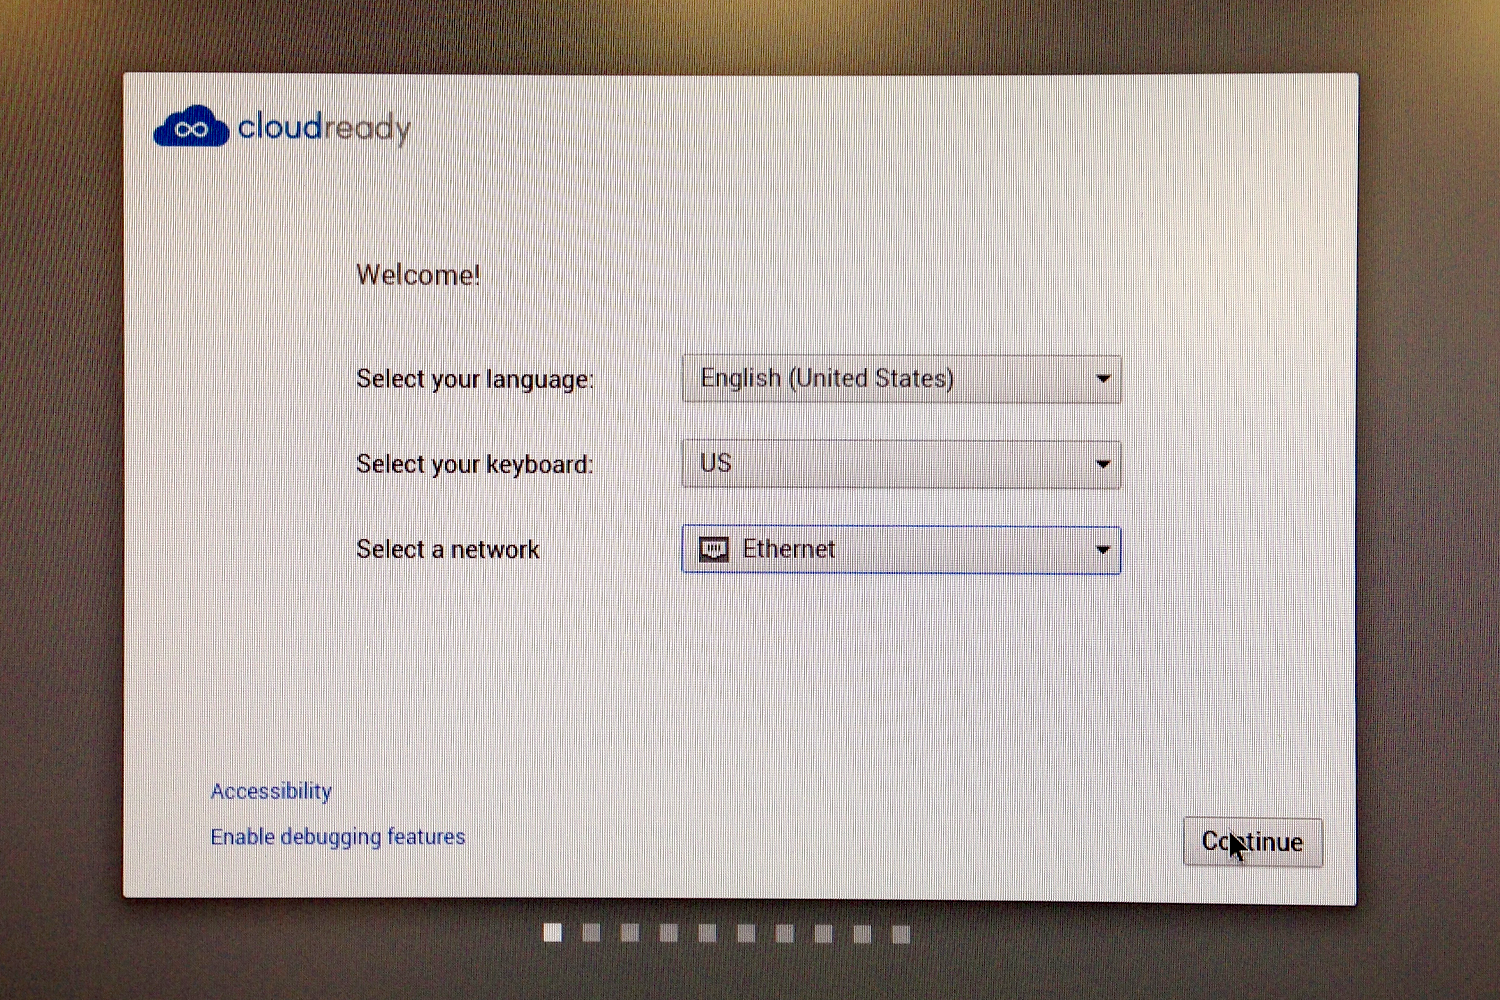
The next steps are relatively straightforward — just follow the wizard. But it’s well worth keeping a close eye on all stages of the install process so you know exactly what you’re doing to your system. Once you’re done, you’ll have the closest thing to a ChromeBook that isn’t actually a ChromeBook.
Pitfalls to Avoid
For the most part, CloudReady is an easily installed OS — but whenever you tinker with a device’s operating system, there are things that can go wrong. Make sure that you’re clear on the method of installation ahead of time, and understand that accidents can happen.
If you’re wondering whether the old PC hanging around in your closet can run CloudReady, the answer is likely yes. Most hardware from the last eight years or so should be supported, but you can also refer to Neverware’s list of approved systems here.
That said, we tried CloudReady on several systems, and found that it did not install on one (an Asus Transformer Book Flip TP200A). There’s no apparent reason why — so the fact your system should work doesn’t mean it will.
It’s a good idea to test out CloudReady by booting from your flash drive ahead of a full install, but remember that you might not get exactly the same experience using this method. Our tests found the USB boot option to run quite slowly.
Lastly, consider a full backup before you start experimenting with CloudReady — whether you’re using an old PC or your primary laptop. It’s best to plan for the worst in these situations, and there’s rarely a downside to having a recent backup should things go awry.
Editors' Recommendations
- Best Chromebook deals: Cheap computers starting at $54
- Best refurbished laptop deals: How to find cheap used computers
- Best 2-in-1 laptop deals: Turn your laptop into a tablet for $349
- 7 best Chromebooks for 2024: the best for every budget
- 9 best 2-in-1 laptops in 2024: tested and reviewed


