Everything used to work perfectly on your Chromebook. The speeds were quick. Your media played flawlessly. But now, you’re experiencing lag, and you can’t figure out what went wrong.
If you need to fix specific issues without completely wiping your Chromebook, we provide a separate guide on how to fix the most common Chromebook problems. However, if resetting appears to be your only solution, we'll show you how to get your Chromebook running like new.
A note before going in
Chromebooks provide three ways to reset the settings if a simple reboot doesn’t work. Here's a brief explanation of each method:
- Hard reset: This resets the hardware settings only, such as the keyboard and camera.
- Powerwash: This resets the Chromebook back to its factory settings, returning it to its out-of-the-box state. Afterward, you’ll need to link it to your account, redownload apps, and so on.
- Recovery: This reinstalls Chrome OS from an external source, like a flash drive. Recovery is required when Chrome OS is damaged/corrupted and cannot be repaired.
Now that you're familiar with these methods, start your troubleshooting by performing a hard reset.
Hard resetting a Chromebook
This may not work, but it's worth a try before returning your Chromebook back to its out-of-the-box settings.
Step 1: Turn off the Chromebook by holding down the Power button.
Step 2: Hold the Refresh button and then tap the Power button.
Step 3: Once the Chromebook starts, let go of the Refresh button.
If your issues persist, move on to the next section.
Powerwashing a Chromebook
Powerwash is your next option. This built-in tool completely resets all settings to return Chrome OS back to its out-of-the-box state. That means it does the following:
- Removes all customizations -- wallpaper, display resolution, homepage, themes, and extensions.
- Removes all user accounts and local files stored on the machine.
- Ignores all files stored on an inserted SD card.
This is a good option if you want to remove clutter or fix a nagging problem. However, your Chromebook will need to install all software updates once it reconnects to the internet. This method does not reinstall Chrome OS -- you need a full recovery to fix or replace the operating system.
Here's how you can do this from inside Chrome OS. You can also begin the Powerwash sequence by pressing the Ctrl + Alt + Shift + R keys at the sign-in screen.
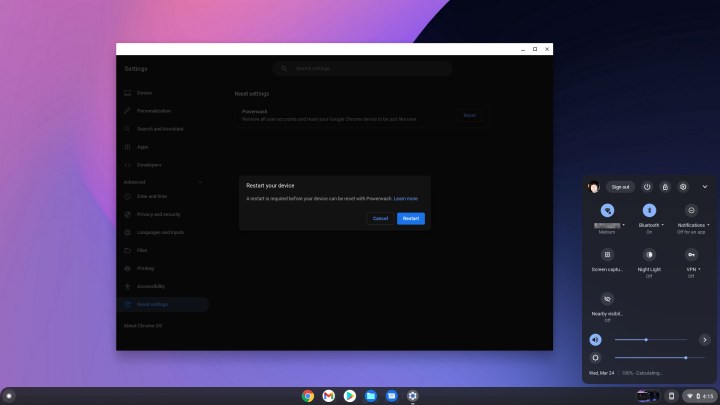
Step 1: Select the System clock on the Shelf and then the Cog icon in the pop-up menu. This opens the Settings panel.
Step 2: Choose Advanced listed on the left to expand the Settings menu, followed by Reset settings shown at the bottom.
Step 3: Select the Reset button displayed next to Powerwash.
Step 4: Select the blue Restart button on the pop-up prompt to continue.
Step 5: Once your Chromebook reboots, Google presents the message displayed in the screenshot below. To proceed, select the blue Powerwash button.
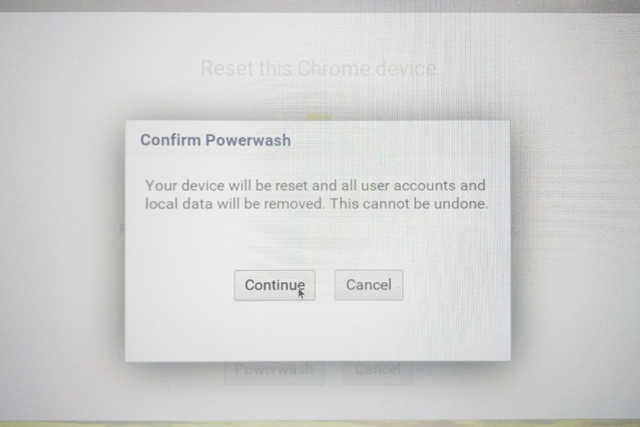
Step 6: Another last chance pop-up window appears. Select Continue.
Your Chromebook will reboot again. When it turns back on, it will spend a short moment restoring the default settings. You’ll then need to set it back up as if you just bought a new Chromebook.
Recover a Chromebook
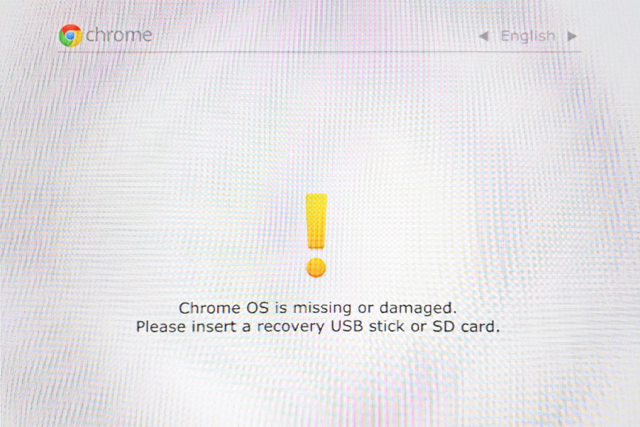
If you can't reach the sign-in screen or you see an error that Chrome OS is missing or damaged, you will need to perform a full recovery. This process completely wipes the internal storage device, making it completely unusable until recovery reinstalls Chrome OS. Google recommends you take a few precautionary steps first.
To recover a Chromebook, you need a second computer with Chrome installed and an external storage device like a USB flash drive or SD card with 8GB of space or more. You’ll also need to plug in your Chromebook's power cord.
Step 1: First, disconnect any accessories (like external storage or a mouse) from the Chromebook you're trying to recover.
Then, press the Esc + Refresh (circular arrow or F3) keys simultaneously. While still holding those keys, press and release the Power key. Keep holding the Esc + Refresh keys until you see a screen that says, “Chrome OS is missing or damaged,” or “Please insert a recovery USB stick or card.”
Step 2: On another computer, insert your USB drive or SD card, open Chrome, and install Google’s Chromebook recovery utility.
Step 3: Launch the utility and select the blue Get started button.
Step 4: Enter the model of your Chromebook, which should be displayed on its error screen — it’s the text at the bottom. Make sure to copy the text exactly. Alternatively, you can choose the Select a model from a list option to select the manufacturer and product. Select the blue Continue button when you’re ready.
Step 5: On the following screen, select the USB drive or SD card you inserted earlier — make sure it’s the correct one so that you don’t accidentally erase other drives connected to your computer. Select the blue Continue button.
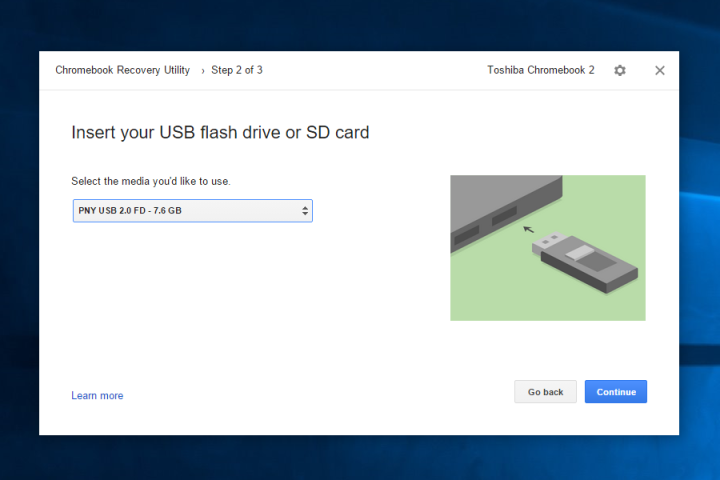
Step 6: Finally, select the blue Create now button to confirm the recovery image’s destination. Wait for the writing process to complete, and if the OS asks you to confirm any software installations, do so.
Step 7: When the process finishes, select Done and then remove the USB drive or SD card from your other computer.
Step 8: Insert the recovery drive into your Chromebook. Your Chromebook will now restart and begin the recovery process.
Step 9: Remove the USB drive or SD card from your Chromebook when the following message appears: “System recovery is complete.”
Step 10: Your Chromebook will automatically restart. Log in to your Google account to finish setting it up. You’ll need a secure Wi-Fi connection to finish.


