Your iTunes library has some convenient built-in features you can use to share your songs and playlists with other devices or users. Sharing your iTunes library means you can enjoy your music from multiple devices and help your friends and family members discover new songs.
Read this guide to learn how to enable Apple’s Home Sharing feature, why you might want to use Apple’s Family Sharing instead, and how to use third-party apps to share your iTunes library without a network.
Further reading
There are a number of ways to share your iTunes library, but, in a broad sense, it can be done in two ways: Via Wi-Fi on your home network, or via Bluetooth to a person nearby.
Note: Apple has discontinued iTunes in MacOS Catalina, so Catalina users may want to use this guide on how to share your Apple Music library instead.
Using Apple’s Home Sharing
Sharing your iTunes library on your home network (or any network for that matter) only takes a few easy steps and will allow library access to any device connected to the network. For this section, we’re assuming that you already have a wireless network in your home or office. If not, consult this guide to figure out how to set one up.
Step 1: Firstly, enable Home Sharing in iTunes. Make sure that you have signed in with your Apple ID, and that all the devices you want to share to are signed in with the same ID, so they can all be part of Home Sharing.
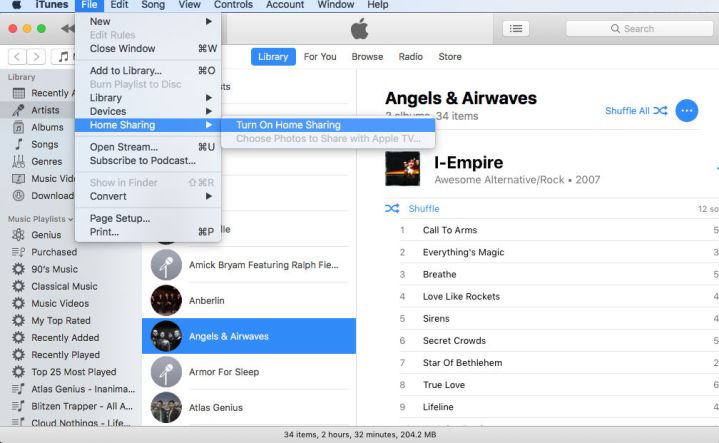
Step 2: With iTunes open, head to the top left of your Mac screen and choose File. From here, select Home Sharing, and then select Turn on Home Sharing. Now, when you go to this section again, you should see your Apple ID here as a sign of what account you are using.

Step 3: Use another device on your local network and log in to iTunes. Click the Music icon in the upper right and you should see a drop-down list of various content. At the bottom, you’ll see the IDs for all available iTunes libraries on the network, allowing you to switch between them. You can share music, movies, and TV shows this way, but only on up to five connected devices.
If you’re looking for more in-depth sharing and content organization, consider using Apple’s Family Sharing instead. Family Sharing lets you share a broader range of content with anyone you designate. Sharing books and iCloud storage is easy, even if your family and friends aren’t on the same network. Apple’s family option is also an excellent solution for allowing your friends or family to use apps that you’ve paid to download. Anything you or your contacts purchase becomes shareable within Family Sharing; no further purchase necessary. Plus, you can customize your sharing options to your family’s needs. The only drawback is that if a friend turned foe leaves Family Sharing, you can no longer access their purchased apps, books, or music.
Sharing without your network
It’s easy to share your iTunes library within your home network or even from one computer to another. But sharing a playlist with someone in a different location requires a different process. Fortunately, all you need is a Bluetooth connection and one of several iOS apps to swap playlists without outside of your network.
You no longer need earbuds to exchange music from one Apple device to another due to the prevalence of streaming apps. The process for downloading, installing, and using each app is a bit different, but it’s generally intuitive to figure out. Two streaming apps we like are:
MyStream (free): A reliable Bluetooth streaming option with a few bells and whistles.
PairShare ($0.99): A feature-rich music streaming app that’s straightforward to use.
Either of these apps will let you easily stream all shareable music at fast speeds.
Editors' Recommendations
- These are the 10 best gaming PCs I’d recommend to anyone
- How to clean a laptop keyboard without damaging the keys
- How to change your Zoom background on Mac and Windows
- Here’s how to choose the right printer to buy in 2024
- How to convert your VHS tapes to DVD, Blu-ray, or digital