The Google Pixelbook boasts a sleek figure and quick internals. It’s Google’s flagship Chromebook, at least for now, with a starting price of $999. If you want the best Chromebook you can get, and/or the benefits of a premium first-party design, this is the way to go.
However, like any other laptop, regardless of the operating system, issues will arise. The device may suddenly feel slow or the webcam refuses to work. Here are some of the most common Google Pixelbook problems and how to fix them.
A note before going in
Google’s Pixelbook provides three ways to reset the settings if a simple reboot doesn’t work. Our instructions may call on these methods from time to time, but we wanted to explain what each reset does before diving into troubleshooting.
- Hard reset: This resets the hardware settings only, such as the keyboard and camera.
- Powerwash: This resets the Chromebook back to its factory settings, returning it to its out-of-the-box state. Afterward, you’ll need to link it to your account, redownload apps, and so on.
- Recovery: This reinstalls Chrome OS from an external source, like a flash drive. Recovery is required when Chrome OS is damaged/corrupted and cannot be repaired.
With that out of the way, let’s start with system-wide issues you may currently face.
Chrome OS is damaged
This is one of the major issues you might encounter if your Pixelbook is misbehaving. Shortly after booting up, you might get an error message that says, “Chrome OS is missing or damaged.” This error comes in a variety of different forms, but it’s a fairly common one.
First, reboot your Pixelbook and see if that fixes the problem. To reboot, do the following:
Step 1: Press and hold the Power button.
Step 2: The screen dims, and a pop-up appears. Click the Power Off button.
Step 3: Press the Power button to turn the Pixelbook back on.
If a reboot doesn’t work, your next step is to reset the device to the original factory settings.
Step 1: Sign out of your account (if possible).
Step 2: Press and hold Ctrl + Alt + Shift + R.
Step 3: Select Restart.
Step 4: Click the blue Powerwash button in the pop-up window.
Step 5: Click the blue Continue button to confirm.
Step 6: Follow the steps displayed on your Pixelbook.
Now your Pixelbook will reset itself to factory settings, and, hopefully, your issues will disappear.
If Powerwashing doesn’t fix your Chrome OS issue, you have a more “nuclear” option available: Reinstall Chrome OS entirely. This process requires a second PC, downloading a new copy of Chrome OS, and creating a bootable flash drive.
For more information on recovering your Pixelbook, read our guide on how to reset a Chromebook to factory settings.
Google Assistant not responding
This one isn’t a huge deal, but given how important Google Assistant is to the Pixelbook’s overall appeal, it’s pretty irritating when it doesn’t function properly. Thankfully, you have a few options here.
First, press the Google Assistant button. As shown above, it resides between the Ctrl and Alt keys, and it’s labeled with the four-sphere Assistant symbol. One of two things will happen when you hit this key:
- You’ll hear the Assistant ask, “Hi, how can I help?”
- You’ll be presented with the option to turn the Google Assistant on. If that’s the case, click Yes.
Now say, “OK Google,” out loud and see if it responds. If not, do the following:
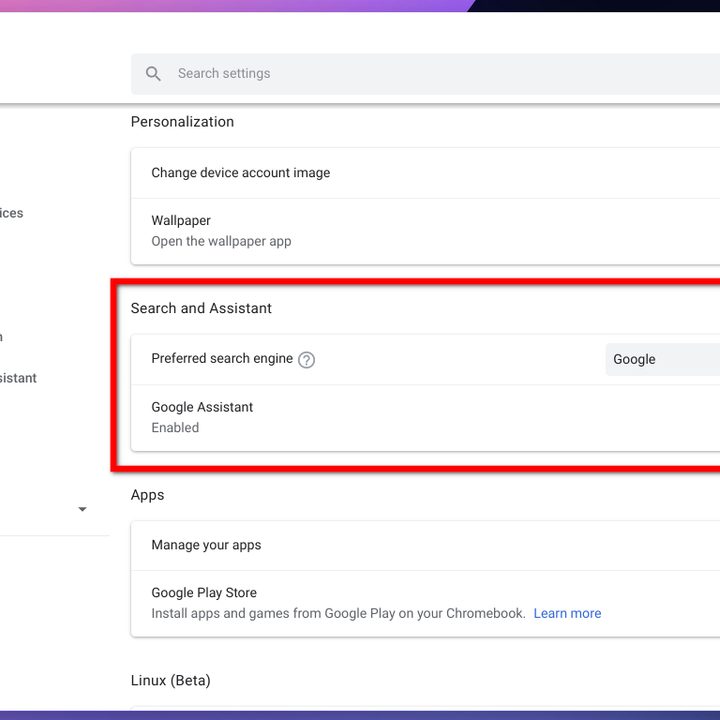
Step 1: Click the System Clock, followed by the Gear icon on the pop-up menu. This opens the Chrome OS settings window.
Step 2: Select Search and Assistant listed on the left.
Step 3: Verify that Google Assistant reads Enabled, as shown above. If not, click the setting and then click the Toggle on the following screen. It should turn blue, indicating that Google Assistant is now enabled.
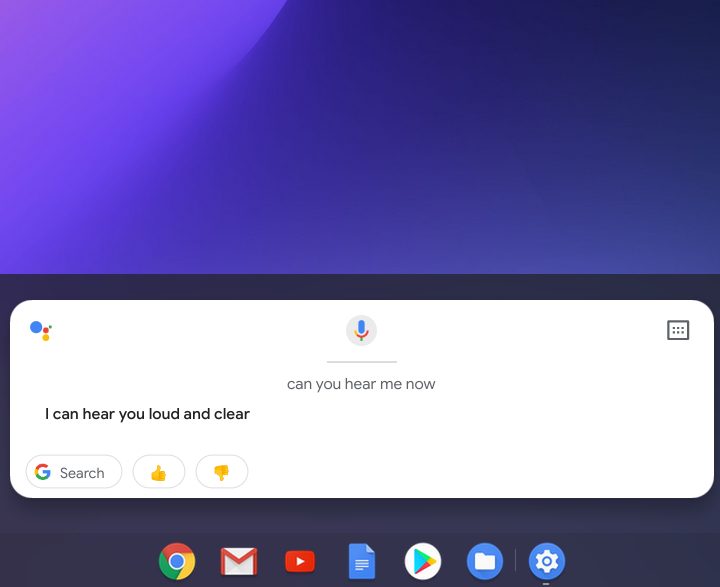
Step 4: Verify that “Ok Google” is enabled by pressing the Google Assistant key or simply saying, “OK Google.”
If nothing happens, move on to this next fix.
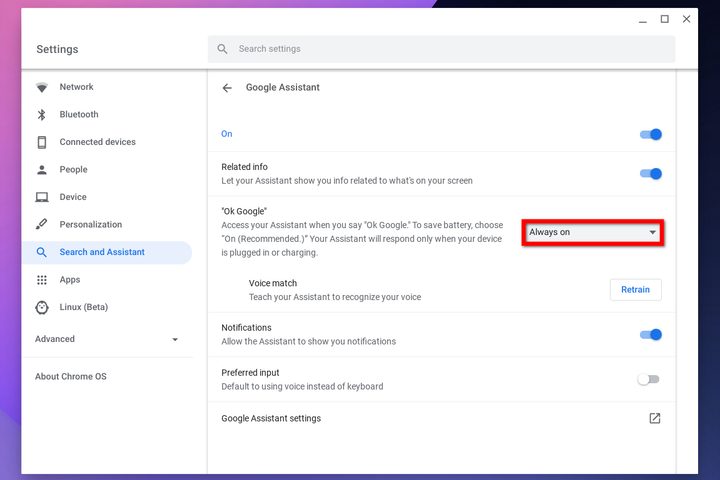
Step 1: Click the System Clock, followed by the Gear icon on the pop-up menu. This opens the Chrome OS settings.
Step 2: The settings window appears on your screen. Select Search and Assistant listed on the left.
Step 3: Select Google Assistant.
Step 4: On the following screen, make sure the “Ok Google” setting is Always On or On (Recommended). If it’s set to Off, choose one of the two other options on the drop-down menu. Follow the steps to retain Google Assistant so it can recognize your voice.
This should solve the problem most of the time. If you’re still having problems getting the Pixelbook to answer you or hear you correctly, there are a couple of different reasons for that. If you’re too far away from the Pixelbook, or if you’re in a noisy room, you can still access the Google Assistant via the Assistant button.
Another common problem is that Google Assistant hears you on the Pixelbook, but says it’s responding on another device. Presumably, it’s defaulting to the last device you used to access Google Assistant, like the Home Mini or Nest Audio. Try again and Google Assistant should respond on the Pixelbook.
Tabs refresh constantly
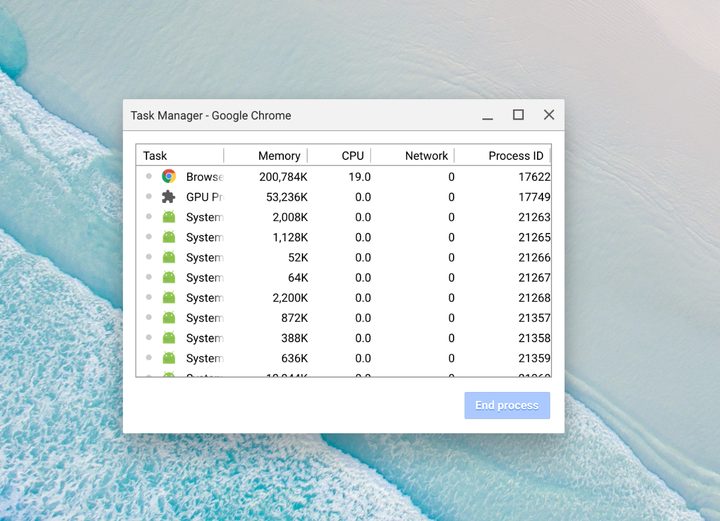
This next issue is both bizarre and a huge headache. Sometimes the Pixelbook decides to continuously refresh tabs in your web browser. Why? It’s due to low memory.
This annoyance has a simple fix, so don’t worry if your browser is currently going haywire.
Step 1: Close all your open tabs and reboot your Pixelbook.
Step 2: When you log back in, press the Search + Esc keys (the Shift + Esc method is retiring, but still may work).
Step 3: The Task Manager appears on your screen. Close anything you’re not currently using, but leave all the System items alone.
Step 4: Open the Chrome browser and type the following into the URL field: chrome://extensions
Step 5: Your extensions library appears on the screen. Disable or uninstall anything you absolutely do not need. This will make sure Chrome doesn’t end up using more memory than it needs.
Pen requires too much pressure
The Pixelbook Pen isn’t exactly an essential part of the Pixelbook experience, but it does offer some pretty great functionality — even if there’s no way to attach it to the Pixelbook itself. The pen allows you to circle items you want to search, handwrite notes, and enter text, but sometimes it doesn’t work quite as well as it should.
Some users have reported trouble with using the pen for everyday tasks. Sometimes it requires an inordinate amount of pressure to use — and pressing too hard on an expensive glass display to just write your name isn’t exactly a great user experience. The problem here has a couple of different solutions.
First, try a hard reset to clear the hardware settings. Here’s how:
Step 1: Turn off the Pixelbook by holding down the Power button.
Step 2: Press and hold the Refresh button and then tap the Power button.
Step 3: Once the Pixelbook starts, release the Refresh button.
If that doesn’t work, give your Pixelbook a Powerwash to reset it to factory settings. To do that, scroll up and check out the Chrome OS is Damaged section in this article. Once it’s Powerwashed, try to use the pen and see if you’re still having trouble with pressure detection.
If the pen still needs a lot of muscle to detect that it’s in use, contact Google Support to see if you can get a replacement pen. To do that, visit Google’s Help Center and click Contact Us at the bottom of the page.
Making a high-pitched noise
This one is pretty troubling. It’s never a good sign when your laptop is making an unfamiliar noise, especially a high-pitched whine. In this case, chances are the sound may be coming from your Pixelbook charger.
First, unplug the charger from the wall to see if the noise stops. If it does, it’s definitely the charger. Next, plug the charger into a different outlet. If the noise resumes, it’s most likely defective.
The only option here is to contact Google’s Pixelbook support team and see if they’ll let you exchange the charger. To do that, visit Google’s Help Center, click Contact Us at the bottom of the page, and explain the problem.
Meanwhile, try using a different USB-C charger if you can.
If the noise emits directly from the Pixelbook itself, it may be suffering hardware issues, like a failing fan as the device grows hotter under its workload. Issues with the motherboard or battery may be the culprit as well. Again, there’s nothing you can do but contact Google’s Help Center regarding these issues.
Smart Lock is unavailable
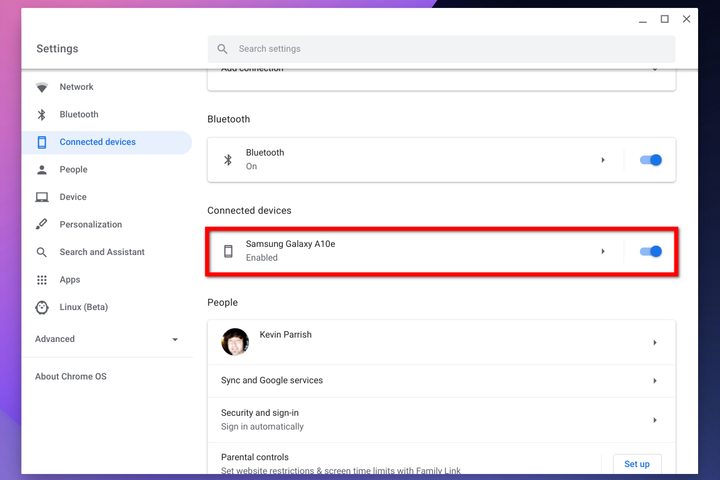
One of the coolest features of the Pixelbook is the ability to unlock it using a paired Android smartphone. The Smart Lock feature can be tough to set up properly, and some users have had trouble getting it to work at all.
For Smart Lock to work, you need to verify the following:
- Your Android phone is updated to the latest version. Smart Lock requires Android 5.0 or higher (Lollipop or newer).
- Your Android phone is on the same Wi-Fi network as your Pixelbook.
- Your Android phone and Pixelbook are signed in to the same Google Account.
- Your Android phone is linked to your Pixelbook and enabled.
First, do the following to see if Smart Lock was somehow disabled:
Step 1: Click the System Clock, followed by the Gear icon on the pop-up menu. This opens the Chrome OS settings.
Step 2: The settings window appears on your screen. Click Connected Devices on the left.
Step 3: Under Connected Devices displayed on the right, click on your linked Android phone.
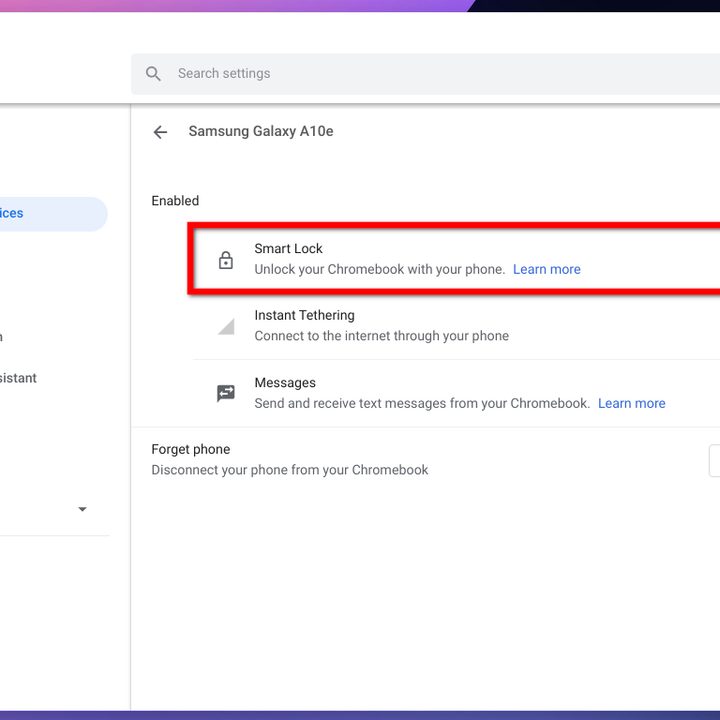
Step 4: On the following screen, verify that Smart Lock is toggled On (blue). If not, click it to turn it blue.
If you don’t even see your Android phone listed under Connected Devices, you’ll need to add it before utilizing Smart Lock.
Step 1: Click the System Clock, followed by the Gear icon on the pop-up menu. This opens the Chrome OS settings.
Step 2: The settings window appears on your screen. Click Connected Devices listed on the left.
Step 3: Under Connected Devices shown on the right, click Set Up listed next to Android Phone.
Step 4: Follow the instructions. You’ll see a Verify button linger for a few minutes until the Pixelbook and the Android phone shake hands over the internet.
With your Android phone now linked, Smart Lock is automatically enabled. Other phone-related options include Instant Tethering and Messaging.
Can’t access the Play Store or Assistant
Your Pixelbook is set up, but Google Assistant and the Play Store don’t work when you sign in. Don’t worry — there’s a workaround designed to get you up and running, even if it’s a little clunky.
If you sign in with a G-Suite account instead of a regular Google account, this problem is inevitable. Even though users have encountered this issue, Google doesn’t have a permanent solution just yet. It’ll still work, but you’ll have to do a workaround.
G Suite accounts are more common in education or corporate settings, which is a short explanation for why this issue tends to occur. Companies and schools more commonly use G Suite login credentials. If your employer or school supplied the Pixelbook, chances are your login is a G Suite account.
One solution created in the forums provides just the walkaround you’ll need. Go through the whole process of enabling access to the Play Store and Google Assistant on a G Suite account.
Since Pixelbooks you get from your company or a school uses G Suite, you’ll probably continually encounter minor issues. It’s worth finding a suitable workaround so you can use Google Assistant and access the Play Store.
Instead of messing with a workout, you might decide to do away with your G Suite account completely. You can set up a regular Google Account to sign in. This solution is the easiest option, but the downside is that you won’t have access to the previous information you accessed through your G Suite account.
Need more help?
If you’re having trouble, but you didn’t see it listed here, check out our extensive list of common Chromebook problems and how to fix them. Don’t be discouraged by the “Chromebook” in the title—most of these solutions work on the Pixelbook too.