
How to beat the Faith-Leap Trial in Baldur’s Gate 3

The Gauntlet of Shar is, well, quite a gauntlet in Baldur’s Gate 3. This dungeon changes things up a bit by giving you three unique trails to challenge you in different ways. The Faith-Leap Trail is perhaps the most puzzling of them all, and may even appear impossible when you first see it. The thing is, you can’t trust your eyes in this trial. There’s just too large of a gap between you and the goal for you to cross unless you do as the name suggests and take a leap of faith. But don’t just put your faith in Shar and hope for the best — instead let us show you the path.

How to beat the Faith-Leap Trial

A altar with a grid of squares in front of it.
Larian Studios

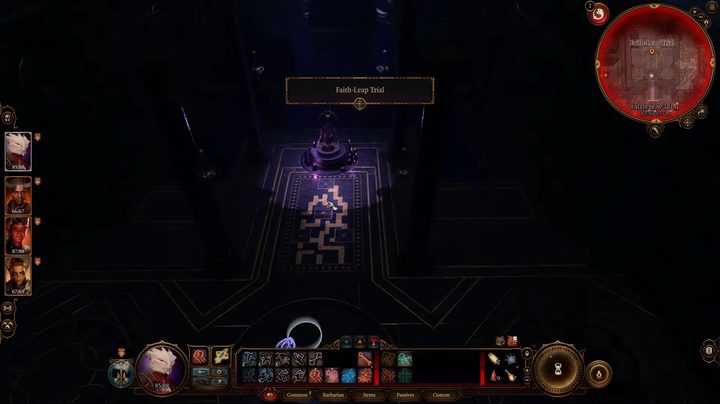
Once you enter this trail after making the blood sacrifice, you will see the Umbral Gem way across a massive death pit. But there actually is a path forward, just an invisible one. The path is the same every time, so as long as you memorize it, you’ll be fine, but you should still make a safety save just in case. You only get three tries before anyone you’re controlling who falls will die.

The path is actually shown to you on the floor in front of the altar at the entrance. Looking at the pattern of squares, you can see a grid showing colored squares where it is safe to walk. The idea is to start one square in from the far right, move forward almost to the altar before turning left to the center, then head forward. Go diagonally up and right once you line up with the edge of the altar platforms until you’re level with the altar in the center, then go diagonally up and left all the way to the finish.

At the end, just grab the Umbral Gem and use the Umbral Transporter to send you back to the entrance so you don’t have to worry about working your way back across.

Jesse Lennox
Jesse Lennox loves writing, games, and complaining about not having time to write and play games. He knows the names of more…
How to solve molecular identification puzzles in Spider-Man 2
Peter and Miles leaping in the air in the city.

The character of Spider-Man is only half of what makes him so interesting. Peter Parker, the man behind the mask, is just as vital to the story as his alter ego in Spider-Man 2. Just as he is in the comics and the first game, Peter is a scientist by trade, and Miles Morales is following in his footsteps in many ways, which is the perfect excuse to introduce some new science-focused puzzles into the game. One new puzzle has you examining different scenes to try and work out what exactly happened so you can determine the materials that were left behind. This puzzle is thrown at the player rather quickly and without much explanation, so we're here to brush up your molecular knowledge so you can solve these with ease.
How to solve molecular identification puzzles

When you first start off ,you will be shown a 3D model of some molecule with green, red, and sometimes yellow nodes. Your goal is to remove all the red nodes without destroying any of the green. Yellow can be left or destroyed.

Read more
How to beat the Green Monster of the Swamp in Lies of P
The green monster of the swamp in a swamp.

People are drawn to challenging games like Lies of P for a variety of reasons. Some enjoy the atmosphere, the storytelling, the exploration, and more, but for many, it is the bosses that make or break the experience. Without a doubt, Lies of P delivers on providing the kinds of challenging bosses fans of other soulslike games are after, but some may push things a bit too far. By the time you've reached the Barren Swamp, the game fully expects you to have mastered all the mechanics, weapons, Legion Arms, and more. At this point, you will be faced with the Green Monster of the Swamp. This boss's patterns are incredibly hard to read, plus it can inflict you with Decay if you're not careful. If this creature from the swamp is giving you grief, here's how to best this foul beast in Lies of P.
Green Monster of the Swamp strategy

The Green Monster of the Swamp fight will have two phases, the first of which it will bear the normal name. To most easily counter this form, you will want a Legion Arm or weapon that can deal fire damage, which is its elemental weakness. For yourself, equip something like the Defense Parts that buff your resistances, as well as Attribute Resistant Ampoules and Purification Ampoules to counter any Decay.

Read more
All weapons in Payday 3 and how to unlock them
Robbers shoot guns in Payday 3.

No one should walk into a robbery in Payday 3 without a reliable gun in their back pocket. Sure, there are plenty of skills and tools to help you and your gang pull off many jobs with no one being the wiser, but mistakes happen. And when they do, you'll be glad to have some firepower on your side. You won't be picking up or finding weapons on the map in Payday 3, and instead must rely completely on which weapons you have equipped in your loadout before starting a heist. You will only start off with a single assault rifle and pistol to your name, but there is a nice selection of shotguns, revolvers, and marksman rifles to add to your kit. Here are all the guns you can unlock in Payday 3 and how.
All weapons in Payday 3

Guns in Payday 3 are all first unlocked by reaching a certain level. Levels are simply gained by completing heists and objectives in the game, so every match you play will contribute toward your overall level. Once you reach a threshold where a new weapon becomes available, you can head into the Vendors menu and purchase t with your cash so they become available when building your loadout. Here's every weapon you get in the order you naturally unlock them:

Read more