
How to gain Inspiration Points in Baldur’s Gate 3

Just like the tabletop game it’s based on, Baldur’s Gate 3 runs off of dice rolls. Everything in the game, even if it isn’t shown to you, generally has a dice roll in the background that determines the outcome, from combat to conversations. When you are prompted to roll for a skill check, you will be shown a D20 with the minimum needed to succeed in that check, as well as any advantages or disadvantages your specific character has depending on the stat that roll is based on. On some rolls, you could have a high skill and add a few points to the die, making it easier to pass, while others will have negative modifiers, making it less likely you will pass. Failing a roll means, well, you don’t succeed in whatever you were attempting to do, but Inspiration Points can bail you out of a bad outcome provided you’ve earned them in Baldur’s Gate 3.

What Inspiration Points do

You can think of Inspiration Points as do-over points since you can spend them on any failed skill check to reroll the die and get another shot at passing it. Rerolling with an Inspiration Point does not guarantee your second roll will be successful, so if your odds are really bad, you will be just as likely to fail a second time as the first. These points aren’t very common, so don’t waste them on checks that are essentially impossible to pass.

How to gain Inspiration Points

A description of how Inspiration works in Baldur's Gate 3.
Larian Studios

Inspiration Points are directly tied to your character’s Background, which is different from your class or your race. While creating your character, you will pick a general origin for your character that colors their past and how they will treat and be treated by others. Not only should you pay attention to your own Background, but those of any companion you’re traveling with as well, since they can also earn Inspiration Points for you based on their Backgrounds. In both cases, this is done through what is known as Background Goals.

Background Goals are essentially a motivator for you to role-play your character the appropriate way. If you perform actions aligned with the Background you chose for your character, you can complete these goals and earn Inspiration Points. This makes it more efficient to have party members with the same Background as your character so that you can potentially earn more Inspiration Points at once. Note that you can only store up to four Inspiration Points at any time, so if you don’t use them, earning more will just be wasted.

Here are some examples of how to earn Inspiration Points for each of the 11 Backgrounds in Baldur’s Gate 3.

Acolyte

Acolytes are focused on serving the gods and doing things that show devotion to them. Some actions you can do are collecting religious treasures, performing rituals, and resurrecting fallen party members.
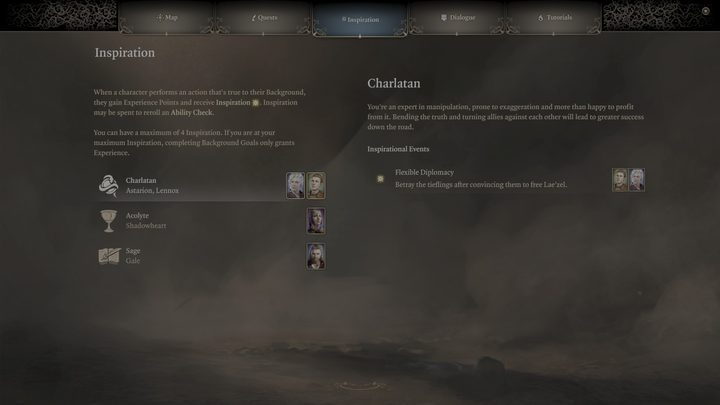
Charlatan

Charlatans are smooth talkers and prefer to use their logic and gift of gab rather than brute force. If you’re able to talk your way out of a situation or convince someone to follow your line of thinking by tricking them, you can earn some Inspiration Points.

Criminal

You can probably guess what you should be doing as a Criminal to play the part. If something seems like it would be against the law, it’s probably what you want to do. Stealing, murder, and other criminal activities fit the bill.

Entertainer

This is a more unique one. As an Entertainer, you will be rewarded for, well, providing entertainment to NPCs. Whether it’s dancing or playing songs, or even rescuing pieces of art or other performers, if you’re able to get people to have a good time, then you’re doing a good job.

Folk Hero

This is your all-around good guy Background. Doing good deeds just for the sake of it, such as rescuing the innocent and saving people’s lives, will fulfill this role.

Guild Artisan

Guild Artisans are dedicated to their craft, whatever form that takes. If you’re a blacksmith repairing weaponry, an alchemist gathering ingredients, or a mechanic repairing broken machinery, there are various tasks you should be on the lookout for.

Noble

While not explicitly evil, a Noble will look out for themselves first and foremost. Whatever raises your social standing, whether it be amassing lots of gold, impressing other nobles, or recruiting loyal followers, will earn you Inspiration.

Outlander

The Outlanders are all about surviving in nature. Anything that tests your survival skills out in the wilderness will be key, such as taming wild animals, passing survival skill checks, and avoiding traps.

Sage

With this intellectual Background, anything that quenches your character’s thirst for new knowledge and information should be sought out. Reading books, lore items, and solving puzzles will be your main ways to pursue this.

Soldier

This is another simple one to grasp since Soldiers are really focused on being good fighters. There’s a bit more to it besides just defeating tons of enemies, though. You can also complete Background Goals by inspiring others to fight too.

Urchin

Last up is the lowly Urchin. This role is based on being born and raised poor, and doing anything to get by. They are somewhat similar to the Criminal in that pickpocketing will be of benefit, but they also look out for others in their situation, so helping the innocent whenever possible, just like the Folk Hero, also applies.

Editors' Recommendations

Topics
Jesse Lennox
Jesse Lennox loves writing, games, and complaining about not having time to write and play games. He knows the names of more…
Mortal Kombat 1 Fatalities: how to do every character’s Fatality
Shang Tsung stealing someone's soul in Mortal Kombat 1.

What set the Mortal Kombat franchise apart when it first hit arcades was just how brutally violent the games were. It looks tame now, but the Fatalities of the original game were some of the most shocking things anyone had seen in a game up to that point, pixelated graphics and all. With Mortal Kombat 1, NetherRealm continues to churn our stomachs with some of the most disgustingly detailed ways to dismantle your opponent. Everyone loves seeing these creative ways your favorite fighter can definitively end a fight, but if you want to show off to your friends and humiliate your enemy, you have to know the specific button input to pull it off for each character. There are more that you can unlock, but here is how to perform every character's basic Fatality in Mortal Kombat 1.
How to perform all basic Fatalities
Here are all the default inputs for every character's Fatality on PlayStation and Xbox controls in alphabetical order, as well as what range you need to be at to trigger the Fatality. Once you have reduced your opponent's health to 0 and they are susceptible to a Fatality, which you will know from the announcer calling out "Finish him" or "Finish her," you will have five seconds to input the correct sequence.
Ashrah - Mid range
Down, Forward, Down, Triangle/Y
Baraka - Close range
Back, Forward, Down, Square/X
General Shao - Mid range
Back, Forward, Down, Square/X
Geras - Mid range
Forward, Down, Down, Circle/B
Havik - Close range
Down, Forward, Down, Circle/B
Johnny Cage - Close range
Forward, Back, Down, Triangle/Y
Kenshi - Close range
Forward, Down, Down, Triangle/Y
Kitana - Mid range
Down, Forward, Down, Circle/B
Kung Lao - Mid range
Down, Down, Back, Circle/B
Li Mei - Close range
Forward, Back, Forward, Cross/A
Lui Kang - Close range
Back, Forward, Down, Circle/B
Mileena - Close range
Back, Forward, Back, Square/X
Nitara - Mid range
Down, Down, Back, Square/X
Raiden - Close range
Back, Forward, Back, Triangle/Y
Rain - Close range
Down, Down, Back, Circe/B
Reiko - Mid range
Down, Down, Back, Triangle/Y
Reptile - Mid range
Forward, Back, Down, Circle/B
Scorpion - Mid range
Down, Forward, Back, RT
Shang Tsung - Close range
Back, Down, Down, Circle/B
Sindel - Mid range
Down, Back, Down, Square/X
Smoke - Any range
Back, Forward, Down, Square/X
Sub Zero - Any range
Forward, Down, Down, Triangle/Y
Tanya - Close range
Down, Back, Down, Cross/A
All Kameo Fighter Fatalities
Cyrax - Mid range
Forward, Back, Forward, RB
Darrius - Mid range
Down, Back, Forward, RB
Frost - Mid range
Back, Down, Back, RB
Goro - Close range
Back, Forward, Down, RB
Jax - Far range
Down, Forward, Down, RB
Kano Mid range
Back, Down, Forward, RB
Kung Lao - Mid range
Forward, Back, Forward, RB
Sareena - Mid range
Back, Down, Down, RB
Scorpion - Mid range
Down, Forward, Down, RB
Sektor - Mid range
Back, Forward, Back, RB
Shunjiko - Mid range
Down, Back, Down, RB
Sonya - Mid range
Back, Forward, Down, RB
Stryker - Mid range
Forward, Down, Forward, RB
Sub-Zero - Mid range
Forward, Down, Forward, RB

Read more
How to get Structural Materials in Starfield
Starfield planet.

Starfield has a massive expanded the amount of things you can build and craft. From entire Outposts to weapon mods and research projects, everything you want to craft will require specific materials to create. These materials will be found all over the various planets, either as lootable objects, ores you need to mine, or even as items you can purchase from various vendors, but some will always be harder to find than others. Structural Materials, while not the rarest resource, are used in nearly every aspect of Outpost building and upgrades. If you're running low on this crucial building block, here's how to get more Structural Materials in Starfield.
Ways to get Structural Materials

Like any resource in Starfield, there's more than one way to get your hands on Structural Materials. The easiest, but most expensive, will be to simply buy them from one of the many shops around the galaxy. Vendors' stock is slightly variable from day to day, but you can typically rely on any of your more "general" stores to carry this common material, such as the Jemison Mercantile in New Atlantis or Shepard's General Store on Akila. Each vendor will only hold a specific amount, so if you need a lot, you will need to do a little legwork. After buying out everything a vendor has, if you wait for 24 hours at a chair or bed, you can go back and their stock will be replenished.

Read more
How to unlock the Pilgrim’s room in Starfield
Cockpit in spaceship from Starfield.

For the most part, the main questline in Starfield won't challenge you too much in terms of puzzle-solving. Missions tend to boil down to getting an objective, fast traveling to a location, and following your marker until you collect an Artifact. Since you can only unlock all the powers by going through the main quests, you will at least want to complete most of them before going off and doing all the faction missions, outpost building, or general space exploration. There's one mission, though, that can be a roadblock if you're not extra observant and invested in reading all the lore. If you don't know the answers to opening the Pilgrim's Computer in Starfield, here is all the information you need.
Pilgrim Computer's answers

After you arrive at Pilgrim's Rest and explore, you will be led to the small base that's full of notes, among dozens of other items. Your objective is behind a locked door that asks you a few questions that you're supposed to learn the answers to by hunting down and reading all the notes. This isn't a door you can lockpick no matter how high your skill level is, so selecting the right answers is the only way forward. Here are all the questions you will be asked, and the correct responses:

Read more