
Forspoken necklaces: all necklace locations and abilities

RPGS, whether action or turn-based, typically have some sort of gear or equipment system that lets you add some nice buffs or special perks to your character. In Forspoken, one of the main forms of gear is simple necklaces, but instead of just being fancy jewelry, these pieces of bling have powerful effects. Picking which one to wear out will come down to more than what matches your outfit, so here are all the necklaces in Forspoken, what they do, and how to get them.

What necklaces do

The necklace menu in Forspoken.

Necklaces are similar to cloaks, but typically enhance your offense more than defense. They give different stat boosts, can be upgraded, and have a nice visual flair too. You will get them through a variety of tasks, such as defeating bosses and completing quests. They can also just simply be founs in the world. There are two that are missable, so pay special attention to those.

Related Videos

All necklaces, what they do, and how to get them

Name What it does How to get it
Nadezhda None Complete the Vivus Village in the Middle Praenost area of Praenost
Sarka Support magic deals extra damage Complete the Ruins of Pagus in the Citadel area of Praenost
Aslani Enemies are downed for longer Complete the Shoal Pond in the Water Garden area of Avoalet
Yavuz Gagnant Precision counters freeze enemies in place


Casting Frequency Boosts surge Magic recharge rate

Complete the Colline Village in The Fountainfields area of Avoalet
Oithur Cuff Counters expend less stamina


Precision Counters expend less stamina

Complete the Ruins of Austur in The Windy Hills area of Visoria
Tesouro de Athia Precision Counters electrocute enemies


Enemies can be knocked to the ground more easily by Precision Counters


Enemies can be knocked to the ground more easily

Complete the Fruegel Village in the Academy Hills area of Visoria
Phool Sa None Complete the Thane Village in The Blessed Plains area of Cipal
Balle Balle Casting Frequency Boosts Critical Hit rate


Improved Surge Magic recharge rate when HP is high


Recovering from defenselessness triggers Auto-Heal Effect

Complete the Place of Prayer in the Sacred Peaks area of Cipal
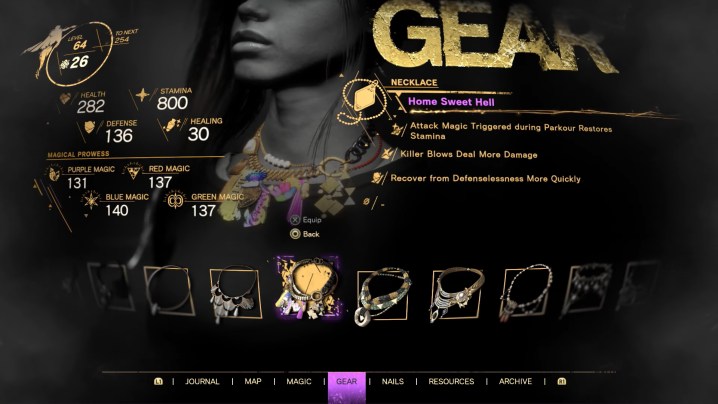
Home Sweet Hell Attack Magic triggered during Parkour restores stamina


Killer blows deal more damage


Recover from defenselessness more quickly

Craftable after purchasing the Sewing Kit item from the Curiosity Shop in Inner Visoria for 64 Old Coins. It requires 3 Fluteblossoms, 3 Bumbershoots, and 3 Lucid Garlands
Orison Auto-Heal Effect triggered when enemy defeated Complete Locked Labyrinth: East in the Barren Plains area of Cipal
Shrift Damage boosted when surge magic not fully charged Complete Locked Labyrinth: Mountain in the Pioneers’ Plain area of Praenost
Troth Killer Blows boost Surge Magic recharge rate


Enemies can be knocked to the ground more easily when Surge Magic Is fully charged

Complete Locked Labyrinth: Depths in the Untrodden Forest area of Avoalet
Sooth Attack Magic damage boosted when stamina fully charged


Support Magic boosted when stamina is full


Surge Magic boosted when stamina is full

Complete Locked Labyrinth: South in the Homestead Hills area of Visoria
Nemeni Prisaha None Complete the Sila’s Pact Detour for Johedy during Chapter 7 of Forspoken *missable*
Naee Aasha None Speak to Johedy before leaving Cipal during Chapter 10 of Forspoken *missable*
Symbol Combo Enemies can be knocked to the ground more easily by Attack Magic triggered during parkour PlayStation 5 preorder bonus
Combo Enemies can be knocked to the ground more easily by Attack Magic triggered during parkour PC preorder bonus

Best necklaces to wear

  • Home Sweet Hell: This necklace has the highest stats in the game, plus it restores your stamina while attacking so you never need to slow down.
  • Tesouro De Athia: If you’re good at performing precision counters, this necklace will make you basically unstoppable by shocking and downing foes with ease.
  • Balle Belle: Just by shooting more spells, which you will be doing naturally, you will start ramping up more and more crits, and the auto healing when recovering keeps you trucking.
  • Sooth: For a simple choice, just take this necklace that improves basically all your offensive magic options.
  • Orison: This necklace is best early on when you’re taking the most damage since you can recover by staying on the offensive and heal from killing enemies.

How to change necklaces

Changing out your necklace is a simple as going into the Gear tab on your menu, selecting your necklace below the cloak option, and then cycling through all the ones you’ve unlocked and equipping whichever you choose.

Editors' Recommendations

Hogwarts Legacy: how to solve every Merlin Trial
A student waving a wand in Hogwarts Legacy.

Even in the universe of Harry Potter, the mythical Merlin is still a legendary figure of the wizarding world. In the case of Hogwarts Legacy, you will have plenty of side activities, quests, and challenges to complete around the open world, however one set is inspired by this powerful magician. Merlin Trials are unlocked and placed all over your map after you complete the "Trials of Merlin" main quest. This will introduce you to the type of magical challenges these trials will present you, but not all of them. Here are all the different types of Merlin Trials in Hogwarts Legacy, and how you're intended to solve them.
How to beat all Merlin Trials

While there are many of each, 85 in fact, there are nine basic trial types you will encounter. They will all be changed up in some way, but still require the same solution. Bear in mind that some trials do require your character to know specific spells, so if you don't have those unlocked yet, the trials won't be able to be solved. If you're ever unsure of what to interact with during the trials, use Revelio to light up interactable objects.
Roll the ball (Depulso required)
This trial type asks you to use the Depulso spell to knock a big sphere to a designated pit in the ground. Simply keep nudging them until you roll them into the slot. Some trials may require you to burn debris off the hole first, so keep that in mind.
Stack the balls (Accio required)
This is another ball-moving puzzle, but this time the balls are small and you need to lift and place them into slots on different platforms.
Blast the balls
One of the most simple trials, this one just asks you to shoot a bunch of targets around the area with any attack spell. The only tricky part can be finding them all.
Blast the slabs
Almost identical to the prior trial, but this time you just need to blast the green stone slabs.
Light the torches (Confringo required)
This type of trail asks you to ignite three torches before any of them go out. As soon as you light the first torch, it will begin sinking into the ground and extinguish the flame once it is fully submerged. Some torches are on higher platforms than others, so it is usually best to start with those to give yourself the most time.
Escort the moths (Lumio required)
Using your Lumio spell, you need to lead three clusters of moths to a glowing statue. Once you bring all three groups of moths to the statues, you're done.
Fix the statues (Reparo required)
A simple trail, this one tasks you with finding the three broken statues and fixing them up with your Reparo spell.
Match the symbols (Flipendo required)
A set of three columns, each with two sections, will be in the area. Each face of the sections bears a symbol you need to rotate through using Flipendo to match the symbols on each column.
Platforming
The last trial type is a simple test of your platforming skills. You just need to navigate an obstacle course of stone platforms all the way to the end without falling. During some trials, we've found that you can actually get on your broom and fly over platforms to activate them. While we're not sure if that's a bug that might get patched out down the line, it currently makes these challenges much easier.

Read more
Forspoken nail designs: all nail design locations and abilities
Frey shields her face with her arms in Forspoken.

It might be the last thing you guess you need, but your nail designs in Forspoken will be a major factor in how your adventure goes. Frey's nail design isn't just for style here -- they function as a very important accessory. You will want to constantly be assessing which nails best serve your current situation, but also synergize with your other pieces of gear, those being your cloak and necklace. You don't want to break any of these nail designs, so check out our guide on where to find them all in Forspoken.
What nail designs do

Nail designs are the most abundant gear type in Forspoken, over cloaks and necklaces.. You will get them through a variety of tasks, such as defeating bosses and completing quests, as well as simply finding them in the world. Unlike the other types of gear, you can (and should) equip up to two types of nail designs at once to stack their effects.
All nail designs, what they do, and how to get them

Read more
Forspoken cloaks: all cloak locations and abilities
Frey uses fire magic in Forspoken.

Frey is from New York, but she can't wear her normal attire for long once she's whisked away into the fantasy world of Athia. Among Frey's new duds is her flowing cloak. Aside from looking awesome, this is one piece of gear in Forspoken that you can swap out and upgrade for stat buffs. It may not seem like a particularly strong armor piece, but once you see how much a good cloak can improve your abilities, you'll be glad to know how to get them all.
What cloaks do

Cloaks serve as Frey's primary piece of gear, along with necklaces and nail designs. They give different stat boosts, can be upgraded, and have a nice visual flair too. You will get them through a variety of tasks, such as defeating bosses, found in the world, and completing quests.
All cloaks, what they do, and how to get them

Read more