How to use the hidden Nintendo Switch browser

Looking for secret Nintendo Switch tips? How about a built-in web browser? This actually exists, you just can’t use it — at least, not directly. Why? Because the console is a portable, gaming-first device. You likely have a smartphone in your pocket, purse, or bag already, and Nintendo knows this. Even more, gaming consoles aren’t the best devices for browsing the internet anyway.

That said, you won’t find a dedicated web browser preinstalled on the console or listed in the eShop. Instead, it’s mainly used to log in to a public access point (hotspot), like a hospital, hotel, airport, Starbucks, and so on. It’s minimal at best, enabling very basic web surfing. It struggles with scripts and doesn’t support modern web-based technologies like Flash, but is worth taking a look for a few giggles.

Difficulty

Moderate

Duration

15 minutes

What You Need

  • Nintendo Switch

To use the browser outside the typical hotspot method, you must trick the console by manually inserting a primary DNS address. Our instructions on how to use the hidden Nintendo Switch browser rely on SwitchBru, a free hosted DNS server that redirects your queries to Google’s public DNS servers. According to the service, your connection is encrypted.

Still, keep in mind that you’re connecting to a third-party service. SwitchBru claims it doesn’t collect information like your IP address and surfing habits, but it does offer a free service for storing your favorite links and preferences.

Further reading

Use the web browser

Step 1: Tap or select the System Settings “gear” icon located on the home screen.

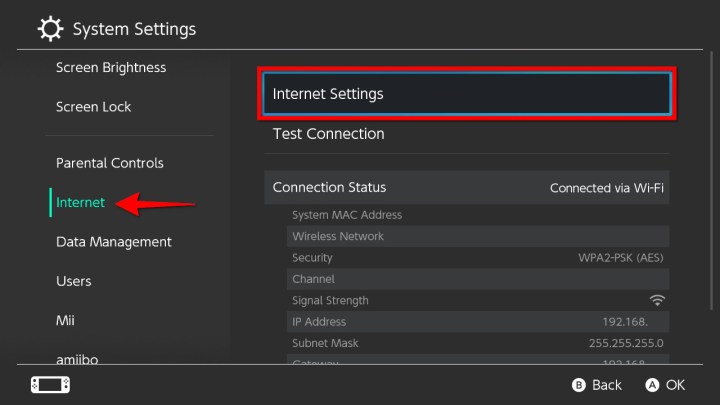
Step 2: Scroll down and tap or select the Internet option on the following screen.

Step 3: Select Internet Settingson the right.

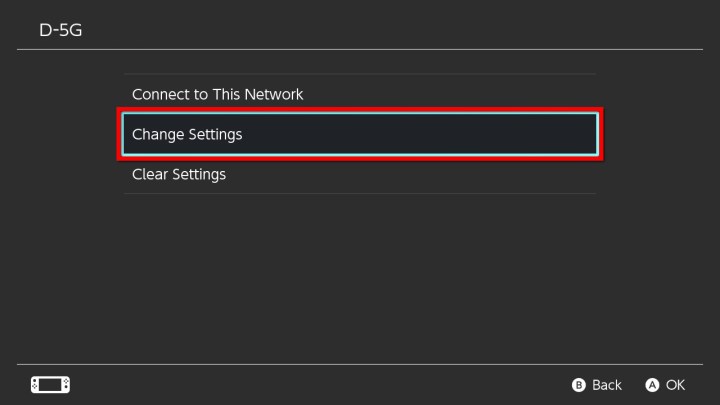
Step 4: Tap or select an internet connection.

Step 5: On the following screen, tap or select Change Settings.

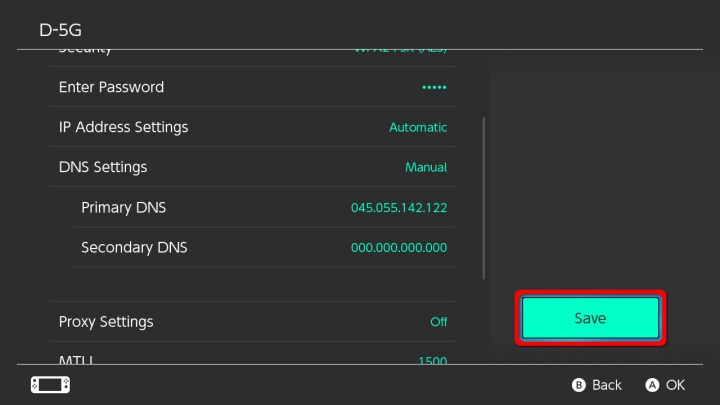
Step 6: Scroll down and tap or select DNS Settings.

Step 7: Choose Manual in the pop-up window at the bottom.

how to use hidden nintendo switch browser enter manual dns

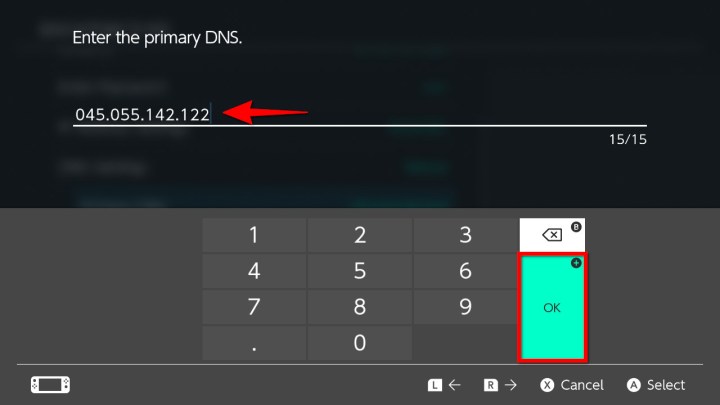
Step 8: Select Primary DNS, clear all the zeroes, and enter this address:

045.055.142.122

Select OK or tap the “plus” button to continue.
Step 9: Tap or select the Save button.

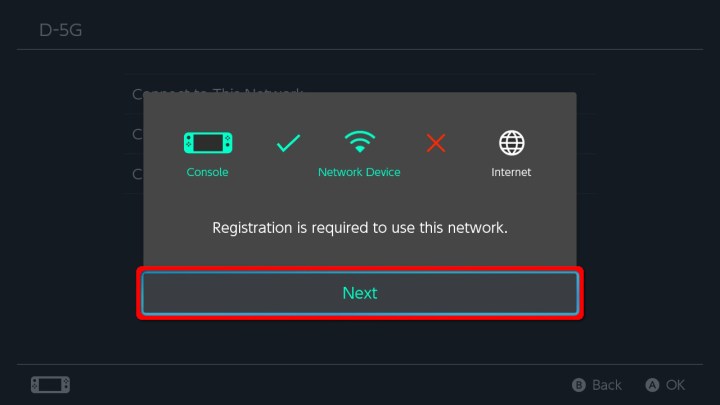
Step 10: Tap or select Connect to This Network on the following screen.

Step 11: The connection appears to fail, requiring registration. Tap or select Next.

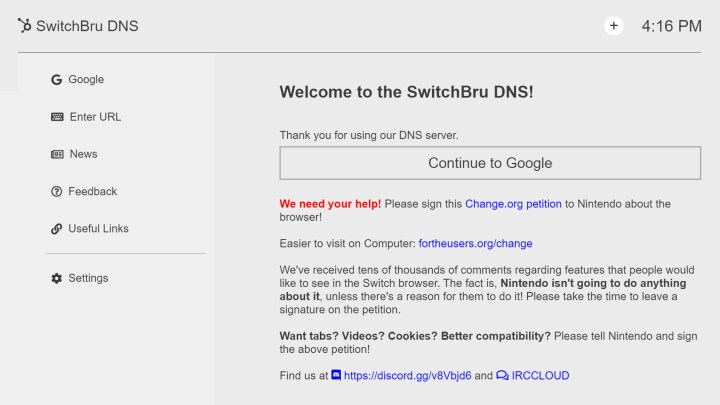
Step 12: The SwitchBru DNS homepage now appears on your screen. Here’s the actual address you can access on any device:

https://dns.switchbru.com

As shown below, you can tap or select the Continue to Google button to load a basic Google search page. You’ll also see a column to the left with six categories:

  • Google: Search the internet.
  • Enter URL: Enter an address.
  • News: The latest news from SwitchBru.
  • Feedback: Take SwitchBru’s survey to provide feedback about the latest web browsing experience.
  • Useful Links: Add custom links and access general and Switch-related links.
  • Settings: Change the theme (white or black), manage notifications, disable ads, and more.
Disconnect the web browser

Now that your Primary DNS is finally rerouted to SwitchBru, you’ll switch to loading the welcome screen each time you utilize that internet connection. To return it back to the original settings and disable the web browser, look at the earlier directions from Step 1 to Step 5. Alternatively, after you arrive at the connection settings screen, follow these steps:

Step 1: Scroll down and then click on or select the DNS Settings option. You’ll immediately see a pop-up page open at the bottom of the screen.

Step 2: Hit or pick the Automatic selection.

Step 3: Press the Save button. After you do this, immediately click the OK button to finish off this step and successfully complete the process.

We believe it’s worth mentioning that if you encounter connection problems using the Automatic setting, you can apply these directions to adjust the primary and secondary DNS numbers using a manual method. For example, here are Google’s DNS addresses:

8.8.8.8 (primary), 8.8.4.4 (secondary)

Editors' Recommendations

Kevin Parrish
Former Digital Trends Contributor
Kevin started taking PCs apart in the 90s when Quake was on the way and his PC lacked the required components. Since then…
How to respec hearts and stamina in Zelda: Tears of the Kingdom
Link holding heart container in Tears of the Kingdom.

You'll find a staggering amount of shrines throughout your adventures in The Legend of Zelda: Tears of the Kingdom, and completing each one earns you one Light of Blessing. You'll use four of these to upgrade your health or stamina at the emergency shelter in Lookout Landing – but what if you feel like you've made a mistake? You're in luck, as you can respec quite easily any time you like. We'll tell you how below.
How to respec hearts and stamina in Zelda: Tears of the Kingdom
To respec your hearts and stamina, go to Lookout Landing and drop down into the emergency shelter where you'd normally go to upgrade your hearts or stamina. Instead of praying at the statue in this room, however, speak to an NPC standing with a broom next to another NPC. Her name is Jerrin and she'll start a side activity for you in regards to a creepy sound coming from the nearby hole in the wall.

Head through the hole to investigate the sound, and you'll notice there are some rock walls to destroy. The path forward leads to a lengthy passage and some gear you may want for later, but to reach the place to respec, we need to clear the right path. Either throw a bomb plant at the rocks or hit them with a rock-fused weapon. After clearing a way through, you'll come across a creepy horned statue.

Read more
How to fast travel in Zelda: Tears of the Kingdom
Link runs toward a ledge in The Legend of Zelda: Tears of the Kingdom.

The Legend of Zelda: Tears of the Kingdom sports an extraordinarily massive map for you to explore, giving you plenty of places to walk, ride, or glide to on your adventures. But what if you want to get around a little bit quicker? That's where fast traveling comes in – a staple in open-world gaming that will let you teleport instantly to a place you've visited before. If you're wanting to know how to fast travel in Zelda: Tears of the Kingdom, we'll fill you in here.

If you need more help, check out our other Zelda: Tears of the Kingdom guides.
How to fast travel in Zelda: Tears of the Kingdom
There are multiple methods of fast traveling in Zelda: Tears of the Kingdom depending on what section of the map you're in.
Hyrule: Shrines and Skyview Towers
As you work your way through the game, you'll soon find that any shrines and Skyview Towers that you visit can become fast travel points. Simply open your map via the Purah Pad and select your desired location, then hit Travel to be instantly transported to that shrine or tower.

Read more
How to get the Hylian Shield in Zelda: Tears of the Kingdom
Link picking up the hylian shield.

The Legend of Zelda: Tears of the Kingdom is a new direction for the series that's also full of callbacks and references to the long lineage of the series. Among various armor and weapons, including the Master Sword, one other iconic piece of equipment from Link's past makes a return, though not unless you go looking for it. The classic Hylian Shield is Link's most trusted defense and is required to complete your classic set. Here's how to get the Hylian Shield in Tears of the Kingdom.

If you need more help, check out our other Zelda: Tears of the Kingdom guides.

Read more