
It’s not controversial to say Sekiro: Shadows Die Twice is one of the toughest games of the generation. Coming from the Dark Souls team, FromSoftware, this is to be expected. Sekiro features incredibly difficult enemies that require concentration, focus, and preparation to defeat. While there are notoriously difficult bosses like Genichiro, Demon of Hatred, and Owl (Father), we wanted to bring attention to one of the lesser-known bosses known as the Headless. These mini-bosses are incredibly deceitful — due to their lack of a … head. But don’t be fooled, you won’t want to come charging into these fights without knowing what to expect.
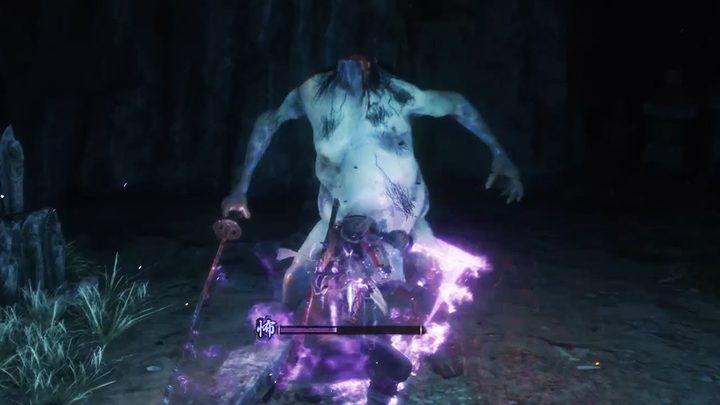
Not only is the Headless a formidable foe on its own, but the mist that appears around the boss slows your movements to a crawl, putting you at a serious disadvantage. On top of that, there are five Headless mini-bosses that spawn throughout the world of Sekiro.
Fortunately, we’ve got the rundown on how to take out all of the Headless mini-bosses, along with a laundry list of tips and tricks to get you by. Here’s how to beat the Headless in Sekiro: Shadows Die Twice.
Further reading:
- Sekiro: Shadows Die Twice beginner’s guide
- Sekiro: Shadows Die Twice – Best items to buy from vendors
- How to break an enemy’s Posture in Sekiro: Shadows Die Twice
Headless overview
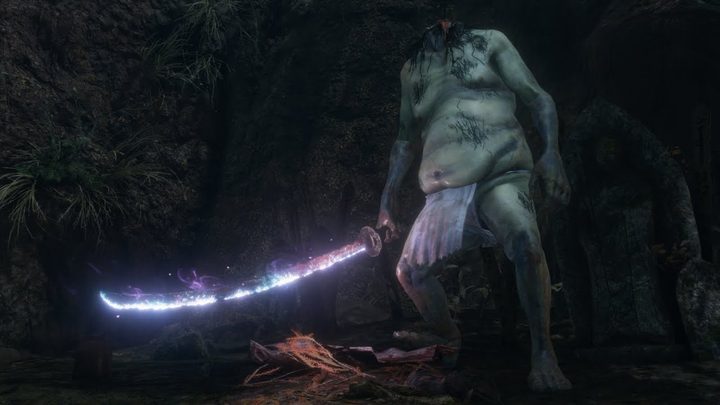
The Headless are optional mini-bosses that are deceptively challenging to take out. On the surface, they might not seem so difficult, but when you consider their wide swing range, ability to turn invisible, Terror build-up, and the fact that you get surrounded by mist that slows you down, these enemies should not be underestimated. The main kicker is that you can’t damage the bosses unless you use Divine Confetti, so be sure to have a stack of them before attempting the on-land fights. There are two versions of Headless to take out — three above water and two underwater — meaning you’ll need to learn two strategies to take them all down.
Headless mini-bosses located on land have two health bars, while the underwater versions only have one — though, you must deal with two at once in Fountainhead Palace. Luckily, defeating these bosses isn’t required to finish the game, but we recommend you take them out, as they drop excellent loot, like Ako’s Spiritfall, which grants you a temporary damage boost in exchange for Spirit Emblems.
There are five Headless bosses
Headless is a mini-boss that appears throughout the world in five locations. Here are the general locations of each one:
- Ashina Outskirts – Near the Underbridge Valley Idol, inside a cave found after shimmying across a ledge up the cliff.
- Sunken Valley – Travel to the Under-Shrine Valley Sculptor’s Idol and turn around, past the three phantoms and into a cave. You need the Mibu Breathing Technique skill acquired from the Corrupted Monk (Illusion) boss fight to access the area with this Headless.
- Ashina Depths – Located in the Hidden Forest close to the Buddha Statue. It’s recommended to face this enemy after you’ve defeated the Mist Nobel so you can see better. Otherwise, you’ll have to deal with mist that hinders your vision.
- Ashina Castle – This fight is located in the lake, just before the Old Grave Sculptor’s Idol. Again, you need the Mibu Breathing Technique skill to engage in this fight.
- Fountainhead Palace – From the Flower Viewing Idol, head into the Great Carp’s lake to find this Headless fight.
What items you should bring with you
If possible, we recommend you bring the following items with you to take on the Headless mini-bosses:
- Divine Confetti – This is essential for damaging the boss. You can buy an infinite supply from the merchant in the Dilapidated Temple after beating the True Corrupted Monk.
- Pacifying Agent – Use this to remove Terror status. (Can be acquired by exploring or purchased from Fujioka the Info Broker in Ashina Castle. This item can be farmed in Abandoned Dungeon.)
- Mottled Purple Gourd – Reduces Terror build-up.
- Ako’s Sugar/Ako’s Spiritfall – For extra attack and posture damage.
- Malcontent – To stun the boss three times per fight, allowing you to get free hits in.
Use this strategy for an easier win above land
First things first: We recommend you take on the Headless boss in Ashina Outskirts first, and only after you’ve gotten close to the end of the game. This way, you’ll have plenty of healing items and will hopefully be familiar with Sekiro’s mechanics. The reason we recommend you defeat the Headless in Ashina Outskirts first is that this mini-boss rewards you with Ako’s Spiritfall — an item that temporarily boosts your damage and isn’t consumed upon use. Instead, it uses Spirit Emblems, which are renewable. Using this item on the rest of the Headless bosses will help tremendously.
Before you start the fight, make sure you’ve got at least two Divine Confetti on you (more is recommended, in case things go awry). We also recommend you bring Ako’s Sugar (a less powerful version of Ako’s Spiritfall), Mottled Purple Gourds, and Pacifying Agents, which we’ve detailed above. Before you start the fight, pop a Divine Confetti and an Ako’s Sugar to give yourself a leg-up right at the beginning.
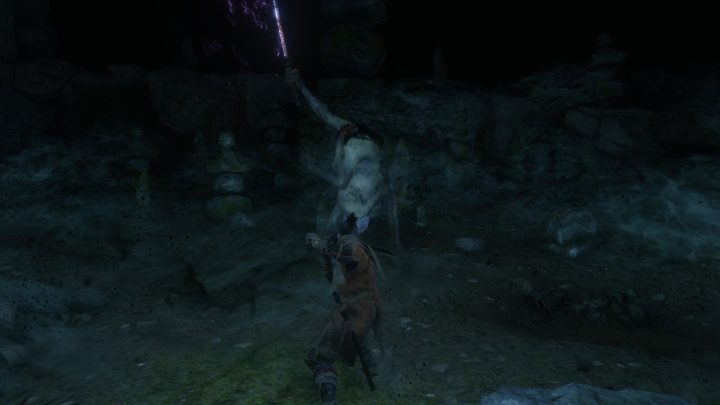
As soon as the fight starts, run up to the boss and get a few hits in. Make sure not to lock on, as the camera can get really wonky. After about five or six strikes, wait to see what the boss does. It’ll telegraph its moves, making it easy to know what to do. If it starts winding up a swing, back away and wait for it to finish. It’ll probably turn invisible, and if it does, immediately turn around because the boss will reappear behind you.
Your goal is to get directly behind the boss while the mist is at your feet, which will pretty much keep you safe from all attacks. The boss is programmed to not attack you unless you’re in front of it, so when you go behind, it will constantly turn to get you in its view. While you’re behind, you’re free to get a couple quick shots in, without worrying about getting hit. The nice thing is that the Headless turns very slowly, at least throughout the mist, giving you the chance to get in two strikes.
The trick is to sprint behind him each time. If you simply walk, he might attack you, so keep your finger on the sprint button the whole time. The other thing to keep in mind is that — depending on your position — the boss might not always turn in the same direction. Always be aware of which way the Headless is turning (watch its feet) and run behind him so you’re safe. Also, don’t get greedy with your strikes — any more than two will put you in harm’s way.
When the mist disappears, the boss actually moves a little faster, so you might want to get in a few attacks, run away, and rinse and repeat until the mist comes back. You’ll eventually need to pop another Divine Confetti, so make sure you run away, or wait for the boss to use its two-handed sword spin attack before using another. Alternatively, you can use one immediately after you take out the boss’s first health bar. Just don’t try to use one when you’re within range of the Headless. Same goes for any additional item like Ako’s Sugar — wait until you’re clear before using one. Once it’s safe, run back to sticking behind the boss just like before. Be cautious, and you’ll take it down in no time.
You can use this same strategy on the other two Headless fights that occur on land, but instead of using an Ako’s Sugar at the start, you’ll now have access to Ako’s Spiritfall after you’ve taken out the Headless in Ashina Outskirts. Come to each fight with plenty of Spirit Emblems to ensure you get the most out of your new item.
One of the benefits of this strategy is that you don’t have to worry about Terror build-up since the boss won’t be hitting you. If you do mess up and get caught in the boss’s way, you’ll want to keep an eye on your Terror meter, as it’ll kill you instantly if it fills all the way. Remember to back away and use a Pacifying Agent if this happens. If you want to be extra cautious, use a Mottled Purple Gourd to slow the rate of your Terror build-up. Though, if you execute the strategy listed above correctly, you shouldn’t need to use any of those items. But keep them on you, just in case.
Finally, if you’re really struggling and can’t get the strategy down, we recommend using the Malcontent Prosthetic Tool, which is an enhanced version of the Finger Whistle. You can use it to stun the enemy temporarily, with the ability to take off nearly an entire health bar before the enemy will attack again. Just make sure you aim it at the enemy to use it effectively. You can use Malcontent three times per battle.
This is a boss that requires a little patience and will reward you if you take your time and come prepared. Getting greedy and trying to attack the boss Rambo-style will likely cause you to die.
And use this strategy for underwater battles

Unfortunately, the simplicity of the strategy listed above isn’t present for the underwater battles, but luckily, the bosses only have one health bar. The catch is that you must deal with two Headless at once — at least for the battle located in Fountainhead Palace. The other underwater fight at Ashina Castle only has one Headless to fight, so we recommend you start there to get some practice dealing with the Headless in this new location.
Regardless of which one you take on first, these fights are challenging because you can’t use most items underwater, so you’ll have to use a different strategy. Fortunately, you can use items before you jump in and they’ll still go into effect. You can heal underwater, which is extremely useful, and you don’t need to use Divine Confetti, but it’s recommended against the spirit Headless in Fountainhead Palace.
For the boss located in Ashina Castle, we recommend sticking behind the boss, just like before, and watching out for its large, two-handed sweeping attacks. Since you’re underwater, it’s tougher to be as precise as you might like.
Before you trigger the fight, pop an Ako’s Sugar (or Ako’s Spiritfall) and a Pacifying Agent to slow Terror build-up. As soon as you jump in the water, find the boss and watch out for its long-range blast. Swim behind the Headless and get in a few attacks. Then back away, wait for it to start the animation of its sweeping attack, and get back behind it to get in a few attacks. It helps to sit back for a little while and watch the boss’s animations to get a sense of what it can do — then you can react more effectively. With it only having one health bar, you shouldn’t have much trouble as long as you use items before the fight and stick behind it.
The underwater battle you need to watch out for is the one at Fountainhead Palace. This is the fight that forces you to ward off two Headless at once. The thing is, you don’t actually have to defeat both Headless to end the fight, but it’s highly recommended to do so since the spirit has low health and can be taken out quickly.
Just like before, use an Ako’s Sugar (or Ako’s Spiritfall), Pacifying Agent, and Divine Confetti before you dive in and make a beeline for the spirit Headless that’s located on the lower section of the boss arena. You can get in a few hits before the other Headless fires off projectiles at you. Again — don’t be greedy and strike the spirit only a couple of times before swimming out of the way. Once you’ve safely dodged the projectiles, swim back in and land the final blows on the spirit headless. It should only take around six to ten strikes, depending on which items you’re using. When the spirit is down, you can focus on the main Headless.
The main Headless will likely already be charging up a projectile attack after you kill its buddy, and if so, you’ll want to swim perpendicular to the enemy to avoid it. Your goal, much like the battle at Ashina Castle, is to get behind the boss. Slash it a couple times and retreat, watching out for the projectiles. You’ll want to put some room between you and the boss so you have plenty of time to react. Try to stay away from any walls or pieces of geometry that could obstruct your view, as the camera can give you a hard time if you get caught in a weird spot.
Typically, we recommend no more than two attacks before you back away — otherwise, you might get hit. Swim in a circular motion (clockwise or counterclockwise) and do your best to get behind the boss, while staying away from the projectiles. Then attack and swim away. There isn’t much else to look out for aside from its black hole attack that should be avoided at all costs.
Another strategy is to only strike while the Headless is using the black hole attack, which is telegraphed by a large guttural noise, accompanied by the enemy pulling back and charging up the move with its left hand. You’ll know it when you see it. If you opt for this strategy, you need to stay close enough to not trigger the projectiles, but far enough away to avoid the sword slashes and the black hole.
Just like the on-land fights, if you come prepared and know what to do, these underwater battles are quite manageable, especially since the Headless don’t have as much health as their on-land counterparts.
Rewards for defeating each Headless
You might be thinking, “Why would I torture myself attempting to defeat these tough bosses?” Well, aside from earning XP, the main reason for taking these enemies out is for the Spiritfall items they drop, which we’ll detail below. Each item uses Spirit Emblems, making them much more useful than their early game counterparts. You can only use one Spiritfall item at a time. Attempting to use an additional one will override the previous one, so don’t waste your Spirit Emblems trying to stack them.
Below, we’ll list the location of each headless, the item they drop after being defeated, and the effects of each item:
- Ashina Outskirts – Ako’s Spiritfall – Vitality and Posture damage increase.
- Sunken Valley – Gokan’s Spiritfall – Reduces Posture damage taken for 20 seconds.
- Ashina Depths – Gachiin’s Spiritfall – Grants stealth and silence for one minute. Enemies won’t see you unless you’re close.
- Ashina Castle Tower Lookout – Ungo’s Spiritfall – Reduces physical damage for 30 seconds.
- Fountainhead Palace – Yashariku’s Spiritfall – Grants attack boost in exchange for cutting your Posture and Vitality in half for 30 seconds.


