
How to set a course in Starfield

Rather than build one massive world like in an Elder Scrolls title, Bethesda opted to create hundreds of planets to travel between in the aptly named Starfield. While not every planet is necessary to visit, you will be jumping between them extremely frequently to complete missions, do sidequests, build outposts, and generally explore. When you are first shoved into the pilot's seat, it can feel overwhelming coming to grips with how the system works. If you just want to get from point A to B, setting a course is the easiest way to dos o. Here's how to get where you need to be without searching the massive star map in Starfield.

Difficulty

Easy

Duration

5 minutes

What You Need

  • Get access to your ship

How to set a course

Setting a course is basically the large version of fast travel, compared to the kind you can do once you're actually on a planet. If your next objective is in a different solar system, this is the way to get exactly where you need to be.

Step 1: Open your quest log and select the active quest you want to travel to.

A tutorial on how to set a course in Starfield.
Bethesda Softworks

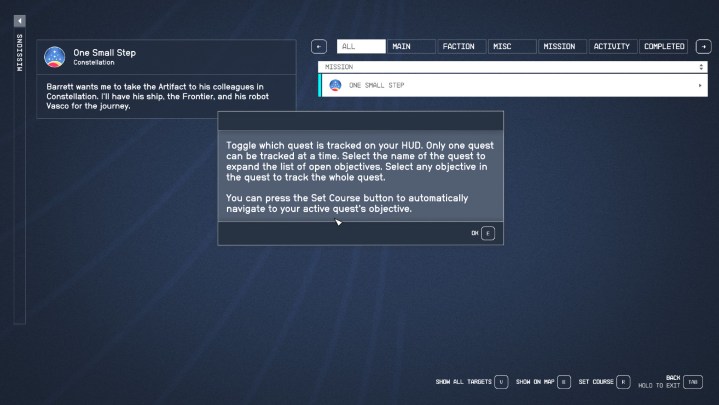
Step 2: Press the Set Course button

A ship plotting a course to a planet named Kreet.
Bethesda Softworks

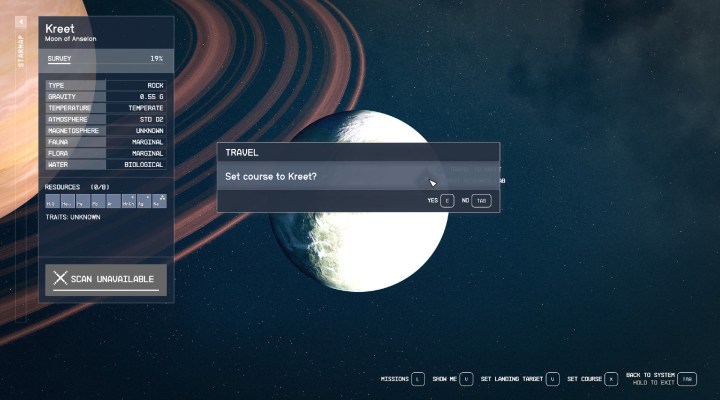
Step 3: This will instantly pull you onto the map showing the planet your objective is on.

Step 4: Simply confirm the option to travel, and you will jump to your desired location!

Editors' Recommendations

Jesse Lennox
Jesse Lennox loves writing, games, and complaining about not having time to write and play games. He knows the names of more…
Where to get the Narwhal spaceship in Starfield
A preview of the Narwhal ship in Starfield.

Among the dozens of ships you can find, buy, steal, and even create yourself in Starfield, there's one that stands out as one of the best you can get without spending hours designing one yourself with the best weapons and parts. The Narwhal may have an ugly name, and an appearance to match, but don't judge this book by its cover. This ship has some amazing stats that make it well worth the sticker price. Having enough Credits to buy it is only half the trouble, though. If you want to become the captain of your very own Narwhal spaceship in Starfield, you'll need to know where to get it.
How to get the Narwhal

The Narwhal is sold at Taiyo Astroneering inside of the Ryujin Industries building on Neon. Neon is a major hub city, but if you haven't been there yet or need a refresher, it is inside the Volli system to the right of Olympus. Once on Neon, find the big red Ryujin Industries building on the promenade and head to the elevator in the back. Select the Yaiyo Astroneering floor, which is one level above the Lobby, and go up to the right into the Show Room. Speak with Veronica and ask to see what she's got for sale.

Read more
How to change your appearance in Baldur’s Gate 3
A party of four adventures walking through a mushroom forest in the Underdark

Making your character can take a long time if you really want to get all the details right. From your race, class, hairstyle, and more, you have a lot of options to tweak before ever starting your adventure. If you're a little too excited, you might end up slacking off on making your character and assuming you can update it later just so you can get right into the action. If so, or you simply want to change up your look after a couple of hours into this massive game, you'll be at a loss as to how, if you even can, change your appearance in Baldur's Gate 3. You may not fully like the answer, but here's the best you can do in terms of altering your appearance after you've exited the character creator.
Can you change your appearance in Baldur's Gate 3?

The answer to this is technically yes, but not in the way you would hope. To get it out of the way, no, there's no way to return to the character creation screen after you've finalized your character. Unlike respeccing your character, there's no NPC, item, or magic mirror anywhere in The Forgotten Realms that will let you change your appearance.

Read more
Mortal Kombat 1 Fatalities: how to do every character’s Fatality
Shang Tsung stealing someone's soul in Mortal Kombat 1.

What set the Mortal Kombat franchise apart when it first hit arcades was just how brutally violent the games were. It looks tame now, but the Fatalities of the original game were some of the most shocking things anyone had seen in a game up to that point, pixelated graphics and all. With Mortal Kombat 1, NetherRealm continues to churn our stomachs with some of the most disgustingly detailed ways to dismantle your opponent. Everyone loves seeing these creative ways your favorite fighter can definitively end a fight, but if you want to show off to your friends and humiliate your enemy, you have to know the specific button input to pull it off for each character. There are more that you can unlock, but here is how to perform every character's basic Fatality in Mortal Kombat 1.
How to perform all basic Fatalities
Here are all the default inputs for every character's Fatality on PlayStation and Xbox controls in alphabetical order, as well as what range you need to be at to trigger the Fatality. Once you have reduced your opponent's health to 0 and they are susceptible to a Fatality, which you will know from the announcer calling out "Finish him" or "Finish her," you will have five seconds to input the correct sequence.
Ashrah - Mid range
Down, Forward, Down, Triangle/Y
Baraka - Close range
Back, Forward, Down, Square/X
General Shao - Mid range
Back, Forward, Down, Square/X
Geras - Mid range
Forward, Down, Down, Circle/B
Havik - Close range
Down, Forward, Down, Circle/B
Johnny Cage - Close range
Forward, Back, Down, Triangle/Y
Kenshi - Close range
Forward, Down, Down, Triangle/Y
Kitana - Mid range
Down, Forward, Down, Circle/B
Kung Lao - Mid range
Down, Down, Back, Circle/B
Li Mei - Close range
Forward, Back, Forward, Cross/A
Lui Kang - Close range
Back, Forward, Down, Circle/B
Mileena - Close range
Back, Forward, Back, Square/X
Nitara - Mid range
Down, Down, Back, Square/X
Raiden - Close range
Back, Forward, Back, Triangle/Y
Rain - Close range
Down, Down, Back, Circe/B
Reiko - Mid range
Down, Down, Back, Triangle/Y
Reptile - Mid range
Forward, Back, Down, Circle/B
Scorpion - Mid range
Down, Forward, Back, RT
Shang Tsung - Close range
Back, Down, Down, Circle/B
Sindel - Mid range
Down, Back, Down, Square/X
Smoke - Any range
Back, Forward, Down, Square/X
Sub Zero - Any range
Forward, Down, Down, Triangle/Y
Tanya - Close range
Down, Back, Down, Cross/A
All Kameo Fighter Fatalities
Cyrax - Mid range
Forward, Back, Forward, RB
Darrius - Mid range
Down, Back, Forward, RB
Frost - Mid range
Back, Down, Back, RB
Goro - Close range
Back, Forward, Down, RB
Jax - Far range
Down, Forward, Down, RB
Kano Mid range
Back, Down, Forward, RB
Kung Lao - Mid range
Forward, Back, Forward, RB
Sareena - Mid range
Back, Down, Down, RB
Scorpion - Mid range
Down, Forward, Down, RB
Sektor - Mid range
Back, Forward, Back, RB
Shunjiko - Mid range
Down, Back, Down, RB
Sonya - Mid range
Back, Forward, Down, RB
Stryker - Mid range
Forward, Down, Forward, RB
Sub-Zero - Mid range
Forward, Down, Forward, RB

Read more