Over the past few years, Apple has been getting perilously close to becoming a full-fledged bank. Features like Apple Pay, Apple Cash, the Apple Card, and the most recent additions, the Apple Card Savings Account and Apple Pay Later service, are blurring the lines between your bank account and your iPhone — and that's not a bad thing for those who enjoy life in Apple's walled garden.
Next to Apple Pay, perhaps the most useful of Apple's iPhone-integrated financial features is Apple Cash. Initially known as "Apple Pay Cash," the company dropped the "Pay" branding a few years ago to simplify things, but it's still the same service it's always been — a Venmo-like money-transfer service that's built into your iPhone and other Apple devices that lets you easily send and receive money via Apple's Messages app, as well as move money to and from your bank account using your debit card and bank transfers right from the iPhone's Wallet app. However, thanks to Apple Pay, Apple Cash goes one step further, giving you a virtual debit card to let you spend money directly at any retailer that accepts Visa Debit. (Apple Cash originally used the Discover card network, but switched to Visa Debit in early 2022.)
Since Apple isn't actually a bank (at least not yet), Apple Cash is backed by Green Dot Bank behind the scenes, which means your money is Federal Deposit Insurance Corporation (FDIC) insured just like it would be in a normal bank account. Don't be too surprised if you see this name come up from time to time, but it's otherwise not a detail you'll need to worry too much about to actually use Apple Cash.
Apple Cash not only lets you receive money from friends, but it also serves as the spot where your Daily Cash is deposited if you're an Apple Card holder, although you'll likely be better off directing it to Apple's new high-yield savings account instead.

What you need to use Apple Cash
For the most part, Apple Cash is managed entirely through Apple's Wallet app on your iPhone. Money can be sent and received through Messages or the Wallet settings on your iPhone, iPad, Apple Watch, or even Apple's new Vision Pro headset, but you'll need your iPhone or iPad to set up and manage Apple Cash. The Mac is conspicuously left out of the party here.
Step 1: Apple recommends that your device use "the latest iOS, iPadOS, watchOS, or visionOS." Since Apple Cash is a secure payment system, there could be changes that might cause problems with older versions, and you'll also miss out on some of the newer Apple Cash features.
Technically, the minimum requirements for Apple Cash are iOS 11.2 or later on an iPhone or iPad or watchOS 4.2 or later on an Apple Watch. Apple Cash also requires a device that supports Apple Pay — an iPhone 6 or later, an iPad with Touch ID or Face ID, or an Apple Watch Series 1. All of these can be updated to at least iOS 12 and watchOS 6 and are the minimum versions you should be using with Apple Cash.
Step 2: Apple Cash is available only in the U.S. Just like when opening any bank account, you'll need to verify your identity by scanning an image of your driver's license or other government-issued ID and supplying a valid Social Security Number.
You must also be 18 years of age, and Apple says you must "live in the United States," although expatriates shouldn't have a problem setting it up as long as they have a valid U.S. address.
Step 3: For security reasons, your Apple ID needs to have two-factor authentication enabled, and you need to be signed into iCloud with the same Apple ID on all of the devices where you want to use your Apple Cash account.

Step 4: Lastly, you'll need to have an eligible debit card in the Wallet app if you want to be able to add money to Apple Cash or send money to others directly from your bank account. Apple Cash does not allow money to be added or sent from credit cards, and bank transfers can only be used to move money from Apple Cash into your bank account.
A debit card isn't strictly required, but without one, you'll only be able to send money that's already in your Apple Cash account, and you won't be able to add money to it manually; your balance will only consist of any Apple Card Daily Cash you direct there and funds received from other people.

How to set up Apple Cash
Once you've met all the requirements, here's how to set up Apple Cash from your iPhone, iPad, or even your Vision Pro.
Step 1: Make sure you have your driver's license or other government-issued ID handy, along with your Social Security Number (SSN), as you'll need to scan your ID with your device's camera and enter your SSN to verify your identity.
Step 2: Open the Settings app on your device.
Step 3: Scroll down and select Wallet & Apple Pay.

Step 4: Toggle the switch on beside Apple Cash.
Step 5: When prompted, authenticate with Face ID, Touch ID, Optic ID.
Step 6: Select Continue and then follow the instructions. You'll typically be asked to verify your identity by providing details such as your full name, SSN, date of birth, home address, and an image of your ID. You may also be asked some questions regarding your personal financial history — the sort of things that might appear on a credit report.
Whether this appears and how many details you're asked for will depend on your financial profile with Apple. In some cases, the verification may be skipped entirely if Apple's risk assessment algorithms are satisfied with other details such as your iTunes, App Store, and Apple Pay purchase history. However, you won't be able to send or receive more than $500 without verifying your identity.

How to send money with Apple Cash
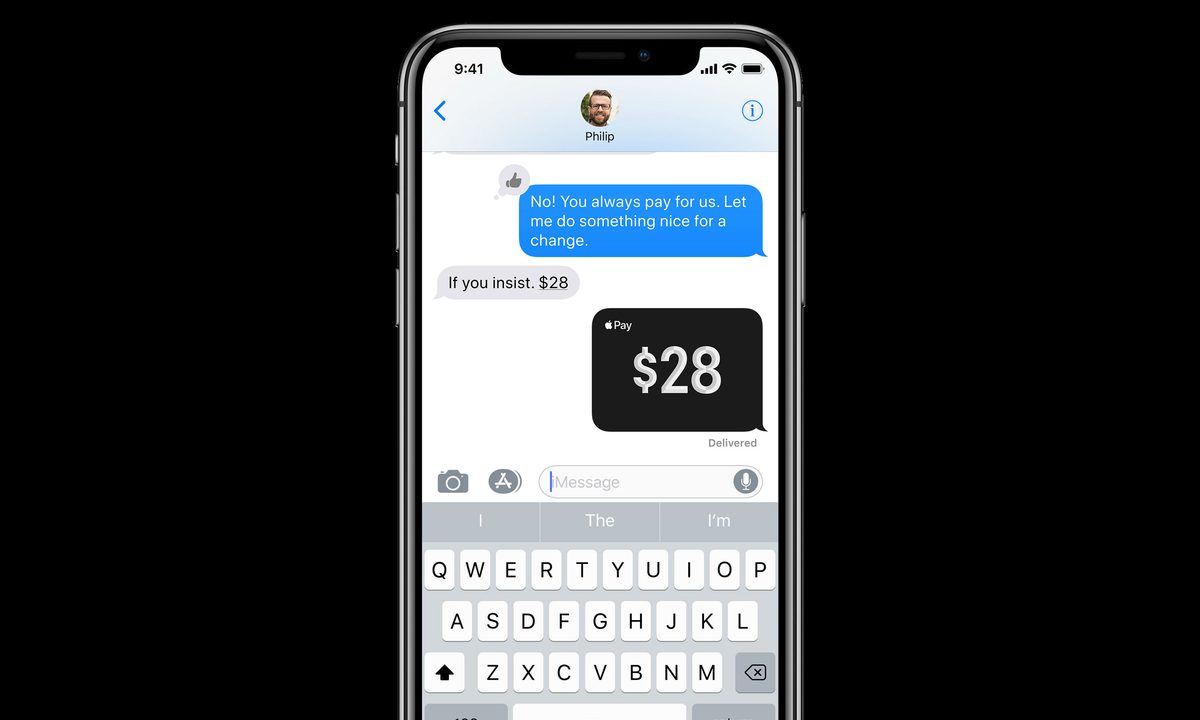
Once Apple Cash is set up, you're ready to send money to any other Apple Cash user, whether that's a gift for a close friend or family member or you're splitting the lunch bill with a work colleague. Apple Cash payments are always sent via iMessage, and this is typically done using the Messages app on the iPhone, iPad, Apple Watch, or Vision Pro. However, they can also be initiated from the Apple Cash card in the Wallet app on your iPhone.
Step 1: Open the Messages app on your device and open or start a conversation with the person you'd like to send money to.
Step 2: Choose the Plus sign in the bottom-left corner.

Step 3: Scroll down on the menu that appears and select Apple Cash.

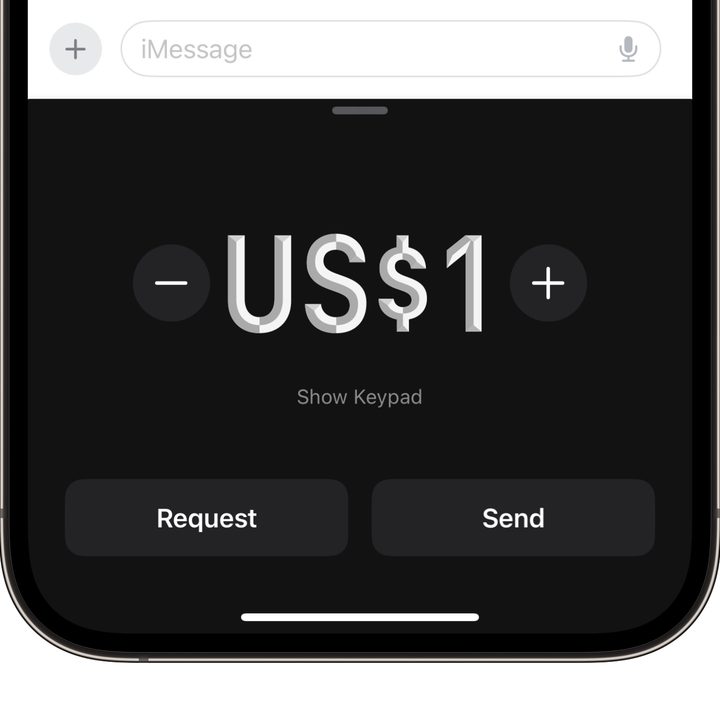
Step 4: Use the Plus and Minus signs to set an amount in even dollars, or choose Show Keypad to enter a specific amount, including cents.
Step 5: Select the Send button.
Step 6: The payment will appear as an attachment, similar to sending a photo in iMessage. You can also enter a message here, which will not only be sent to the recipient, but also be attached to the Apple Cash payment in your transaction history. This will be denoted by a black bubble rather than the usual blue one.
Step 7: When ready, tap the Black send arrow.

Step 8: An Apple Pay payment prompt will appear next to confirm the transaction. By default, the funds will be taken from your Apple Cash balance, unless that's not sufficient, in which case your debit card will be used instead. Like any other Apple Pay transaction, you can tap the payment method to select an alternate one; however, only your Apple Cash balance and debit cards can be used here.
Step 9: Confirm the transaction by double-clicking the side button on a Face ID-equipped iPhone or iPad and confirming with Face ID. If you have an iPad Air, iPad mini, iPad, or an iPhone SE or older iPhone with a home button, lightly place your finger on the Touch ID sensor to confirm. If you're using a Vision Pro, double-click the top button and look at the Optic ID icon to confirm.

How to request money with Apple Cash
The process for requesting money with Apple Cash is very similar to sending money. You can initiate a request from the Messages app or the iPhone Wallet app, and it's mostly a matter of pressing a different button.
Step 1: Go to the Messages app and open or start a conversation with the person you'd like to request money from.
Step 2: Choose the Plus sign in the bottom-left corner.
Step 3: Scroll down on the menu that appears and select Apple Cash.
Step 4: Set the amount you'd like to request, either by using the Plus and Minus signs or choosing Show Keypad to enter a specific amount.
Step 5: Select the Request button.

Step 6: The request will appear as an attachment, giving you an opportunity to add a comment before you send it. As with sending money via Apple Cash, anything you enter here will also be attached to the request in your transaction history, and show as a black bubble in the conversation.
The recipient can tap the request once they received it, which will take them through the process of sending an Apple Cash payment from their iPhone, iPad, Apple Watch, or Vision Pro.

How to add money to Apple Cash from your bank account
You can top up your Apple Cash balance at any time using your debit card if you've added one to your account. There's no charge for this from Apple's side, but it's treated as a normal debit card transaction, so you'll still need to pay whatever fees your bank might charge for these.
Step 1: Go to Settings > Wallet & Apple Pay on your iPhone or iPad.
Step 2: Select your Apple Cash payment card.
Step 3: Select Add Money
Step 4: Enter the amount you would like to transfer and select Add in the top-right corner.
Step 5: Confirm the payment by double-clicking the side button and using Face ID, holding your finger gently on the Touch ID sensor, or double-pressing the top button and using Optic ID on the Vision Pro — depending on the device you're using.
You can also add funds by choosing your Apple Cash card from the Wallet app on your iPhone, selecting the Three-dot menu in the top-right corner, and choosing Add Money. However, this method only works from the iPhone, as there's no standalone Wallet app on the iPad.

How to automatically reload your Apple Cash balance
In addition to adding funds to your Apple Cash account manually, you can also set up an auto reload so there's always a bit of spending money available on your Apple Cash card. This will automatically add money from your bank account when your Apple Cash account falls below a minimum balance.
Step 1: Go to Settings > Wallet & Apple Pay on your iPhone or iPad.
Step 2: Select your Apple Cash payment card.
Step 3: Choose Set Up Auto Reload.
Step 4: Choose Amount and select the amount you would like to automatically reload from your bank account (from $25 to $200).
Step 5: Choose Minimum Balance and select the threshold below which you'd like the reload to occur: $10, $15, or $25.
Step 6: Select Set Up in the top-right corner.
Step 7: Confirm by double-clicking the side button and using Face ID or holding your finger gently on the Touch ID sensor, depending on the device you're using.

How to transfer money from Apple Cash to your bank account
Money can also be transferred from Apple Cash to your bank account using standard automated clearinghouse (ACH) transfers or via an eligible debit card. An ACH transfer will typically take 1 to 3 business days while a debit card transfer is usually immediate. There's no charge for ACH transfers, however you'll need to pay a fee of 1.5% of the money you're transferring if you want to use your debit card to get the funds into your bank account right away, with a minimum fee of 25 cents and a maximum of $15.
Step 1: Go to Settings > Wallet & Apple Pay on your iPhone or iPad.
Step 2: If you want to use ACH transfers, make sure you've added a bank account by selecting Bank Account and following the instructions to enter your banking information, such as a routing number and account number. Debit card transfers will use any eligible card that's already available in your Apple Wallet.
Step 3: Select Transfer to Bank.
Step 4: Enter the amount you would like to transfer and select Next in the top-right corner.
Step 5: Choose the bank account and method you would like to use for the transfer and select Next in the top-right corner.

Step 6: Confirm the transfer by double-clicking the side button and using Face ID or holding your finger gently on the Touch ID sensor, depending on the device you're using.
You can also transfer funds directly from the Wallet app by selecting the Apple Cash card, choosing the Three-dot menu in the top-right corner, and selecting Transfer to Bank. However, this only works from the iPhone, as there's no standalone Wallet app on the iPad.

How to use Apple Cash Family
Although you need to be at least 18 years old to set up an Apple Cash account on your own, you can set up Apple Cash accounts for younger members of your family as long as you're all part of an Apple Family Sharing group.
Children of all ages can have their own Apple Cash account, as long as they're under the supervision of a parent or guardian. The family organizer can limit who a child or teen can send money to, get notified of their transactions, and also lock their account.
Those younger than 13 will have a few additional restrictions. Since they can't otherwise use Apple Pay, they won't be able to add a debit card of their own or set up recurring payments. However, they can spend the balance on their Apple Cash card anywhere that accepts Apple Pay, and this even works for kids who only have an Apple Watch on a Family Setup plan.
Step 1: Open the Settings app.
Step 2: Select Family below your name at the top.
Step 3: Choose the child or teen that you want to set up Apple Cash for.
Step 4: Select Apple Cash and follow the instructions.

Step 5: Kids and teens who have been set up for Apple Cash will appear in your Apple Cash card details under Settings > Wallet & Apple Pay. From here, you can monitor their transactions, set up recurring payments, control who they can send money to, and lock their Apple Cash card to prevent it from being used.

How to set up recurring payments in Apple Cash
If you're running iOS 17 or later, you can now set up recurring payments in Apple Cash. This can be useful for giving your kids an allowance (see the previous section on how to set up Apple Cash for your family), or sharing a recurring bill with other members of your household. Recurring payments can be scheduled to start up to a year in advance, and can be sent weekly, monthly, or every other week after that. Here's how to set one up:
Step 1: Open the Messages app on your device and open or start a conversation with the person you'd like to set up a recurring payment to.
Step 2: Choose the plus sign in the bottom-left corner.
Step 3: Scroll down on the menu that appears and select Apple Cash.
Step 4: When the dollar amount appears, select Show Keypad.
Step 5: Enter the amount you would like to send as a recurring payment.
Step 6: At the bottom, choose Send Recurring Payment.
Step 7: Select Starts and choose a date from the calendar picker if you would like the first payment to be sent at a future date. Leaving it set to "Today" will send the first payment immediately.
Step 8: Beside Repeats, choose how often you would like the payment to recur: Every Week, Every Other Week, or Every Month.
Step 9: Optionally, select Add a Memo... and type a note that you would like to include with each payment.
Step 10: Choose Send in the top-right corner.
Step 11: The recurring payment will appear as an attachment. You can also enter a message here, which will not only be sent to the recipient, but also be attached to the Apple Cash payment in your transaction history. This will be denoted by a black bubble rather than the usual blue one.
Step 12: When ready, tap the Black send arrow.
Step 13: Confirm the transaction by following the instructions and using Face ID, Touch ID, or Optic ID, depending on the device you're using. By default, the funds will be taken from your Apple Cash balance, unless that's not sufficient, in which case your debit card will be used to make up the difference. Like any other Apple Pay transaction, you can tap the payment method to select an alternate one; however, only your Apple Cash balance and debit cards can be used here.
Step 14: The recurring payment will be set up, and the initial payment will be sent immediately if it was scheduled for day you set it up. Subsequent payments will arrive in the recipient's Apple Cash account by 9 a.m. PT on the scheduled dates.
You can view and manage your recurring payments by going to Settings > Wallet & Apple Pay > Apple Cash > Recurring Payments or by selecting your Apple Cash card in the Wallet app and choosing the three-dot menu and then Recurring Payments.

How to set up a virtual card number for Apple Cash
One of the great things about Apple Cash is that it also works as a virtual debit card on the Visa Debit network. However, until recently, it's only been possible to use it with Apple Pay, which means it's limited to those merchants and websites that accept it as a transaction method. The Apple Cash card has a Visa Debit card number that's used for these transactions under the hood, but there's no way to find out what it is — which means there's no way to punch it in to purchase something on a website, nor is there a valid expiration date or verification code to go with it.
The good news is that Apple has added the ability to create a virtual card number in iOS 17.4, complete with expiration date and CVV2 code — the three-digit number usually found on the back of most credit cards. This feature should be familiar to Apple Card users, as it's been around since the card launched in 2019, but it's new for those who would rather use their Apple Cash account to make online purchases.
For security reasons, the virtual card number isn't enabled by default, and you can safely ignore it if you don't spent money directly from your Apple Cash card, or you're OK continuing to stick with merchants that provide Apple Pay. However, if you want a card number that you can use elsewhere online, you can enable the virtual card number — and change it anytime if you're concerned it's been compromised. Here's how:
Step 1: Go to Settings > Wallet & Apple Pay on your iPhone or iPad.
Step 2: Select your Apple Cash payment card.
Step 3: Choose Card Information.
Step 4: Select Set Up Virtual Card Number.
Step 5: Read the instructions and select Continue when ready to proceed.
Step 6: Confirm that you want to generate a virtual card number by double-clicking the side button and authenticating with Face ID or by placing your finger gently on the Touch ID sensor if you have an iPhone SE or an older model with a home button.

Step 7: Select Done.
The virtual card information will be shown at the top of the card information screen, although you'll need to authenticate with Face ID or Touch ID to get here. The number and expiration will remain unchanged unless you regenerate them by using the Request New Card Number button. The virtual card information will also be added to Safari so it can be automatically filled on webpages, just like any other payment card.
Note that a new security code will be generated every time you visit this page or use Safari AutoFill. Security codes will also expire every 24 hours to prevent them from being reused later.