If you're still using a hard drive as your main boot drive, you could really benefit from moving Windows to another drive — preferably a solid-state drive. To keep your existing data as is but enjoy the SSD speed, you'll need to move your operating system (and all the data it holds) over to the new drive. That's not as complicated as it sounds, though, and it means you'll get up and running again far quicker than if you simply started from scratch.
Windows 10 doesn’t make this simple, but the instructions below make cloning and swapping your Windows 10 install to a new hard drive as easy as possible.
We’ll show you how to move Windows 10 to an SSD in just a few steps. Take note, though, this guide is aimed at people who are only switching drives, even though this method may work if you’re building a new rig or swapping computers, depending on your setup. It likely won’t work with any virtualization project, though you can find those services if you’re willing to pay for them.
Before you start trying to move Windows 10 to a new drive, it's important to install the new drive so it's ready for the process. For tips on that, check out our in-depth guide on how to build a PC.

Download Macrium Reflect Free
As part of our guide, we'll be using Macrium Reflect Free. This software will let you clone your main drive with Windows 10 installed on it to a new SSD for free. Note that you'll also need a destination SSD that's larger or equal to your main drive for cloning. Otherwise, this won't work.
Step 1: Head to the website and choose the Reflect 8 Free Commercial option. Click the Download free button and enter in your email. Choose I need a personal free license.
Step 2: Once you choose that option, click the Continue button and then check your email for download instructions.
Step 3: Visit the link in your email, download the app, and install it. During setup, choose the Free option and choose Download at the bottom. Make sure the Run installer directly after downloading button is also clicked so the app will auto-install.
Step 4: Follow instructions on your screen. Keep clicking Next on the prompts and uncheck any boxes for installing extra software. Click the Finish button and let the app install. When done, click Launch now.

Configure Macrium Reflect 8 for drive cloning
Once Macrium Reflect 8 is installed, you can open the software and start the cloning process. Here's how.
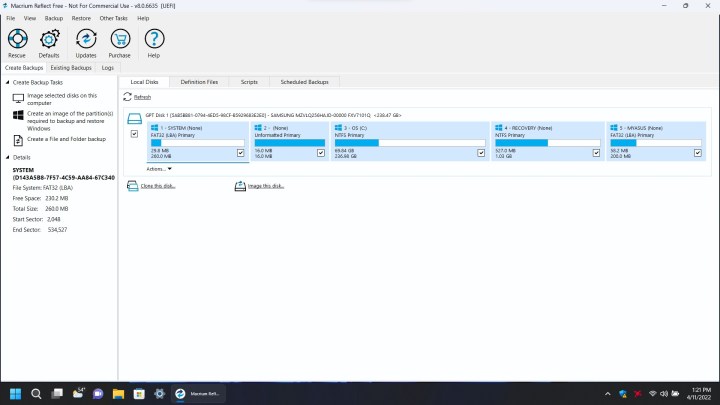
Step 1: Click on the Local disks tab at the top and choose your main disk with your data. Choose the Clone this disk option in the middle of the app. You'll known this is your main disk as it will have multiple partitions on it.
Step 2: Next, click all of the check marks on the main disk. Make sure everything and all partitions are checked.

Step 3: Head down to the Select a disk to clone to area, then select your new SSD from the list in the app. If you don't see it, reboot the app. You'll want to choose the Erase disk option and erase the SSD so it's blank, as in our screenshot below.

Step 4: To continue, choose the Copy selected partitions when I click next option and make sure it is checked. Click the Next button to proceed.
Step 5: You'll be taken to an optional schedule page. Skip this, and click Next. You'll see a summary of everything you're about to complete, as we have below. Click the Finish button.

Step 6: In the pop-up menu, choose the Run this backup now box. Agree to any warnings, and click Continue > OK.
Step 7: Sit back and wait while your disk is cloned. It could take quite a while, depending on the speed of your PC and the type of SSD you're using. Our clone took seven minutes.

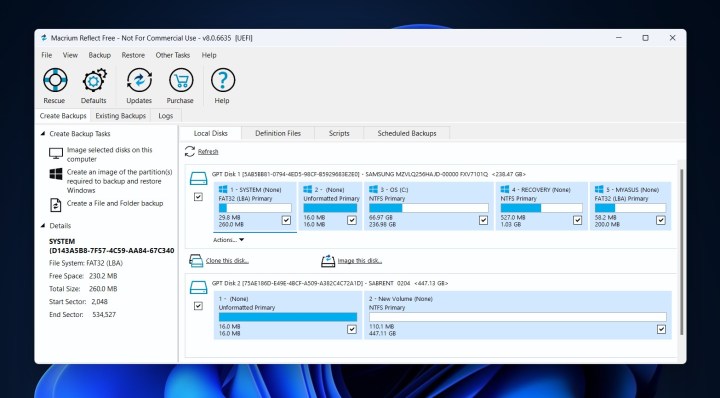
Step 8: When done, you should see that your drive is now fully cloned and both look the same in Macrium Reflect 8's utility, as pictured above.

Change your new SSD to the boot drive
To end this process, you'll want to set your new drive as the main boot drive. You can leave the old drive in your PC if you plan to use it for something else. Otherwise, you can physically remove it too.
Step 1: Boot into your PC's BIOS or UEFI settings. Usually, ESC works for this, or you can use the Delete key. If you're not sure, consult online guides or your PC maker's support page.
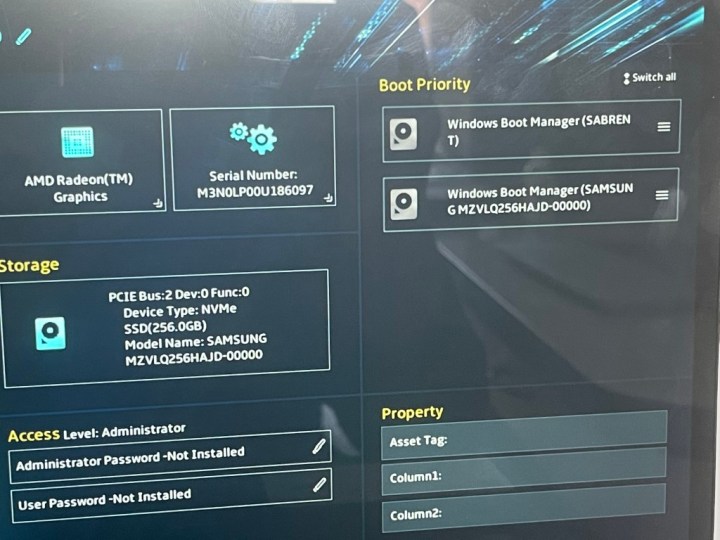
Step 2: Head into the Boot settings tab and remove or disable your old drive as one of the boot options, then add or enable the new drive in its place instead. Some BIOS or UEFI will let you drag the drive around or select it from a checklist.

Step 3: Once you have your new drive as the main boot option, click the Save and exit button, usually labeled in the BIOS. Your system should now boot to your new SSD!
Frequently asked questions
Is it worth moving Windows 10 to a new SSD?
Moving your data from a traditional spinning hard drive to an SSD has an enormous performance benefit. SSDs are much faster than hard drives, meaning if you can move Windows 10 to a new drive, your PC will boot a lot faster. Your games will also load quicker and apps will perform better, too. We have a dedicated guide that explains the differences, but ultimately, your whole system will feel more responsive once you have Windows installed on an SSD.
Do I need to reinstall Windows when moving to an SSD?
You won't actually need to reinstall Windows when moving to a new drive. This is as long as you use the software we mention in this piece.
Using specialized software, you can "clone" your drive and copy over Windows exactly as you left it. In the worst-case scenario, you might just have to reactivate Windows after you move to the SSD, which should not be a problem. Our separate guide covers issues with Windows activation.
If all else fails, you can back up your existing Windows 10 installation and restore from it at a later point after installing Windows 11 to the new SSD on your PC. Our guide also covers backups and reinstalls.
In our guide, we use Macrium Reflect 8 as clone software, but there are many others, like EaseUS Todo Backup Free or AOMEI Backupper Standard. Additionally, if for some reason you end up having issues, then we suggest you place your old drive back into your PC and back it up to a separate external SSD. Then, clean-install Windows and restore your files and apps manually.
Editors' Recommendations
- Windows 11 might nag you about AI requirements soon
- You’re going to hate the latest change to Windows 11
- How to disable VBS in Windows 11 to improve gaming
- How to check your laptop battery health
- How to convert FLAC to MP3 on Mac, Windows, and web


