
How to complete the Solved by the Bell quest in Hogwarts Legacy

While you’re technically at Hogwarts to attend classes and study to be a proper witch or wizard, that’s only a small part of what you actually do in Hogwarts Legacy. Aside from the main quest and simply exploring the wizarding world, there are tons of sidequests you can take on for XP, loot, and more. While some are on the more simple side, many of these diversions are rather complex, especially in the types of puzzles they present you with. The Solved by the Bell quest isn’t only easy to miss, but it’s also even harder to solve. Here’s a full walkthrough of this quest in Hogwarts Legacy.

How to start Solved by the Bell

A map with musical notes on the bottom.
Image used with permission by copyright holder

Before you can access this quest, you will need to have unlocked and gotten your own broomstick. Once you have one and are free to soar the skies, you will need to travel all the way to the south of the map to Henrietta’s Hideaway in the Manor Cape region. It is a hidden area, so you will need to get close to it to uncover it if you haven’t been there yet.

Once you arrive, make sure you’re ready for some tough enemies. The Ashwinders in this area can be anywhere around level 30 to almost level 40, so don’t rush to this quest if you aren’t prepared. Once the area is clear, head down the steps and enter the large doors.

Solved by the Bell walkthrough

The first room you enter is a bit of a puzzle. The way ahead is locked, and in the room are two platforms on the floor and one movable cube, but two will be required. To get the second, find the unlit brazier and use any fire spell to light it up. This will spin a pillar and reveal the second cube you need.

The simple solution is that you just need to use a spell such as Accio to move the cube onto the platform that has an icicle symbol on it and cast Glacius on the cube. With that done, you should position the second cube on the other platform with the flame symbol on it and cast Incendio. This will let you pass to the next area.

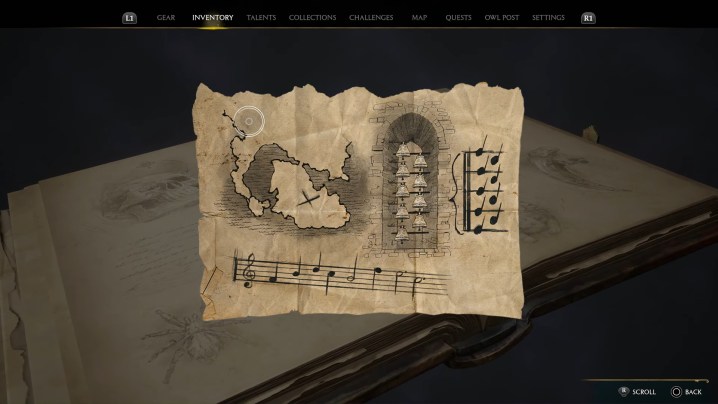
There will be a bit more fighting ahead, plus a shifting bridge of sorts that you just need to cast Arresto Momentum on to cross safely. After one more combat encounter, you will find a hidden passageway on the right wall that holds a map with music symbols on it. You can cast Revelio to make it easier to see which wall you need to approach to find the secret area. Collecting the map is technically what starts the Solved by the Bell quest. Your quest will update at this point, but you will only be told that you need to “use the Musical Map to find the treasure,” so you’re on your own to not only find the location on the map, but also solve the musical puzzle.

Solved by the Bell puzzle solution

A wizard shooting bells with magic.
Image used with permission by copyright holder

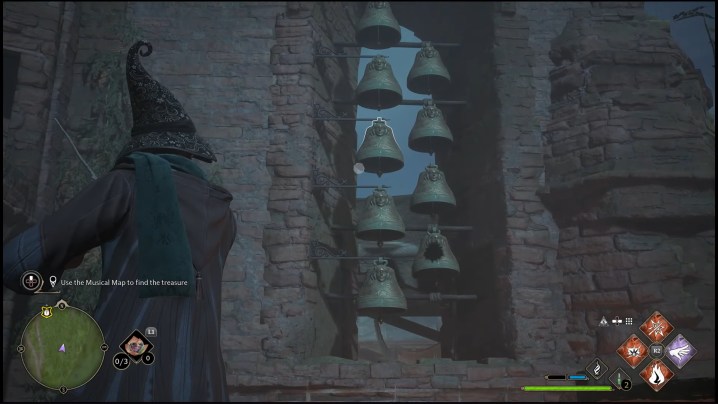
Let’s get the easy part out of the way first. The location shown on the map you need to go to is Clagmar Castle. This is located not far to the east of Manor Cape, so either fly or fast travel over. There are more Ashwinders here that you will need to clear out, and then you’ll need to find the tower with nine bells on it in two vertical columns. If you’re lost, casting Revelio will highlight them for you so you know which way to go.

As you could probably guess, the puzzle presented to you is to hit the right bells in the right order based on the musical notes provided on the map. Naturally, not everyone knows how to read music, but thankfully, each bell you hit does illuminate magical notes below the bells so that you could, in theory, brute force the solution by hitting each bell, marking down what note they make, and then cross-referencing that with the map. Or, you could just follow these steps for a much quicker and easier time.

This is the order you need to hit the bells with your basic magic attack:

  • The bottom bell on the right side
  • The third bell from the top on the left side
  • The second bell from the top on the left side
  • The second bell from the top on the right side
  • The third bell from the top on the left (again)
  • The top bell on the left
  • The top bell on the right
  • The second bell from the top on the right (again)

Once you’ve hit them all, the bells with ring in that order again in a rhythm that, if you hadn’t picked up on it already, will be very familiar to fans of the films. Once the little chime is done, a treasure chest will appear beside you. Pop it open to complete the quest and gather your rewards. You will get the Treasure-Seeker’s Longcoat, which is a cosmetic gear type you can use to change other gear’s appearance with, 400 Galleons, and 180 XP.

Editors' Recommendations

Jesse Lennox
Jesse Lennox loves writing, games, and complaining about not having time to write and play games. He knows the names of more…
The best vocations in Dragon’s Dogma 2
Dragon's Dogma 2 key art featuring a knight with a fiery hole in their chest.

Your Vocation defines your role in combat in Dragon's Dogma 2. Everything from your skills to what weapons and armor you can use is tied to this class. You will pick from just a handful at the beginning of the game, but can easily change Vocations later on, as well as unlock more than twice as many new options than what you start with. It can take a while to really get a feel for a Vocation and how it performs in combat, as well as to look through all of its skills and augments, before knowing if it's worth sticking with to level up. Personal preference will play a part to some degree, but these Vocations have the most potential to make you the strongest Arisen in history.
The best vocations in Dragon's Dogma 2

You can pick from 4 Vocations at the start of Dragon's Dogma 2, but will end up with a total of 10 by the end of the game if you unlock them all. New Vocations are unlocked by completing quests, but they are almost unmissable. Four Vocations -- the Magick Archer, Mystic Spearhand, Trickster, and Warfarer -- can only be used by your character and not any Pawns.
Warfarer
There's very little downside to being a jack-of-all-trades in Dragon's Dogma 2, which is exactly what the Warfarer is. This is the only Vocation that can use any weapon in the game AND learn any skill from other Vocations. This is the only Vocation that really lets you build whatever class you want and gives you the ability to adapt to any situation you find yourself in. The main downside to this class is it has the lowest base stats, but that is a small price to pay for how versatile you can be.
Mystic Spearhand
Hybrid Vocations are all quite powerful, but we put the Mystic Spearhand at the top of the heap. This class turns you into a fighter that can take advantage of magic to output crazy damage. The two almost overpowered abilities you get here are the ability to slow enemies for a short time and to create a magical mimic that doubles all your actions. It is great for both crowd control and large single targets, but takes a while to unlock and lacks some range.
Warrior
If you're going to be a straight-up melee fighter, you might as well hit with the biggest weapon you can, right? The Warrior swings swords large enough to make Guts blush and is a full-on tank. You won't be doing anything fancy with this vocation beyond charging up and swinging as hard as possible. The obvious drawback is any flying or ranged enemy will counter you, so bring some Pawns in those classes to cover your bases.
Sorcerer
For those who fancy themselves a pure mage, stick to the Sorcerer over the actual Mage vocation. While the Mage is more focused on healing, it is the Sorcerer who gets the best offensive spells you will want to be casting. If you have a second Sorcerer with you, you can even sync up and decrease your casting time. If not, you will need some tanks to take aggro while you deal with some slightly long casting times and low total health.
Thief
As far as the starting Vocations go, the Thief is the one we find the most fun and viable for the entire game. This is a light and speedy build focused on critical hits and being able to climb and hang on to large beasts. Once on, you have a number of great skills to stagger and knock down an enemy so the rest of your squad to gang up on it. Just don't get hit because you're one of the squishier Vocations.

Read more
How to revive the dead in Dragon’s Dogma 2

Death comes at you fast in Dragon's Dogma 2. While you have the luxury of being able to restart from your last save after death, and pawns can be revived or summoned again, if an NPC bites the dust, then you need to act fast if you want to bring them back. Just like fast travel, however, reviving the dead will cost you a rare and limited resource. This isn't an item you will happen across during normal travel or find on sale in a shop. If you lost an important ally and need to bring them back to life, we'll show you the way.

Read more
How to get the true ending in Dragon’s Dogma 2
A dragon attacks in Dragon's Dogma 2.

It's hard to know if a game has multiple endings, especially one as unique as Dragon's Dogma 2. You can finish the game and not have any clue as to whether or not you're missing anything. And in this case, there's quite a bit more hidden if you're able to unravel a few cryptic hints. If that's too much work for you, we can guide you like a faithful pawn to the solution.

The true ending to Dragon's Dogma 2 is far more satisfying in terms of story, but also adds a surprising amount of gameplay as well. This is something you certainly don't want to miss if you enjoyed the game up to this point, so let's break down what you need to do to get the true ending.

Read more