Checking out the temperature of your Mac is important to help it last a long time, and can be useful to diagnose any issues you may be having with overheating components. Newer models of Mac like the Mac Mini M2 or Mac Studio shouldn't have much of a problem with getting too hot, but this can be more of an issue for older Mac. If you want to find out your Mac's processor and graphics card temperatures, here's how.
If temperature readings are pushing into higher levels, it might be time to do some Mac spring cleaning to clear out vents or consider upgrading components to better handle the current workload. For this guide, we’ll describe exactly how to tell the temperature on MacOS for both Intel and Apple Silicon. A spot check is possible as well as ongoing temperature monitoring.
Check Apple Silicon Mac CPU temperatures with the Hot app
iMazing developed the free and open-source app, Hot, to make it quick and easy to monitor CPU temperature on a Mac or MacBook. This works on both Apple Silicon and Intel-based systems. There are other solutions for Intel Macs, covered below, that provide GPU data as well, but for any M1- or M2-based Mac, the Hot app is a free app that's always visible in the menu bar at the top of the screen for at-a-glance ease.
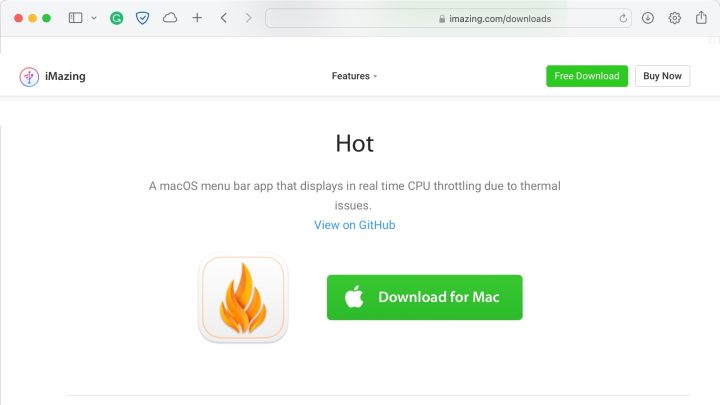
Step 1: The Hot app can be downloaded from the iMazing website and is found about a third of the way down on the free app page.
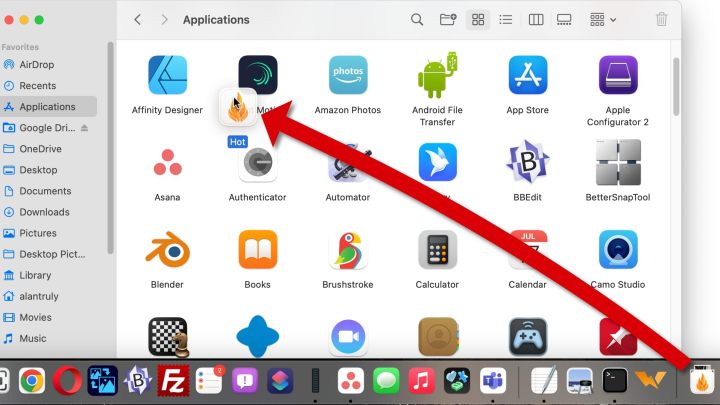
Step 2: Open a Finder window and choose the Applications folder. Then drag the Hot app from the Downloads folder in the Dock to the Applications folder. The app can be launched from Launchpad or the Applications folder.
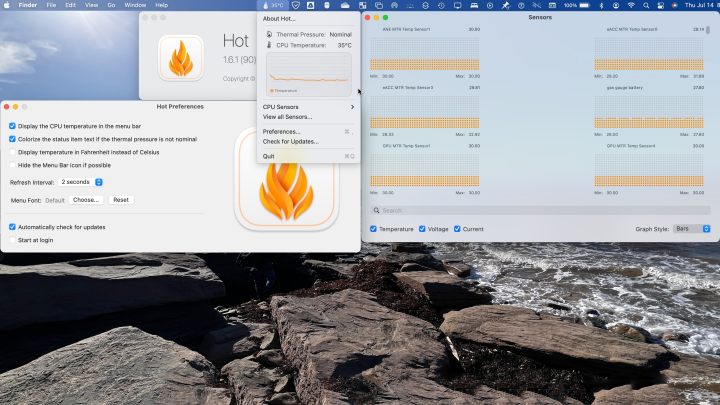
Step 3: Check the menu bar at the top of the screen for the Hot app's icon, which looks like a flame. The average CPU temperature will appear beside it. Open the Hot app's menu to see more options, such as choosing between Fahrenheit and Celsius for the temperature display.
Get a temperature snapshot for Intel Macs with Terminal
If you are primarily interested in quickly checking in on your CPU temperature, there’s an easy way to do that on Intel-based Mac computers without the need to download any extra tools. It’s a specific command that you can use in the Terminal — macOS’s version of Command Prompt — that will start tracking your CPU temperature. Here’s what to do:
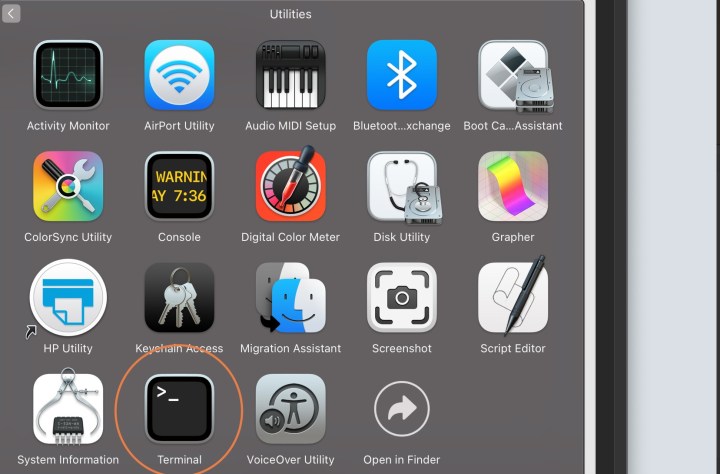
Step 1: Open the Terminal app. You can find it by going to the Dock and selecting Applications. Here, look for the folder called Utilities and open it. The Terminal should be located in these apps.
Step 2: With the Terminal open, type in (or paste) this exact command sequence:
sudo powermetrics --samplers smc |grep -i "CPU die temperature"
Now select Enter to input the command. At this point, you may need to input the login password for your macOS account. The Terminal app can be a little tricky with this because it won’t normally show the characters you are typing, so you’ll have to input the password blindly and then select Enter again. You do not need to enter the command again after entering your password.
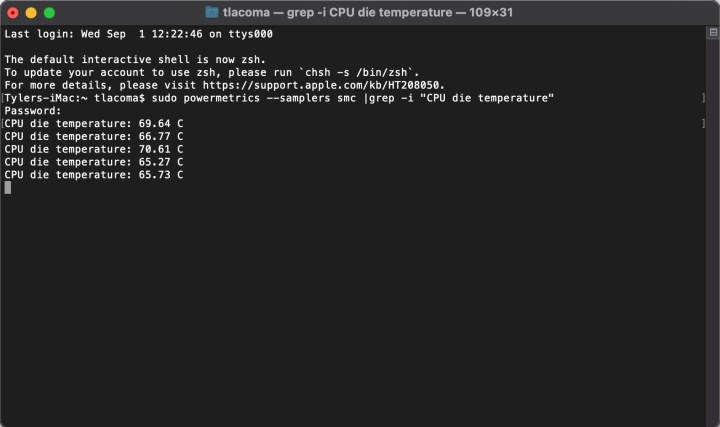
Step 3: Give Terminal a moment, and it will start producing logs for your CPU temperature. Terminal will keep producing a log every few seconds to show how the temperature is changing over time and will stop when you close the application.
Note that the temperature readings will be Celsius. This is the common format for computer temperature readings, so you will need to do some quick ballpark conversion in your head to get Fahrenheit numbers or just plop the temperature into Google for a Fahrenheit translation if you aren’t used to working with Celsius.
You can use this command whenever you want for a CPU reading, but it becomes a little laborious for frequent checks. Let’s take a look at an alternative option that will work better for long-term temperature management.
Monitor ongoing Intel Mac temperatures with the Fanny app
What if you want an ongoing look at your Intel Mac temperature without needing to use a command every time? What if you want to monitor GPU temperature separately from CPU temperature to help diagnose specific problems or focus on only a certain piece of hardware?
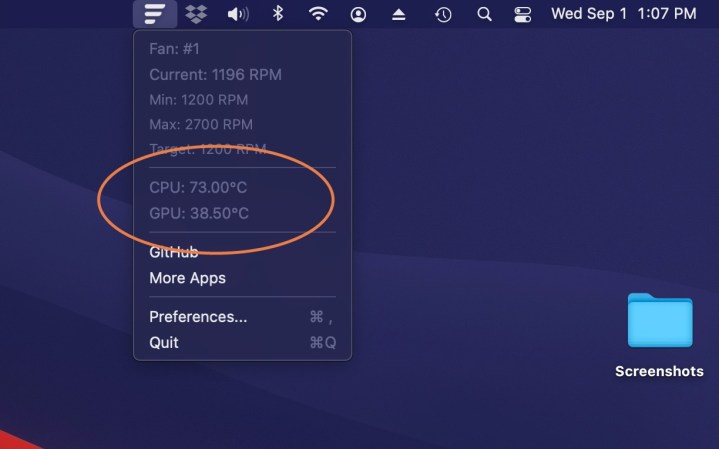
In this case, we highly recommend installing the Fanny app. It’s free, lightweight, super easy to use, and provides constant monitoring of your Mac’s performance, including CPU and GPU temperatures:
Step 1: Visit the Fanny Widget site here and select the Download button.

Step 2: Fanny will download as a zip file on your Mac. Find and select the zip file to open it, then select Fanny to download it. Confirm you want to Open it.

Step 3: Fanny will not open a new window for you to use. Rather, it will add a small icon to the upper-right of your Mac, Three dashes that indicate Fanny is working. Select that icon, and a new screen will drop down.
How do I know if my Mac is overheating?
It's important to be able to monitor your Mac's temperatures using these apps because they can tell you if your Mac is overheating. If you are seeing issues like your computer shutting down or rebooting unexpectedly, or freezing when performing tasks, this could be due to overheating. This is particularly the case if these issues happen when they computer is under heavy load, meaning you are doing a resource-intensive task like using Adobe Photoshop or playing a game.
This happens because the hardware inside your computer, particularly the processor and graphics card, will generate heat when they work. There are systems to move this heat away from the components and toward a fan and an air vent, but sometimes they won't be able to move heat fast enough and the hardware will stop working. This is the computer overheating.
You should use these apps to keep an eye on your Mac's temperatures, and see if the temperatures are particularly high before a shutdown or other issue occurs. If so, the problem is likely due to overheating.
For Intel-based Mac desktops and MacBooks, CPU temperatures should be under 45 to 50 degrees Celsius when idling and when no apps are active. The machine's temperature will quickly climb when more apps are opened, and more demanding workloads result in more heat. Intel Core chips can sustain temperatures up to 100 degrees Celsius without causing any damage.
Apple Silicon-powered Mac and MacBook computers typically idle at a much cooler 20 to 35 degrees Celsius but can also climb to as high as 100 degrees when running demanding apps, Examples include those that process 4K ProRes videos or render large 3D graphics scenes. This is expected, and every MacOS PC is designed to increase fan speed and/or throttle the processor's speed to protect against damage.
That said, a faulty fan or clogged ventilation can become a problem, so it is good to keep an eye on this. Ultimately, upgrading components and PCs to newer, more efficient models helps breeze through harder tasks while keeping the computers cooler. We also have a guide on how to speed up your Mac, where most of the solutions discussed can also help cool down your processor and GPU.


